The Battle for Manshiyah: A Victory in 100 Pictures
The following timeline details the day-to-day events of the three-month rebel offensive to capture the al-Manshiyah neighborhood of the southern Syrian city of Dara’a. Documenting this battle relied almost exclusively on the recently removed opposition group al-Bunyan al-Marsous’ Telegram channel. With the exception of the geo-location maps, all pictures and statements shown below were originally published by al-Bunyan al-Marsous. This timeline and analysis is written largely from the rebel point of view, with a few statements by the pro-government al-Masdar News and the impartial Carter Center used as references. Thus, any statements regarding damaged armor or repelled attacks that are not accompanied by photo evidence must be viewed with some degree of doubt.

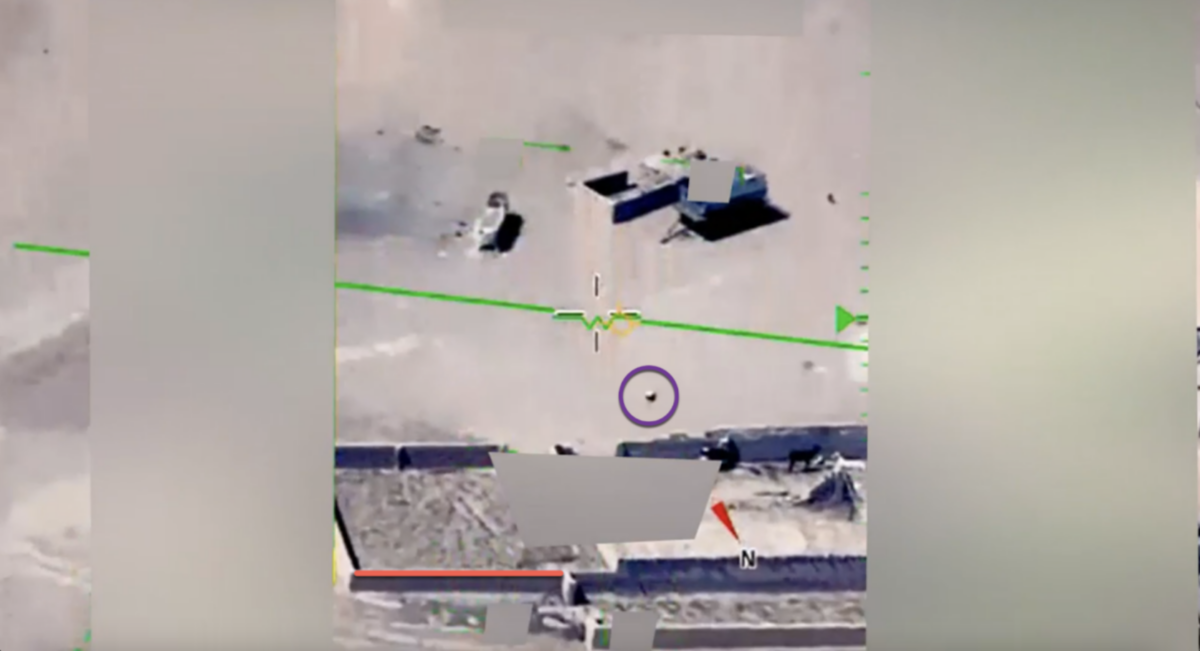
Graph 1
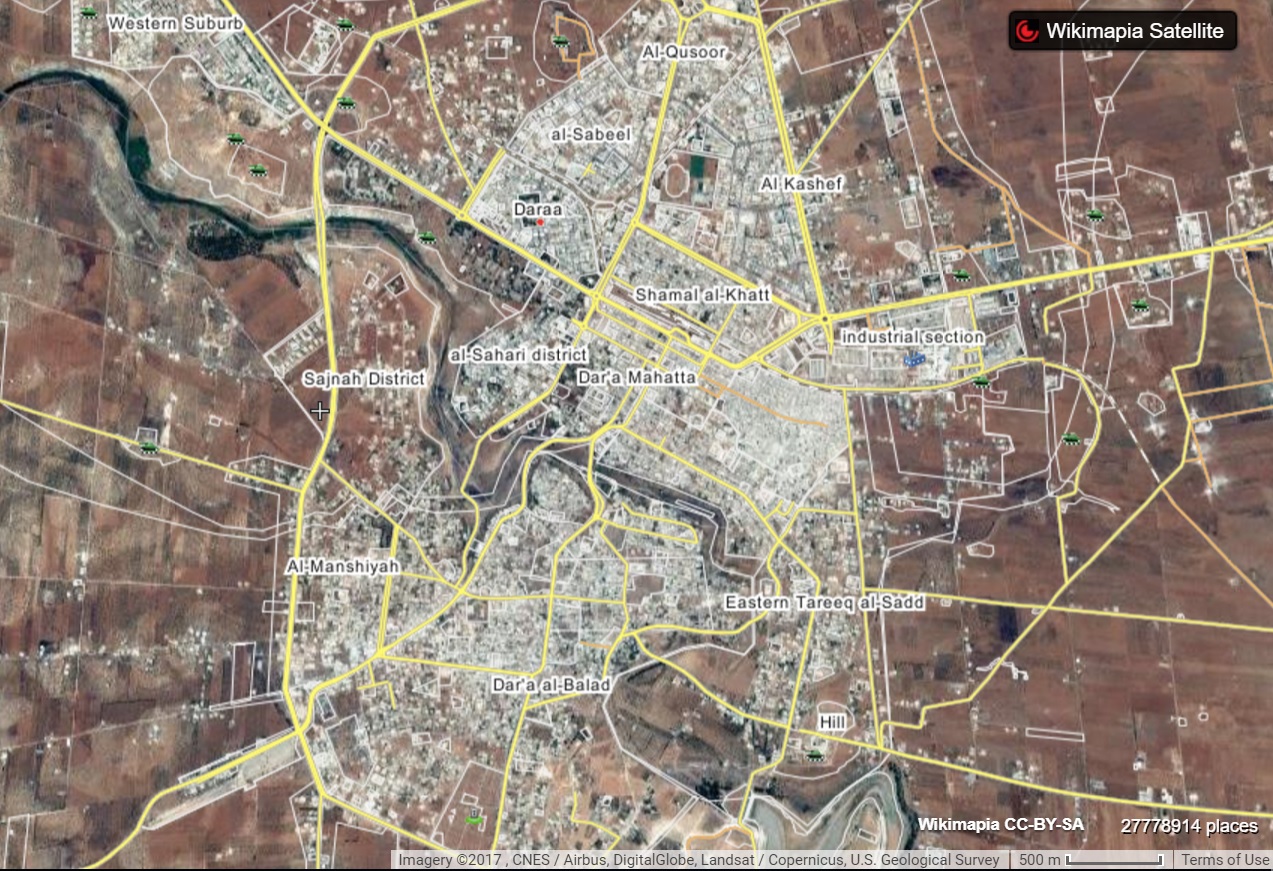
Map of Dara’a, Syria
From February 12 to May 22, al-Bunyan al-Marsous Operations Room (BM) – formed in June of 2016 from several Southern Front factions, Jaish al-Islam, Ahrar al-Sham, and a small Jabhat al-Nusra contingent – captured nearly all of the al-Manshiyah neighborhood of Dara’a. BM heavily relied upon “explosive hoses” to clear government fortifications, although it is unclear if these were homemade by packing industrial hoses with explosives or government UR-77 mine clearing lines that were captured after failing to detonate. BM also employed at least two tanks, one Shilka, one BMP, self-propelled and field artillery, remote control car bombs (as well as two suicide vehicle borne IEDs (SVBIED)), homemade “Omar” missiles, and anti-tank missiles to slowly dismantle regime checkpoints in the heavily fortified neighborhood.
After the first week of the offensive, fighting eased into a steady pattern of quiet followed by a few days of intense combat. Rebels occasionally bombed regime fortifications until a day or two of offensive action where they would capture several blocks. Following this, BM would consolidate its gains and publish photos and maps of the recent operations. After several days, pro-regime forces would counter-attack, with both sides reporting favorable results. Violence would again die down for several days until the next rebel attack which would seize additional territory. This pattern is detailed below using the labels “attack” to convey a rebel attack, “counter-attack” to convey a government attack, and “pause” to convey a period of time with light to no skirmishes.
In total, BM reportedly killed over 180 regime fighters and destroyed as many as 10 tanks, 8 Shilkas, and 2 bulldozers. All of the fighters killed by BM were named, and many had pictures published as well. In my own research tracking pro-government losses beginning on March 20 I found most of the names published by BM, but never attempted to corroborate every name they published. All of the publicized attacks have been mapped below.
On June 2, 2017, regime forces – consisting of Hezbollah, Republican Guard, 4th Division, and Iranian supported Afghan fighters – launched an offensive on rebel held positions in Dara’a, concentrating on the Palestinian camp to the north-east of Manshiyah. This offensive failed to capture any new territory and led to 79 reported pro-regime deaths, including 24 Hezbollah and Afghan fighters. Reported pro-regime deaths from March 20 to June 23 have been mapped in Graph 1.
Attack
February 12, 2017
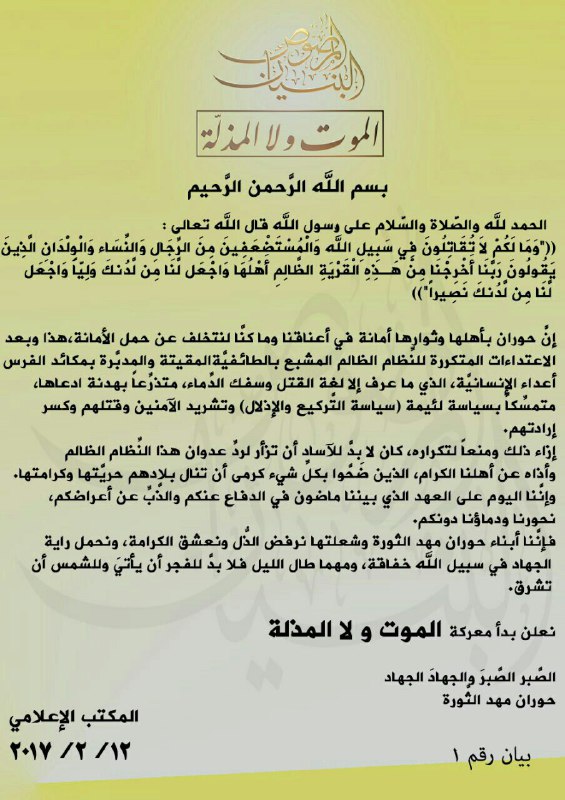
Al-Bunyan al-Marsous announces a new offensive in the Manshiyah neighborhood, the last regime stronghold in the elevated parts of southern Dara’a, with the name “Death over Humiliation.” Their statement justifies the renewal of hostilities as a necessity “in order to prevent…the repeated attacks of the oppressive regime saturated with sectarianism…and the Persians,” and refers to BM fighters as “sons of Houran, the cradle of the revolution and its flame.” Their announcement mixes nationalism with religion, calling for “dignity” for the people of Houran while stating that “we reject humiliation, we love dignity, and we carry a flag of Jihad for the sake of Allah.”
The offensive begins with two SVBIEDs (Figures 1 and 2) driven by Hayat Tahrir al-Sham fighters and an explosive hose (Figures 3 and 4). The explosive hose targets the Abu Najib checkpoint (in red) while one of the SVBIEDs targets the Manshiyah Mosque (in blue), as shown in Figure 5. BM media reports four regime KIA, including a Lieutenant and a Captain, as well as the destruction of a tank, a tunnel, and a 23mm cannon.
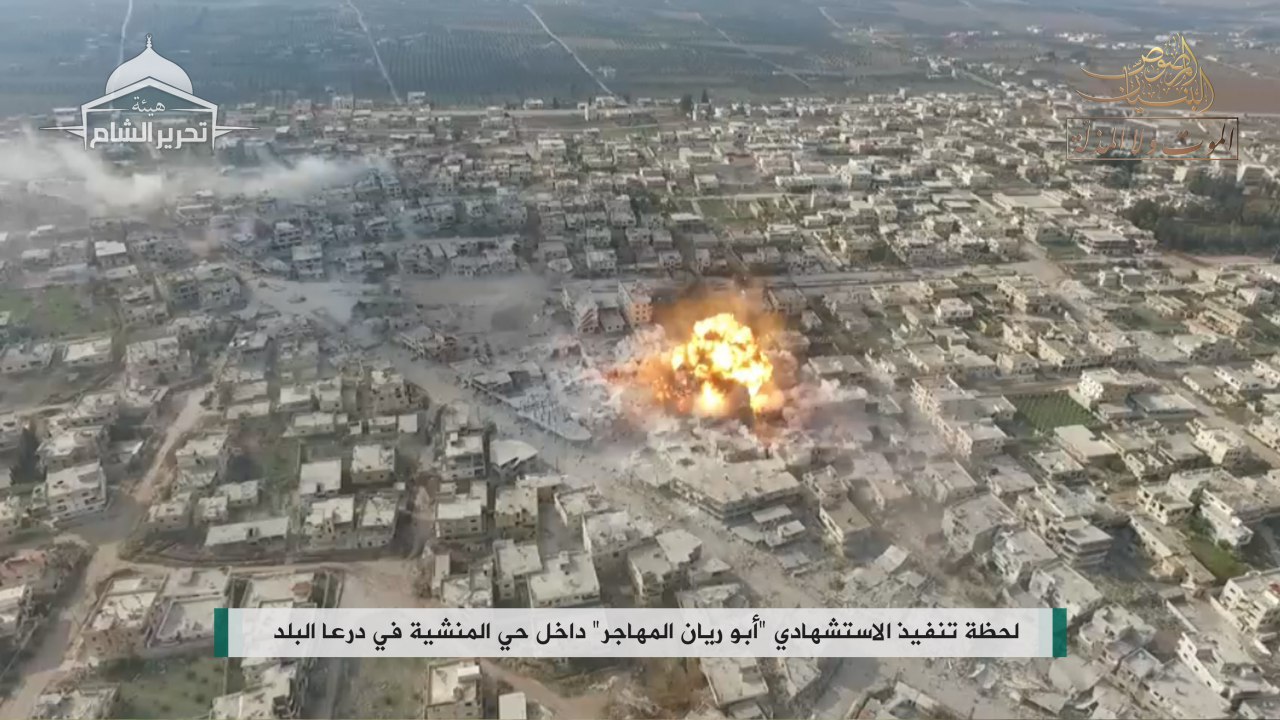
Figure 1
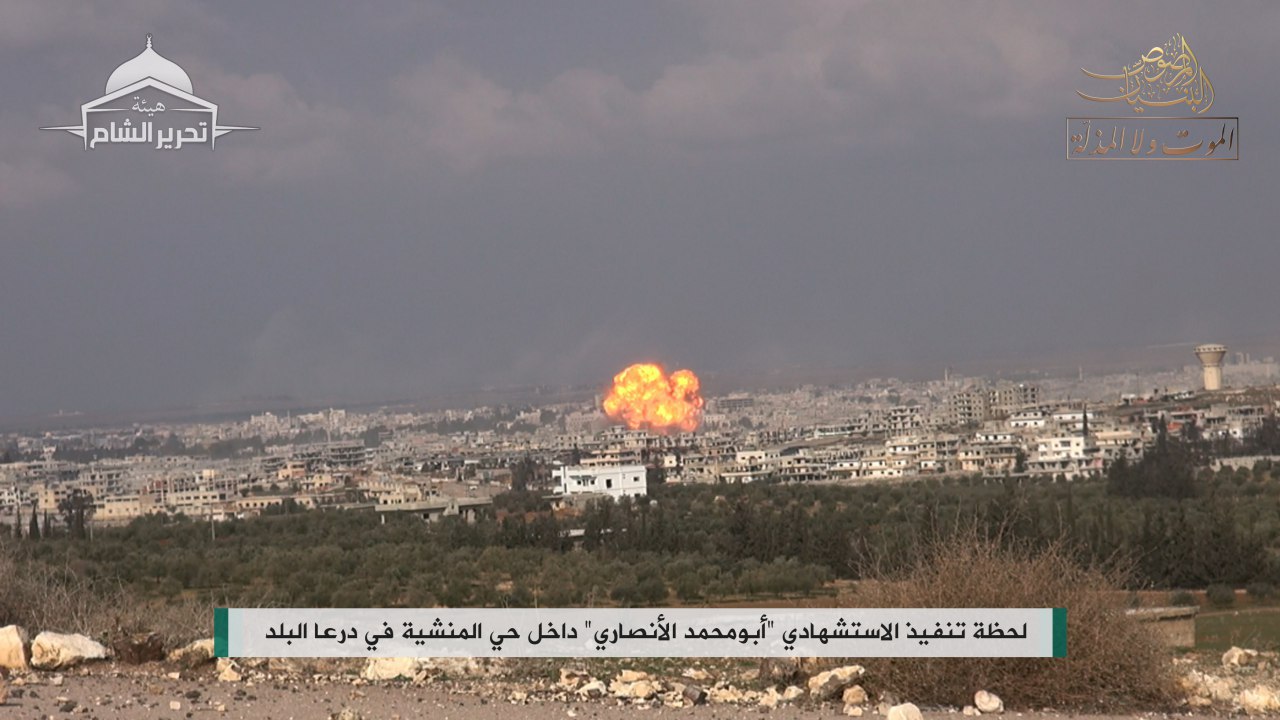
Figure 2

Figure 3
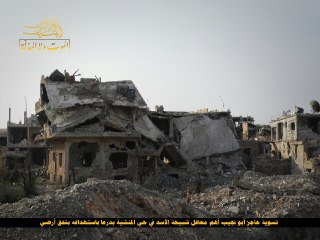
Figure 4
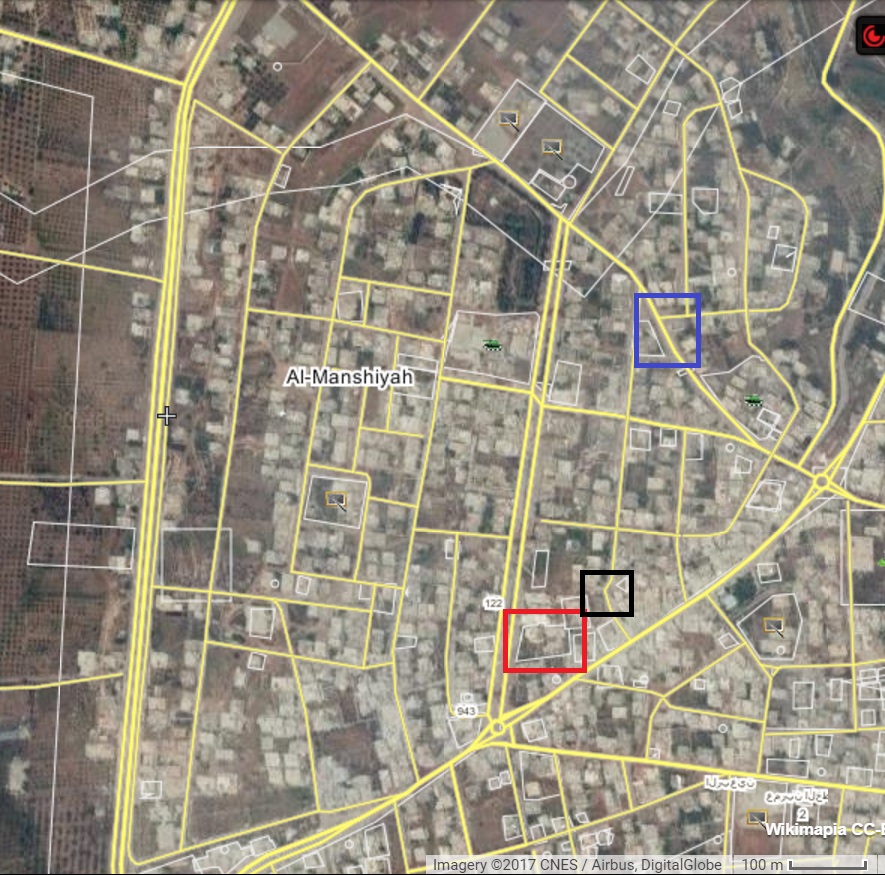
Figure 5
February 14, 2017
BM releases an infographic (Figure 6) on the results of the first three days of the offensive, claiming 30 pro-government killed in action (KIA), 50 wounded in action (WIA), two damaged or destroyed T-55 tanks (Figure 7), two destroyed 23mm guns, and 4 blocks captured along with dozens of armor piercing discarding sabot (APDS) rounds (Figure 8) used by the now destroyed tanks. Among the captured territory is the Manshiyah Mosque (Figure 9) and the “Strategic Checkpoint” (Figure 10), locations shown on Figure 11. BM also claims that Hezbollah and National Defense Force reinforcements have arrived in the city.
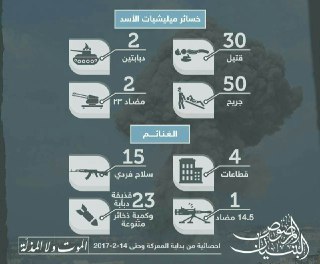
Figure 6
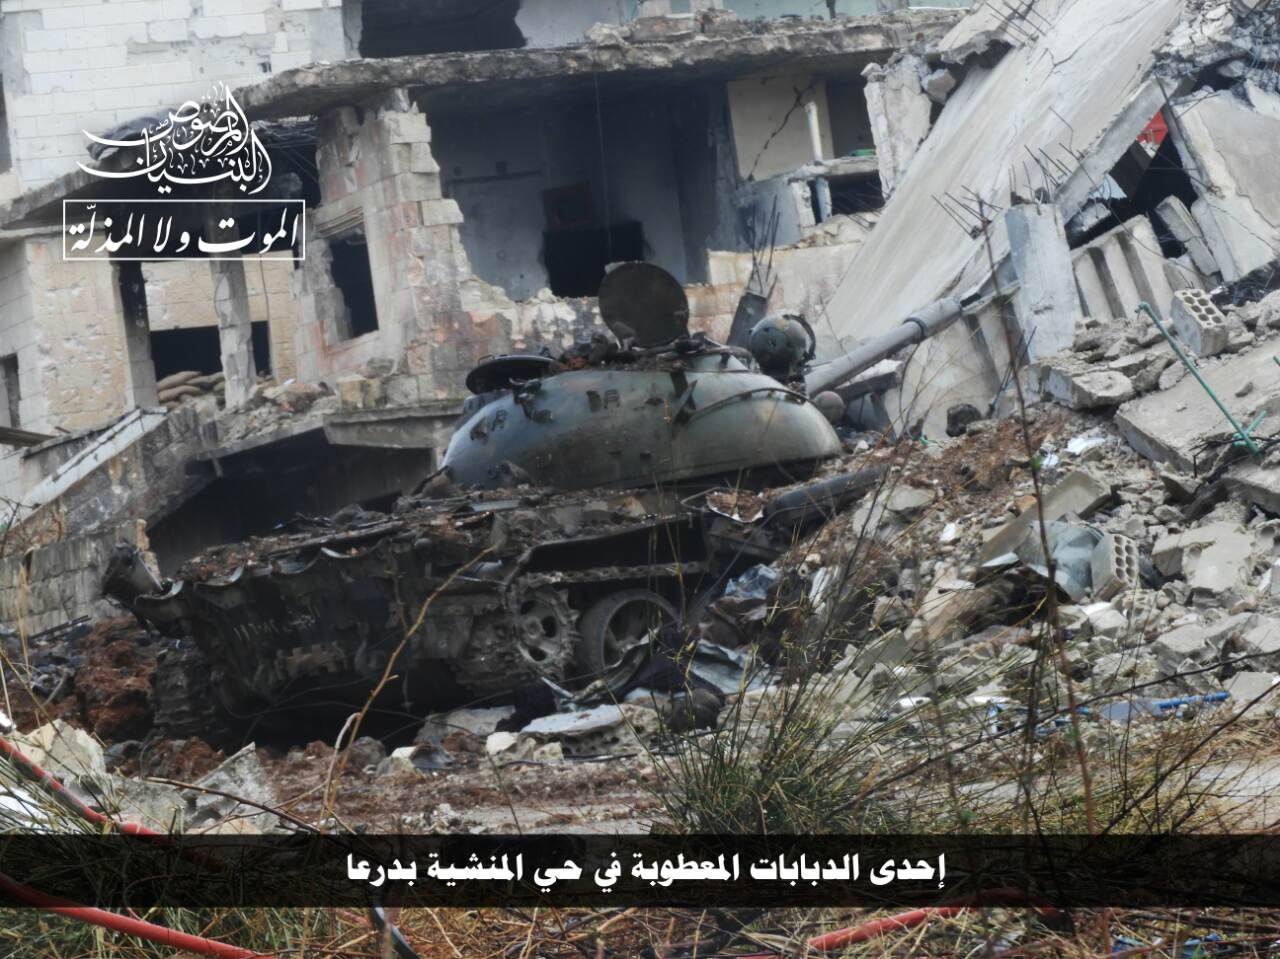
Figure 7
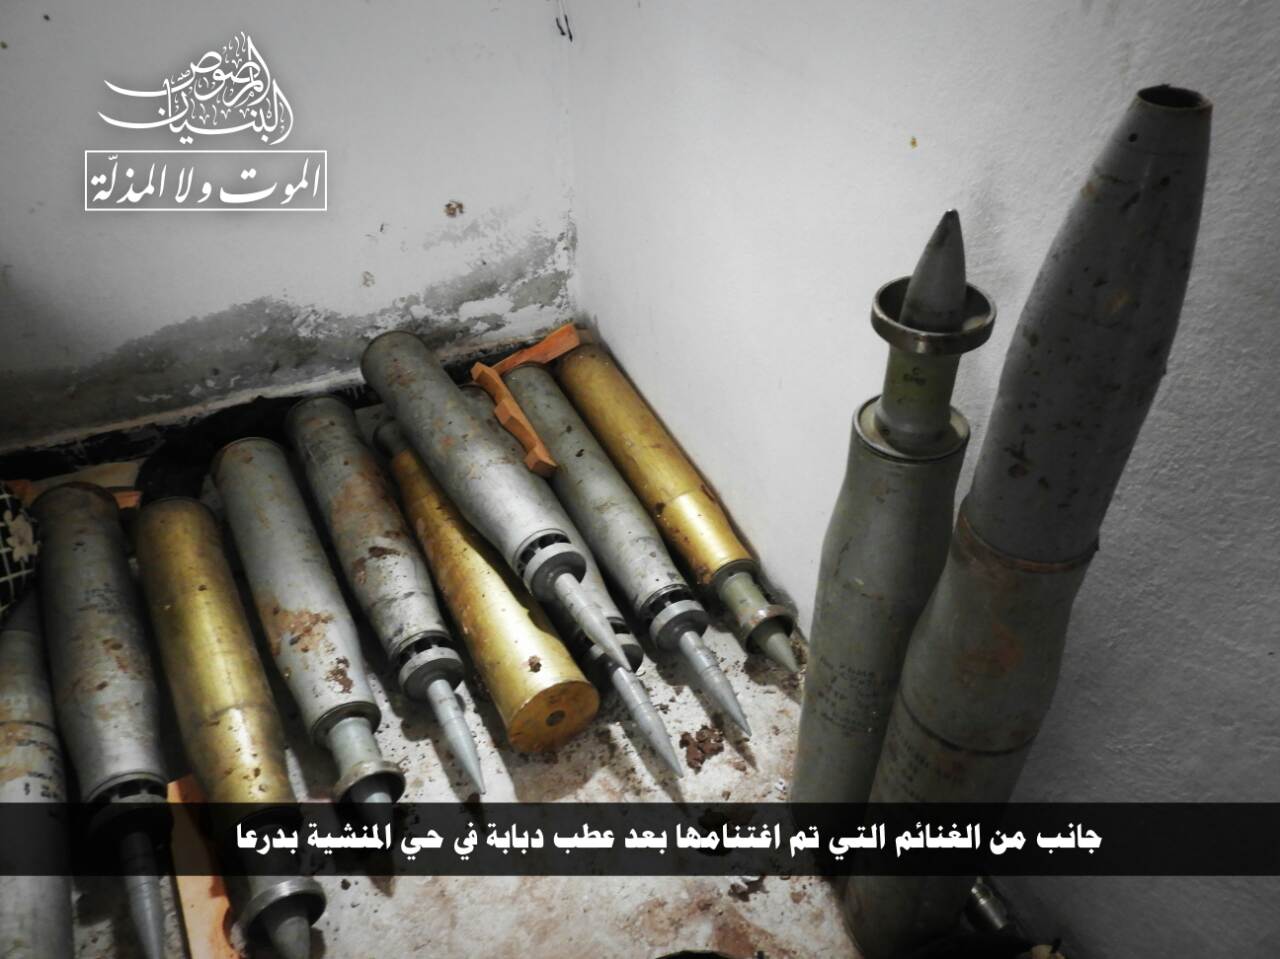
Figure 8
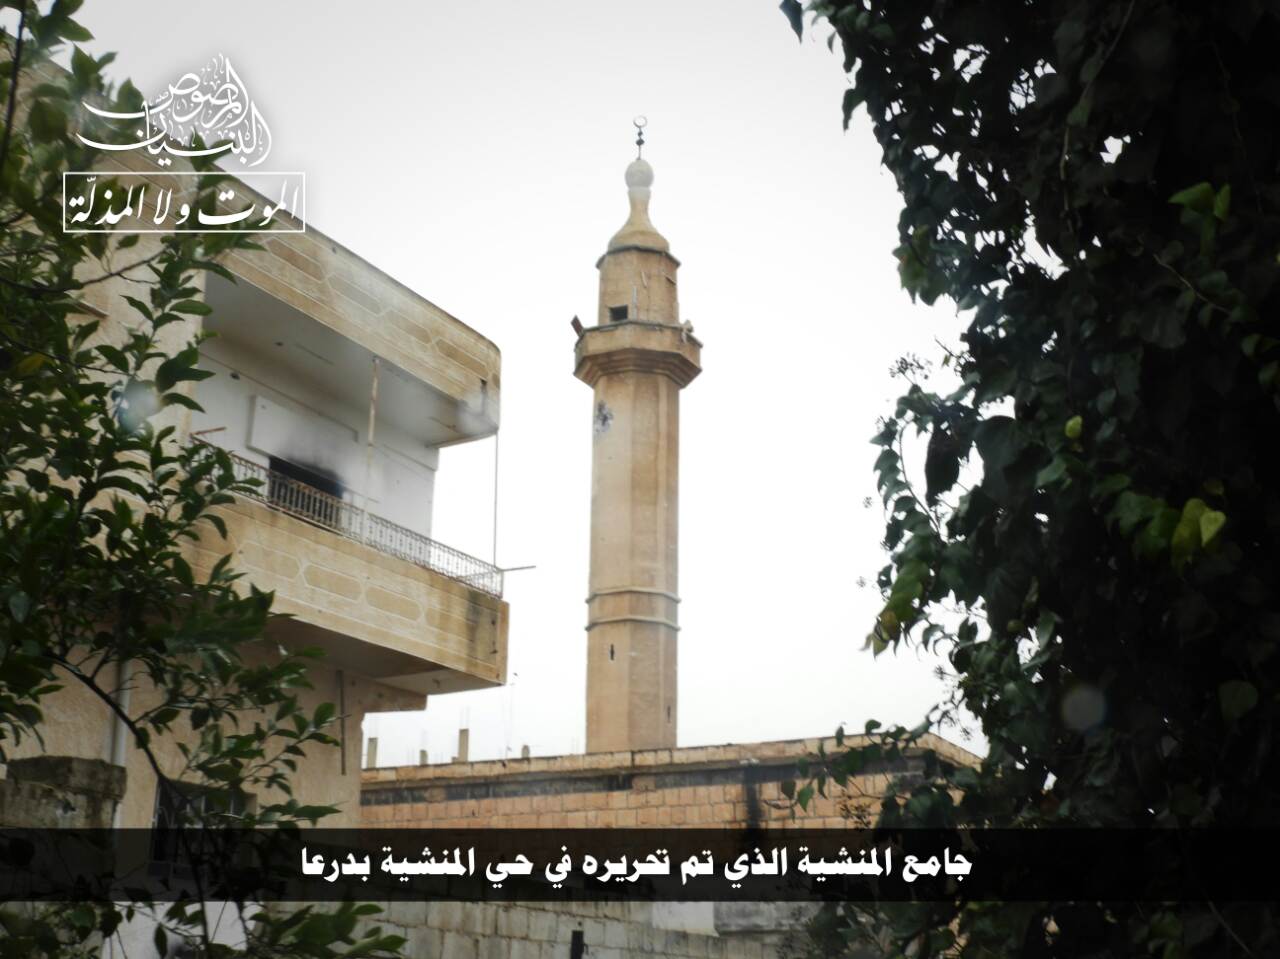
Figure 9
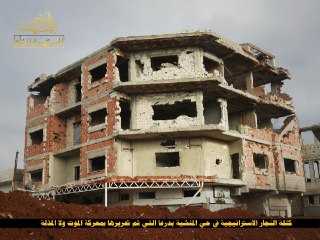
Figure 10
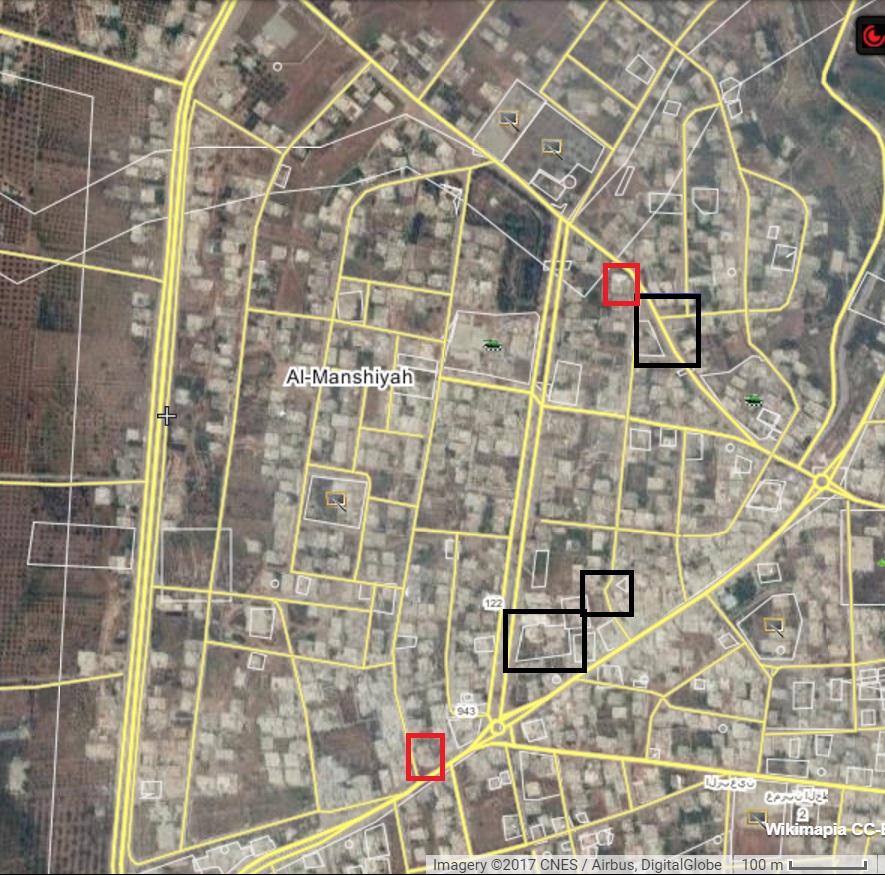
Figure 11
February 15, 2017
BM releases its first map (Figure 12) of alleged gains in Manshiyah, which, depending on the map’s accuracy, includes the “Strategic Checkpoint” in the south but is at least one block shy of the Manshiyah Mosque in the north. BM also releases pictures of the newly captured Al Arouj Kindergarten (Figure 13) and Al Rahman Bakery (Figure 14).
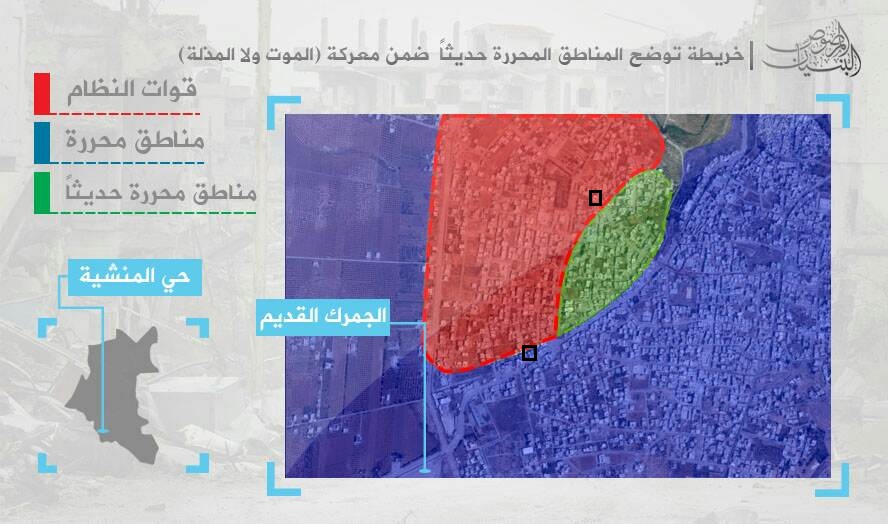
Figure 12: Red = “Regime-held” Blue = “Opposition’s area” Green = “Recently liberated area”
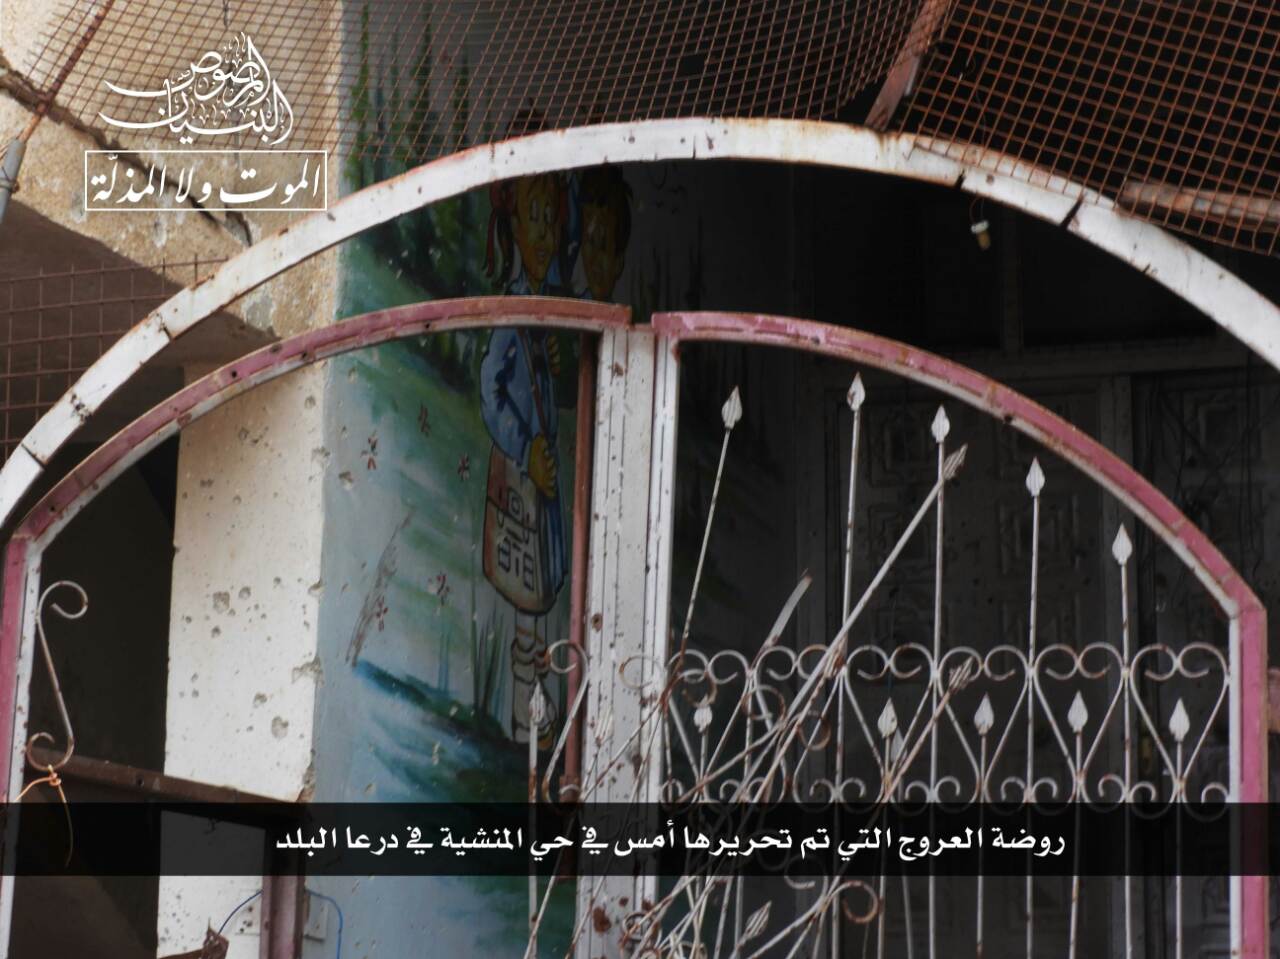
Figure 13
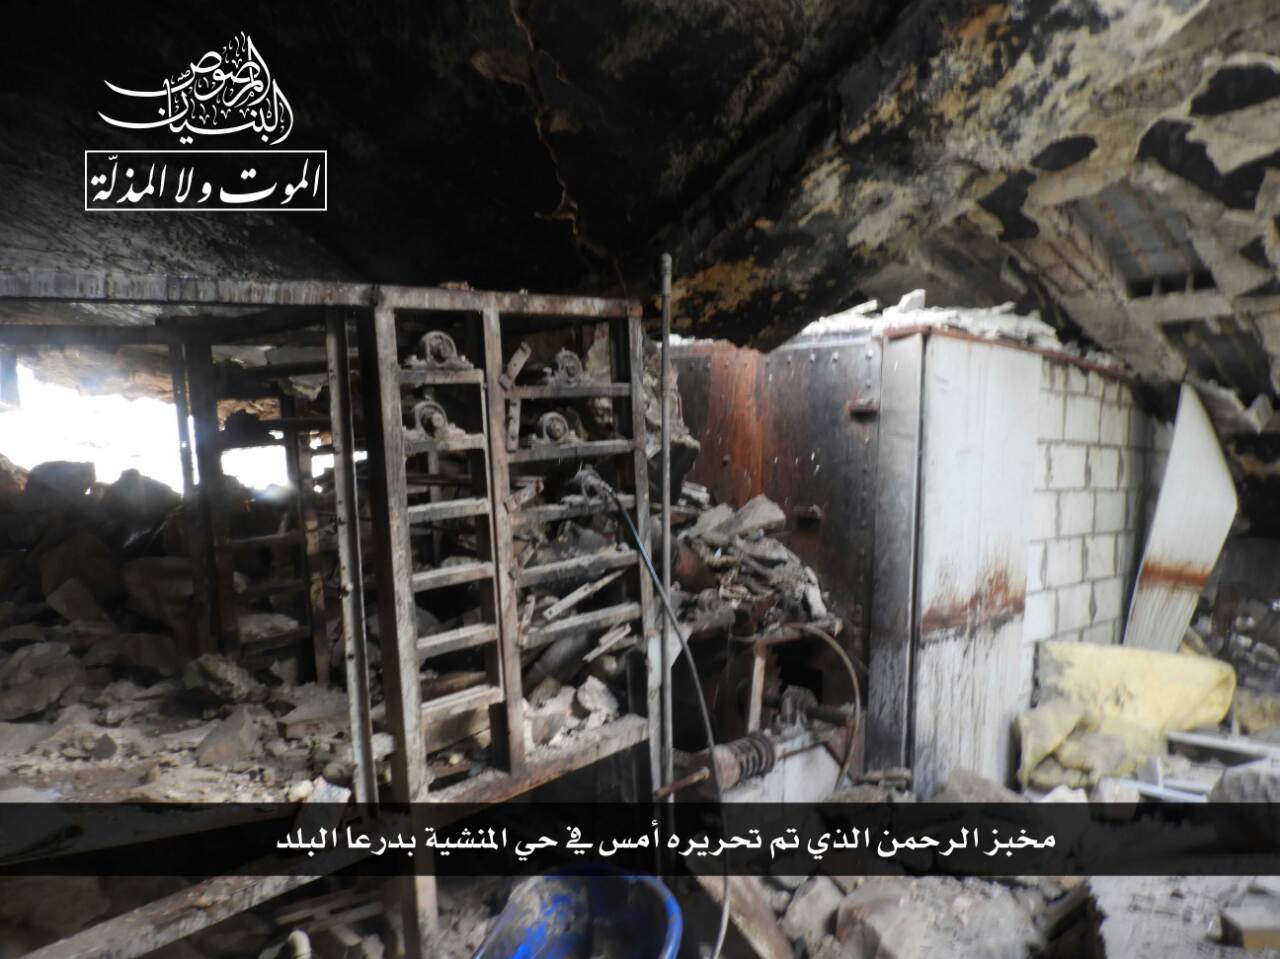
Figure 14
Pause
February 17, 2017
Loyalist Facebook pages have reported a total of 36 pro-government deaths in Manshiyah – including two deaths from February 9 – with one Iranian death (Figure 15). The reported ranks of those killed breaks down as follows: Brigadier General (1), Colonel (2), Lieutenant Colonel (1), Major (1), Captain (2), Lieutenant (4). The Syrian fighters came from the following governorates: Latakia (8), Tartous (5), Hama (5), Homs (4), Dara’a (4), Unspecified (4), Damascus (2), Aleppo (1), Suweida (1), Idlib (1). BM releases a photo showing an ATGM hit on a bulldozer, location unknown (Figure 16).

Figure 15
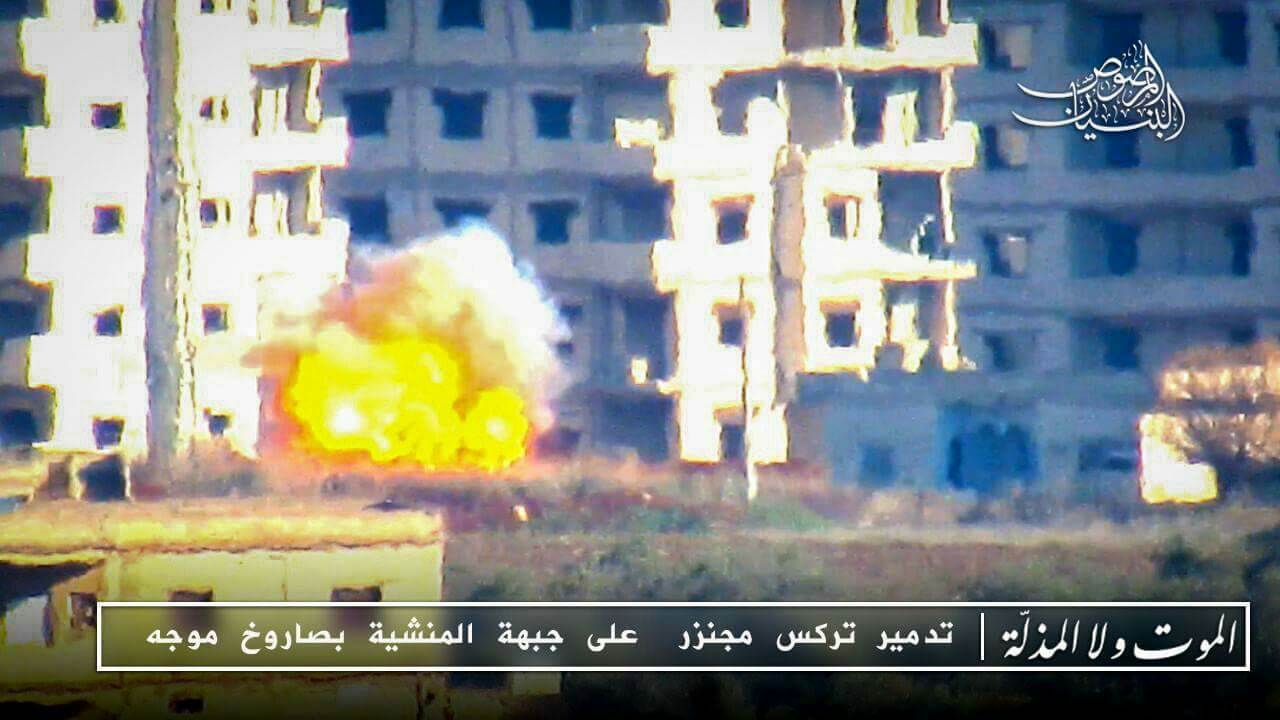
Figure 16
February 18, 2017
BM announces the completion of the “First Phase” of its offensive after one week with the capture of the entire al-Mustansiya neighborhood in eastern Manshiyah. This includes control over the Abu Najib checkpoint, Najjar Building Block, Medical Point, and al Rahman Bakery checkpoint. BM also releases an infographic (Figure 17) claiming 42 pro-government KIA – including 12 officers – and more than 60 injured and claims to have destroyed two T-55 tanks and two armored vehicles.
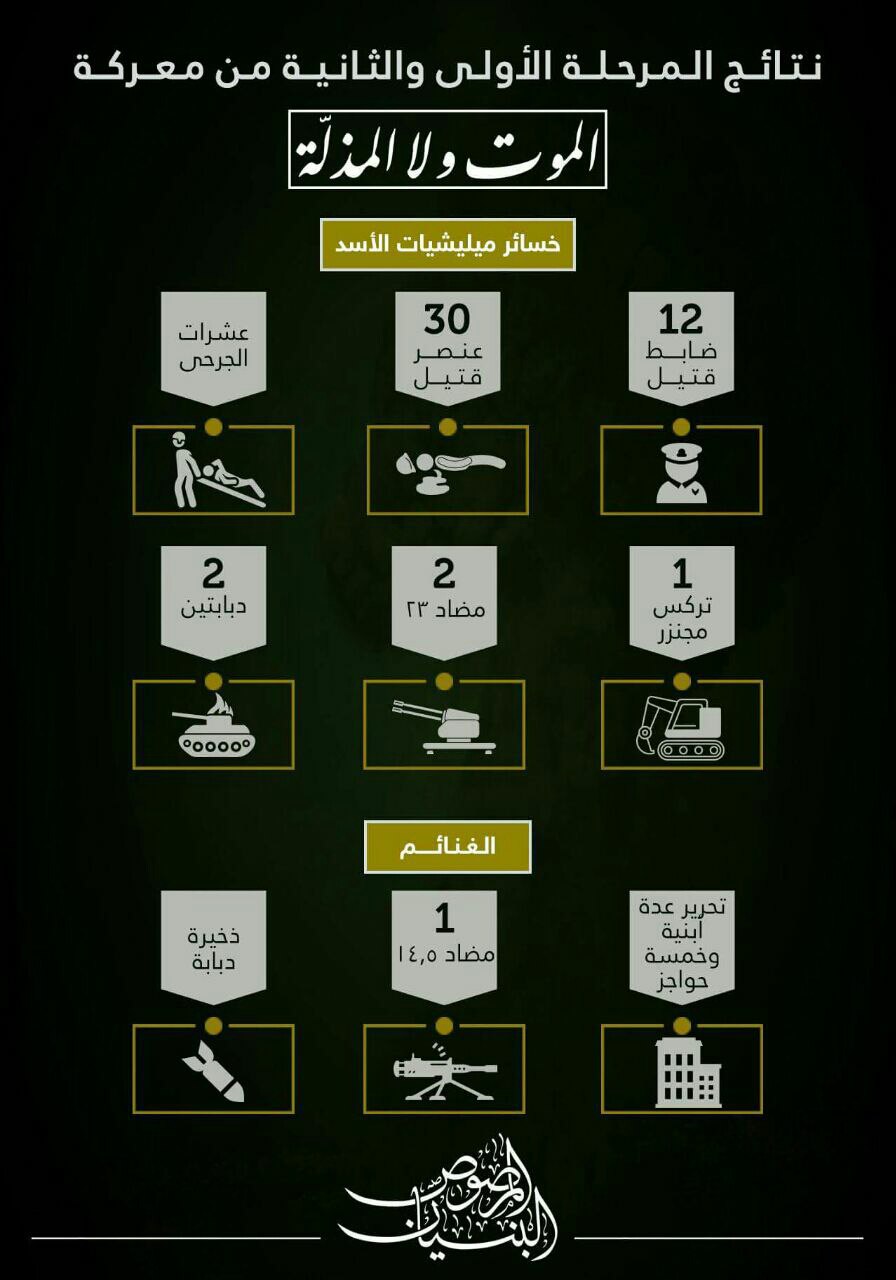
Figure 17
February 19, 2017
Figure 18 depicts a car bomb attack near the Engineering School in North Manshiyah, its exact location is unknown. There is no indication that this is a suicide bombing based on the language used to describe the attack.
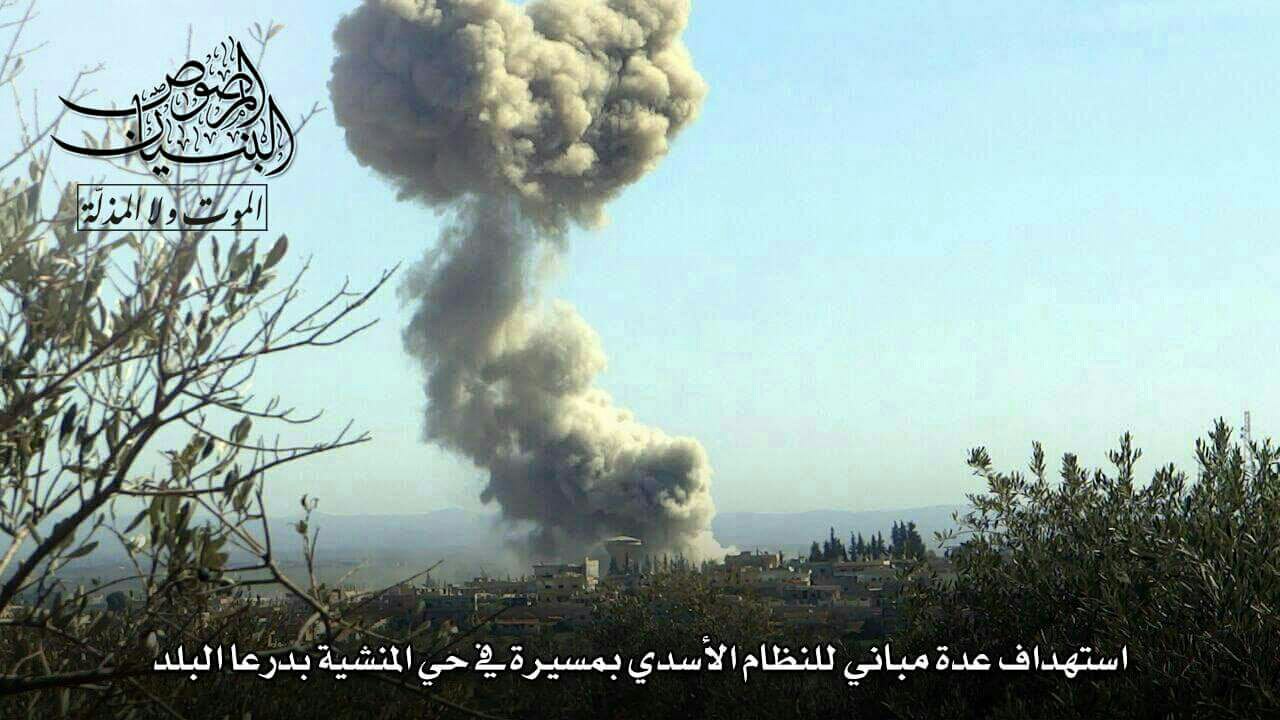
Figure 18
Counter-Attack and Attack
February 23, 2017
Pro-Regime media outlet al Masdar News reports a joint Hezbollah, NDF, and 5th Armored Division counter-attack with some points seized. BM reports no changes in the frontlines. BM publishes a photo (Figure 19) showing the detonation of an IED trap at the al Sanfour Checkpoint (Figure 20) and claims to have destroyed a Shilka in the Sajnah neighborhood north of Manshiyah – likely as part of the regime counter-attack.
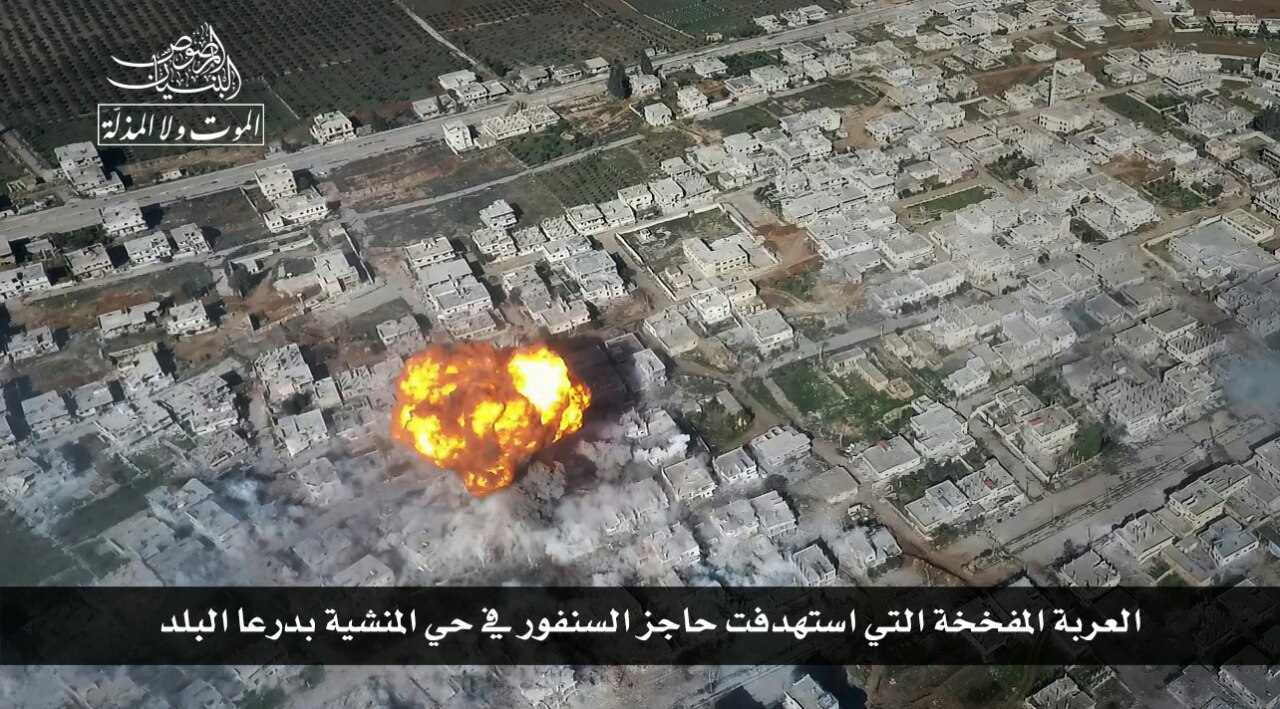
Figure 19
Figure 20
Pause
February 24, 2017
Photos show an Omar Missile strike (Figures 21 and 22) on the Mauwiya School Checkpoint (Figure 23), a regime stronghold just south of the Engineering School. The Omar missile is a home-made missile developed by BM and used extensively throughout the battle. BM also reports on 10 regime deaths since February 18 (Figure 24 and 25), likely from the February 23 regime counter-attack. The fighters reportedly hailed from Damascus, Qamishli, Tartous, Dara’a, Suweida, Latakia, and Idlib, indicating the mixed nature of the Dara’a garrison, a rarity in Syria.
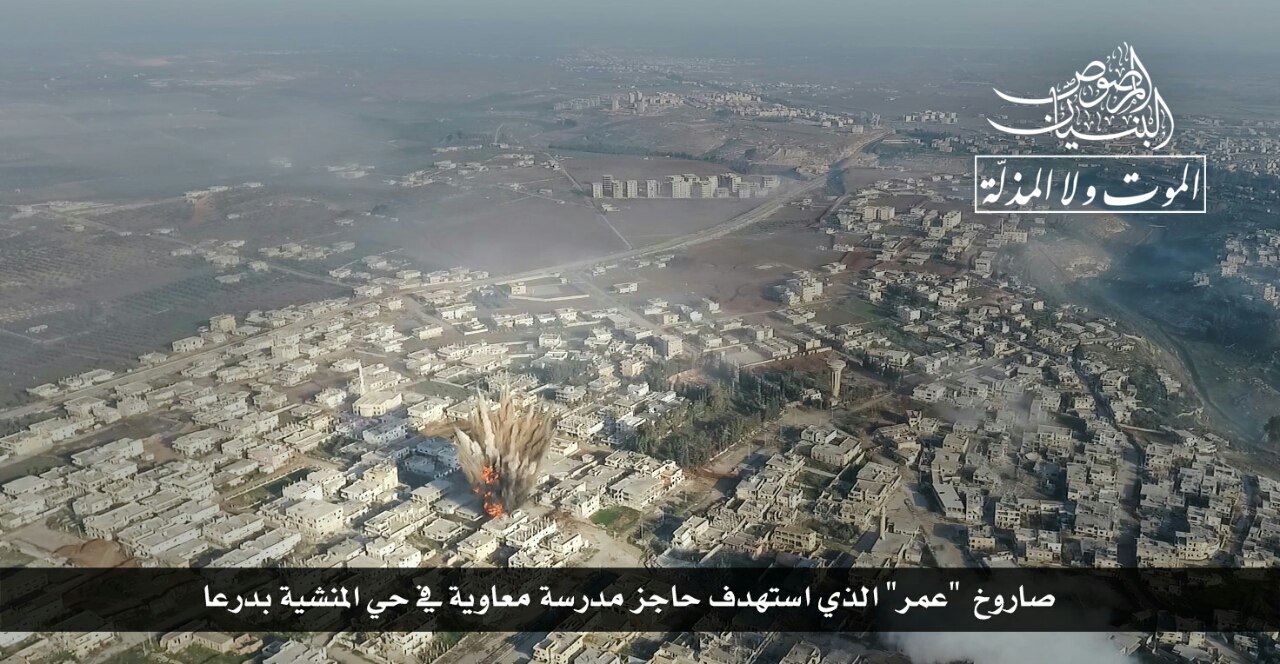
Figure 21
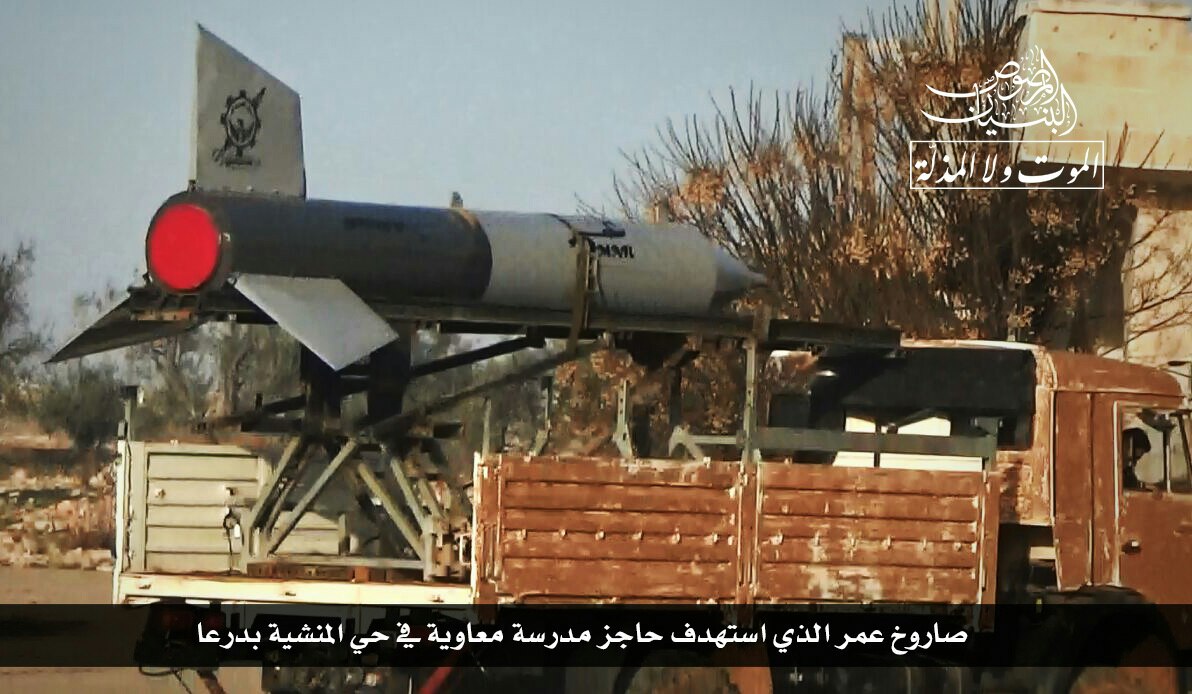
Figure 22
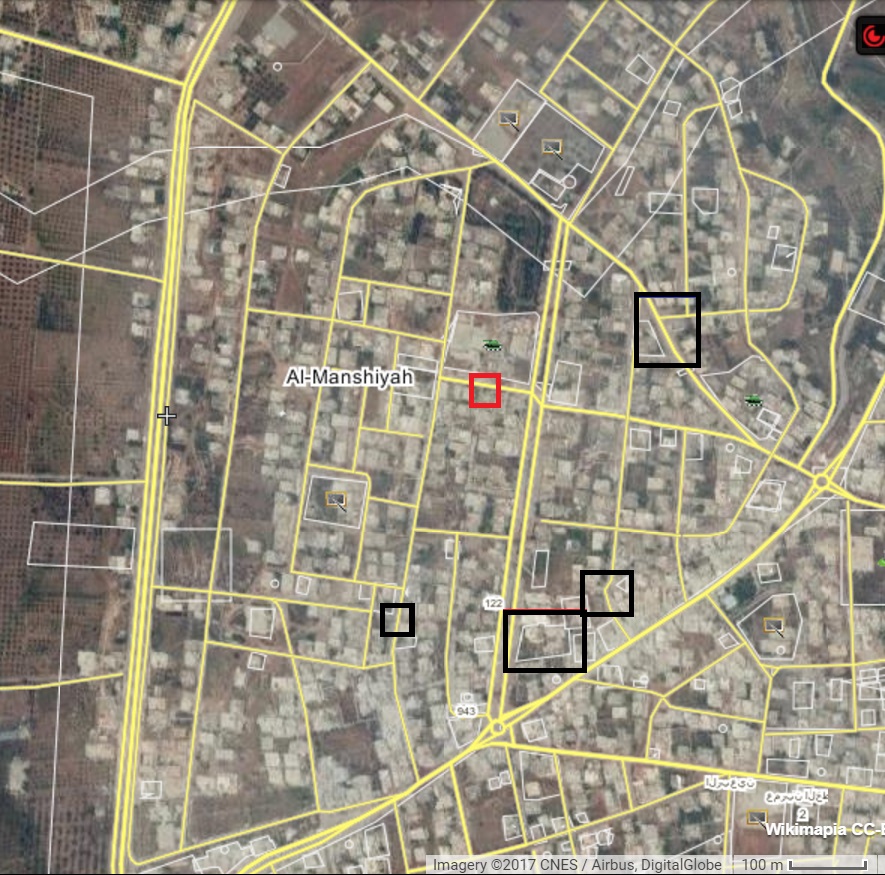
Figure 23
Figure 24
Figure 25
March 1, 2017
BM releases a new map (Figure 26) of territorial control, showing expanded control in the south around the Sanfour Checkpoint and Syriatel Checkpoint, which appears to be next to the “Strategic Checkpoint” previously captured and then lost. BM had targeted the Sanfour Checkpoint with an IED on February 23.
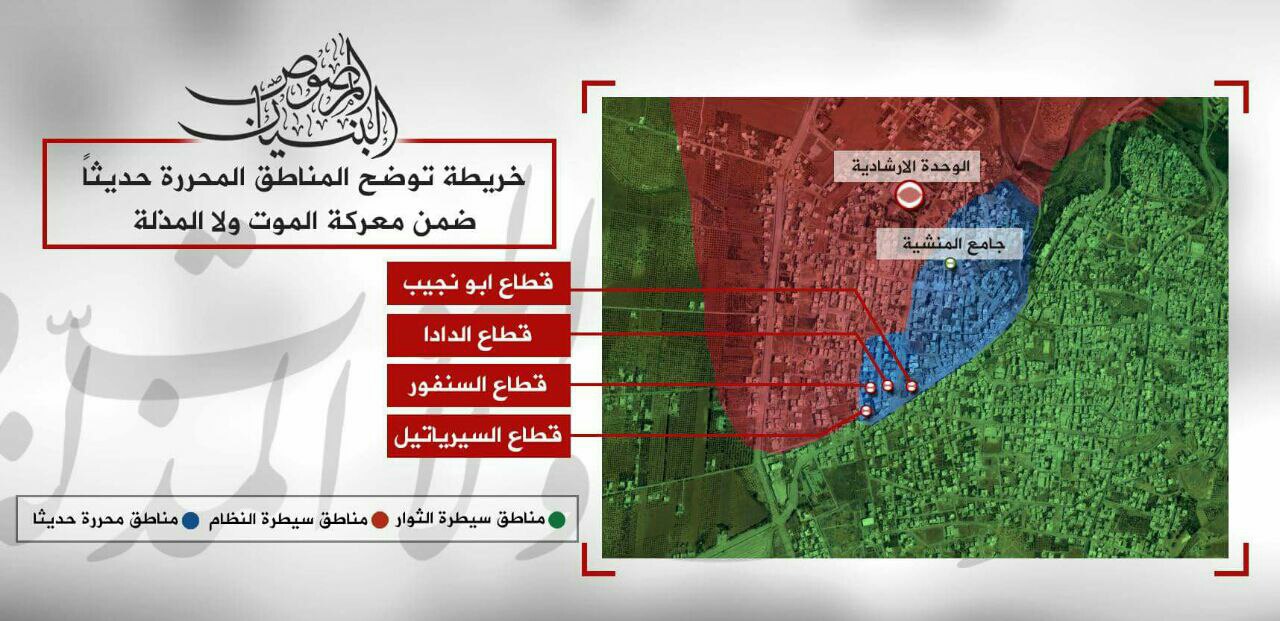
Figure 26: Blue = “Recently Liberated Area” Red = “Regime Controlled” Green = “Opposition Controlled”; Top to Bottom: Abu Najib Sector, Dada Sector, Sanfour Sector, Syria Tel Sector
Counter-Attack
March 5, 2017
After a week of relative quiet, pro-regime media announces the deaths of 12 rebel fighter and the destruction of two technicals through airstrikes during the first day of its new counter-attack. Pro-regime media claims to have secured four building blocks north-west of the al Rahman bakery on March 6. BM denies reports of regime advances and publishes propaganda photos depicting its fighters engaging in combat (Figure 27) and touring recently captured territory (Figure 28).

Figure 27
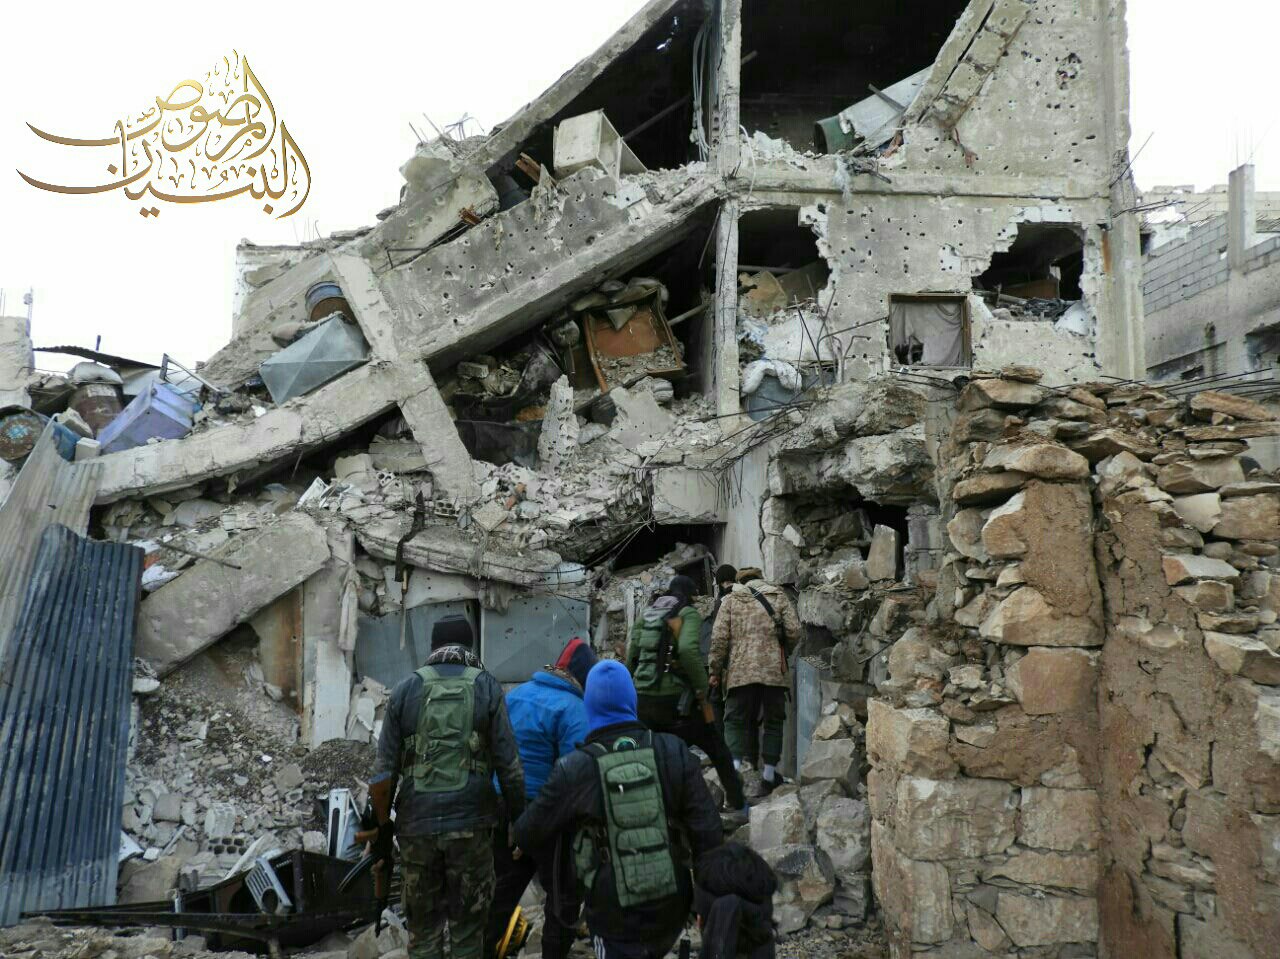
Figure 28
Pause
March 10, 2017
BM releases a photo (Figure 29) of a destroyed regime bulldozer that was reportedly “trying to infiltrate” rebel positions and announces (Figure 30) the destruction of a Shilka in Manshiyah.
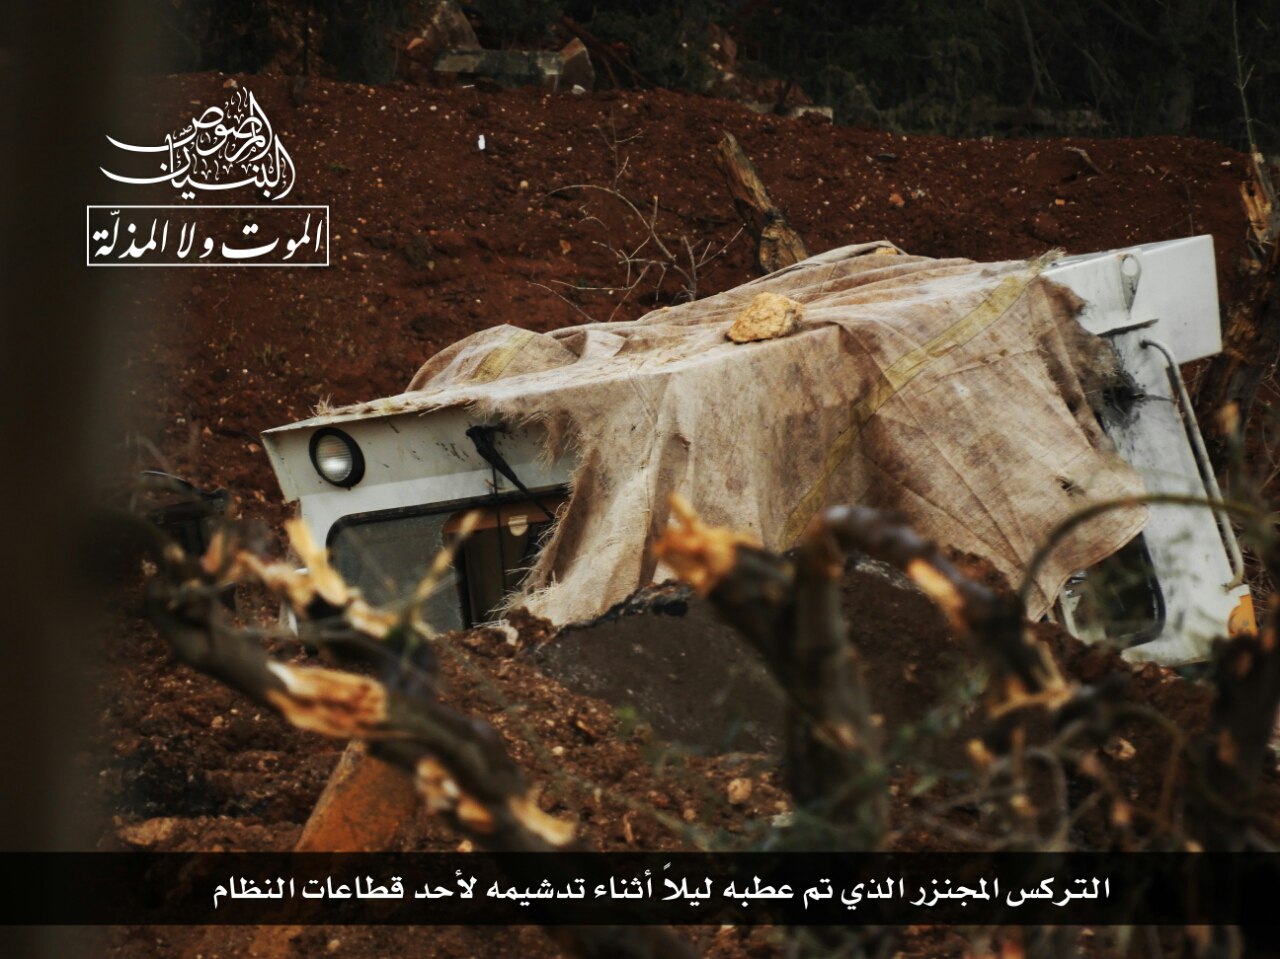
Figure 29
Figure 30
Attack
March 12, 2017
After 16 days of no real offensive action, BM announces the beginning of the “Fourth Phase” of its offensive (it is unclear when the third phase occurred). This announcement includes pictures of the detonation of a booby-trapped vehicle (Figure 31) on the Mauwiya School Checkpoint (Figure 32), the capture of Abu Raha Checkpoint (Figure 33 and 34), and the destruction of an ATGM position (Figure 35) and a Shilka (Figure 36, no picture) in Sajnah. BM further claims 4 KIA and 20 WIA
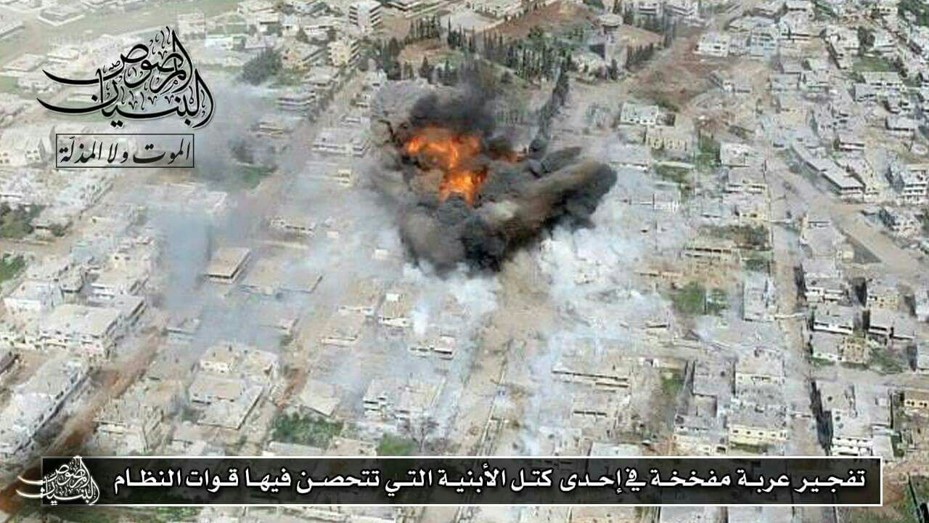
Figure 31
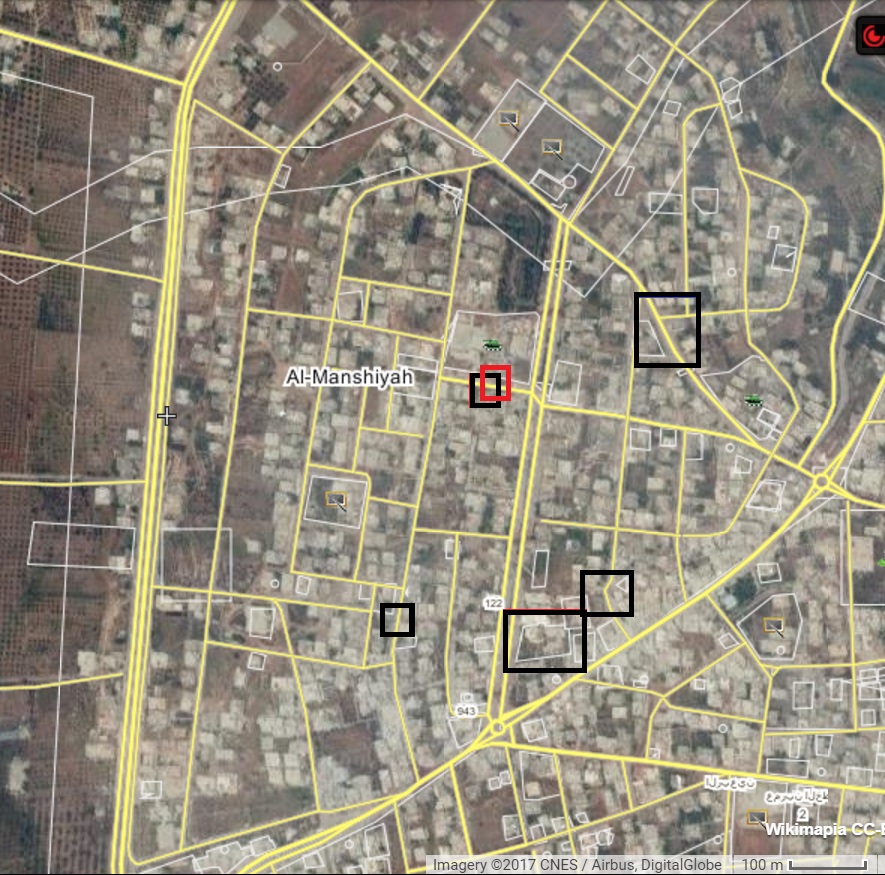
Figure 32
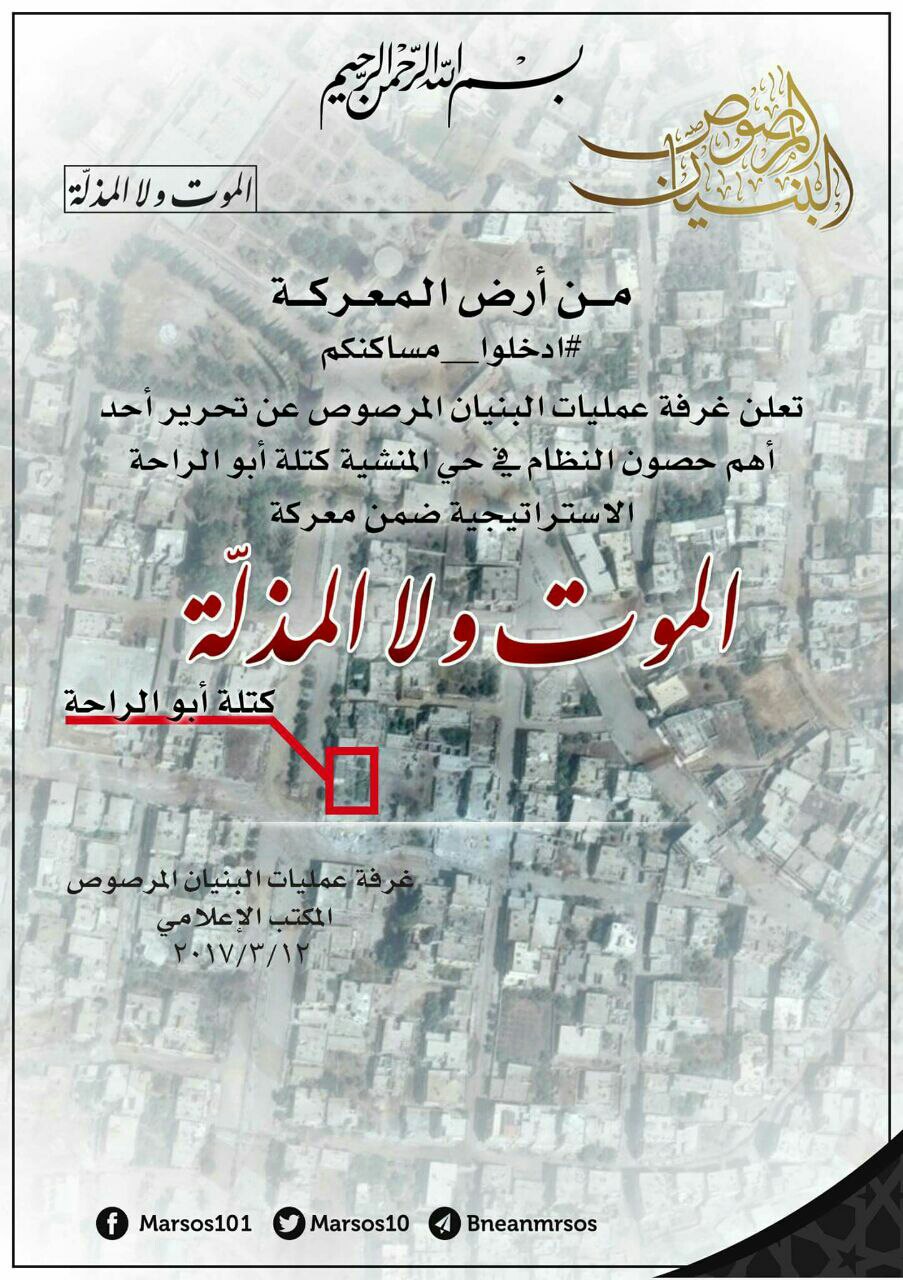
Figure 33

Figure 34
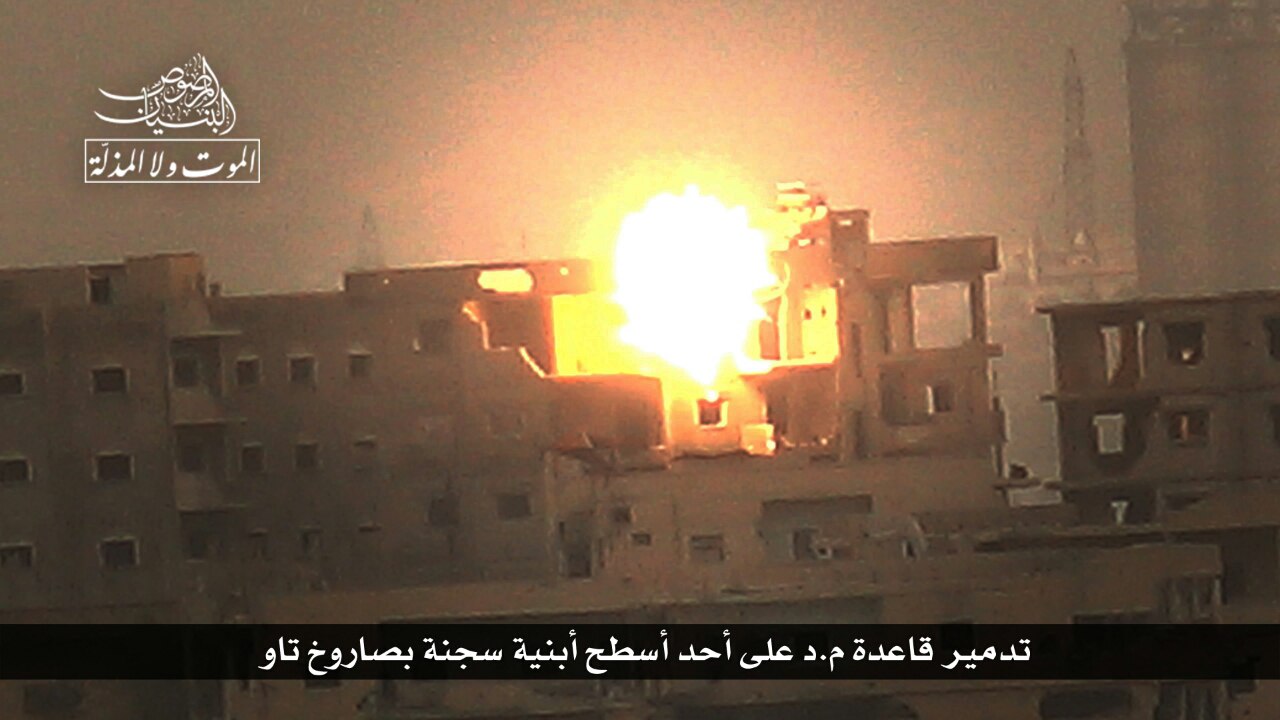
Figure 35
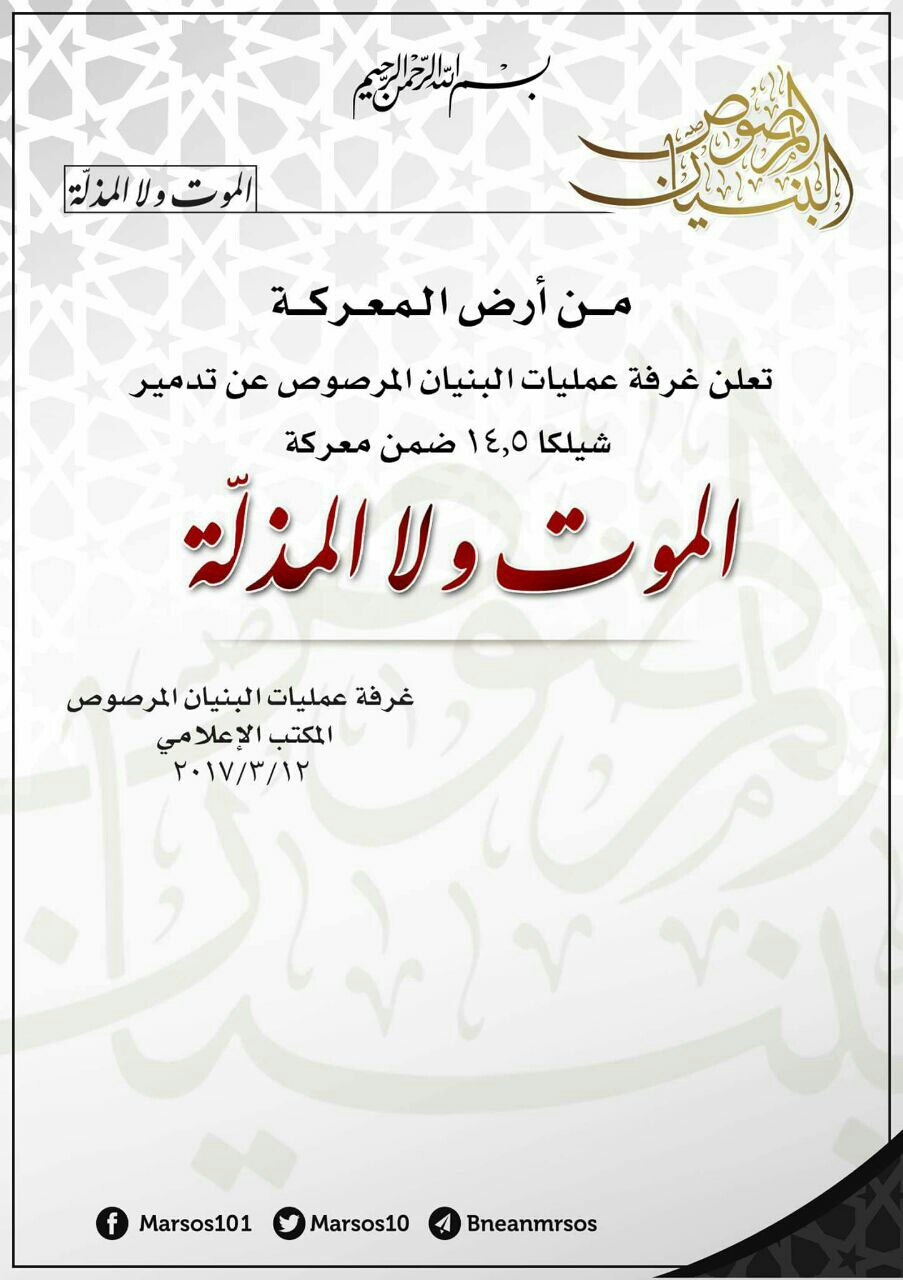
Figure 36
March 13, 2017
BM releases a photos and infographic of captured weapons – three rifles, two RPGs, and one PKM heavy machinegun (Figure 37) – and regime KIA (Figure 38) from the previous day’s operations.
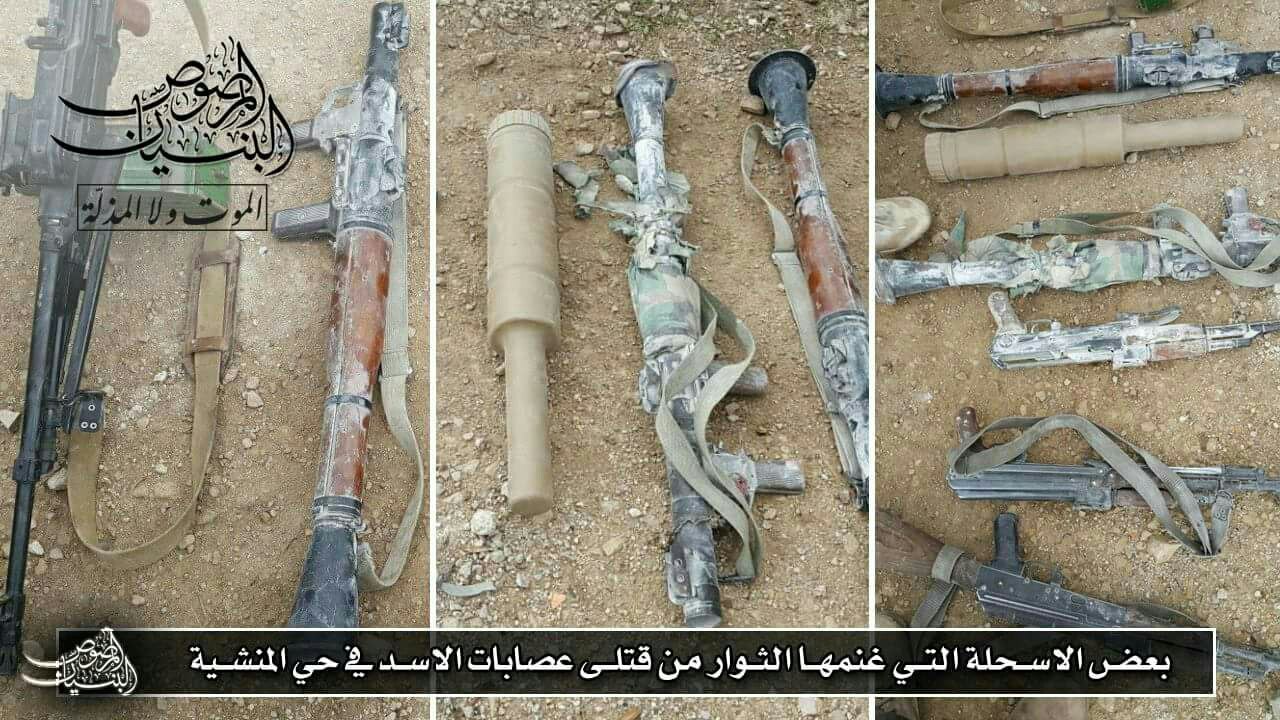
Figure 37
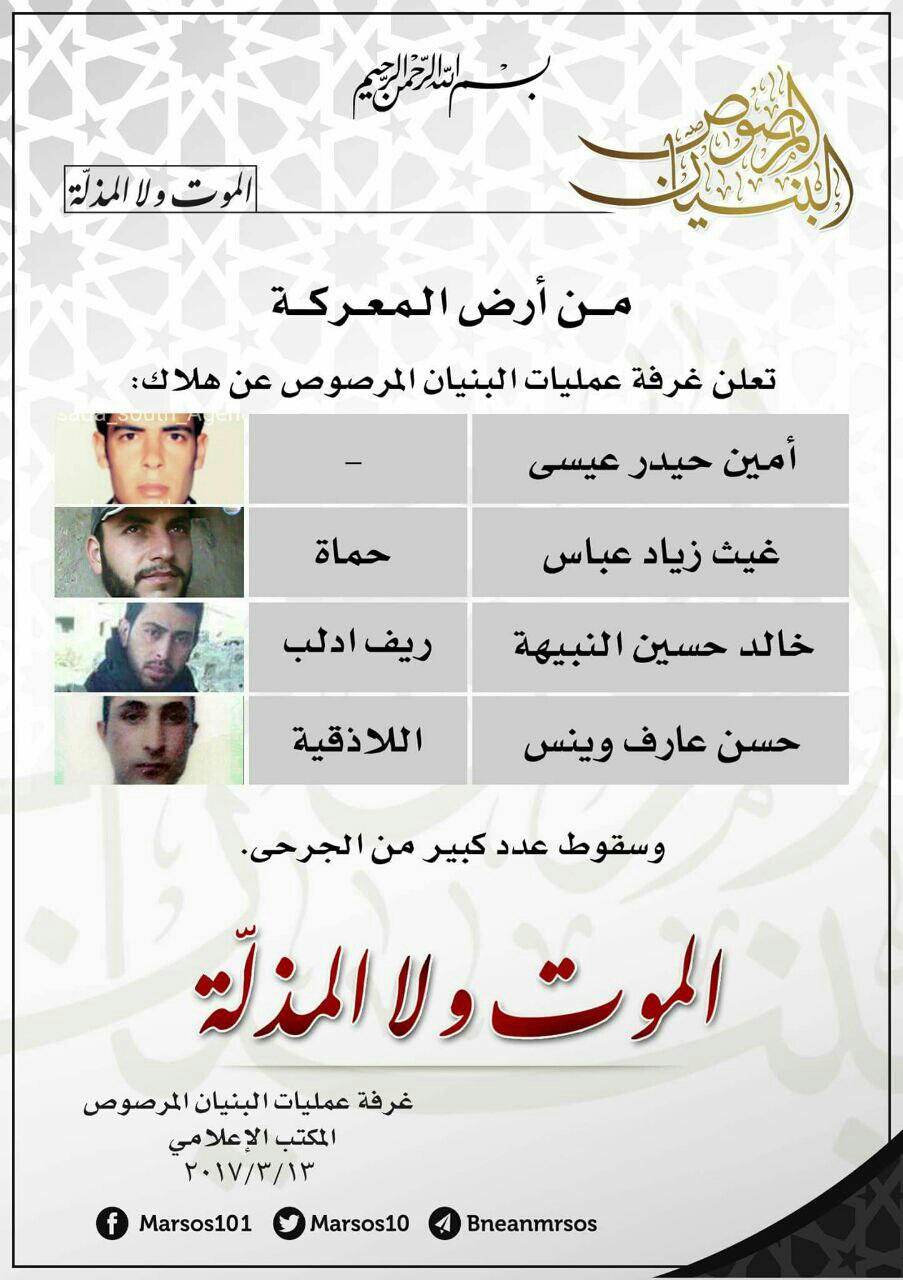
Figure 38
Pause
March 14, 2017
BM releases another infographic (Figure 39) on regime KIA, with fighters hailing from Tartous, Damascus, Hama, and Hasakah.
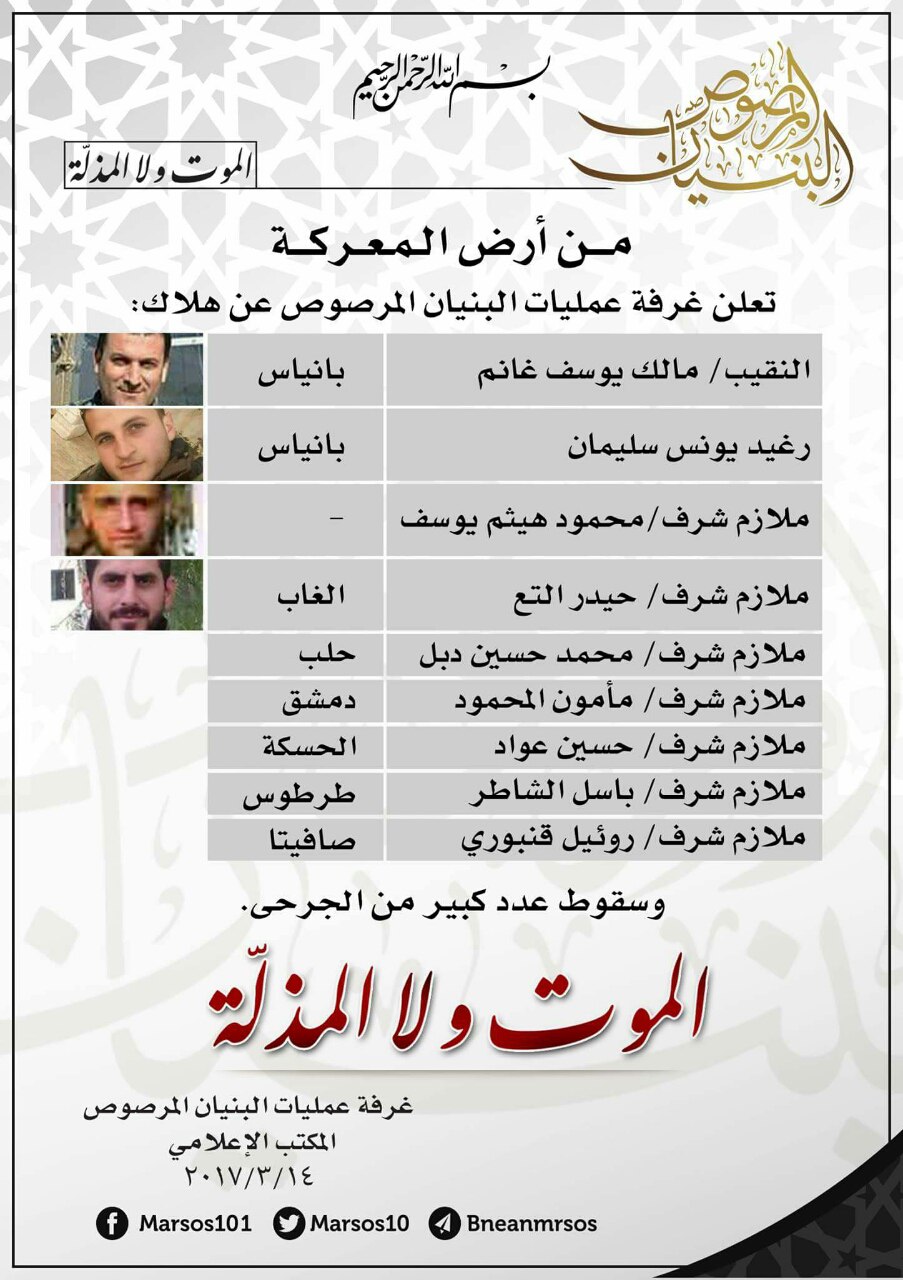
Figure 39
March 16 and 19, 2017
Fighting eases again after the rebel push on March 12. BM releases an infographic on regime losses since February 12 (Figure 40) and a new map of territorial control in Manshiyah (Figure 41) showing expanded control eastwards towards the Engineering School. The infographic claims 56 regime KIA, including one Iranian and one Hezbollah fighter, as well as the destruction of three tanks, three Shilkas, and two bulldozers.
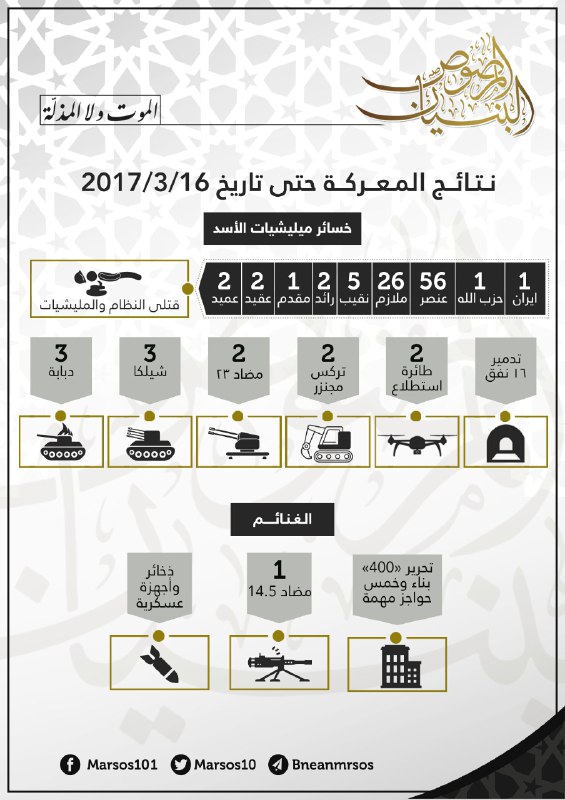
Figure 40
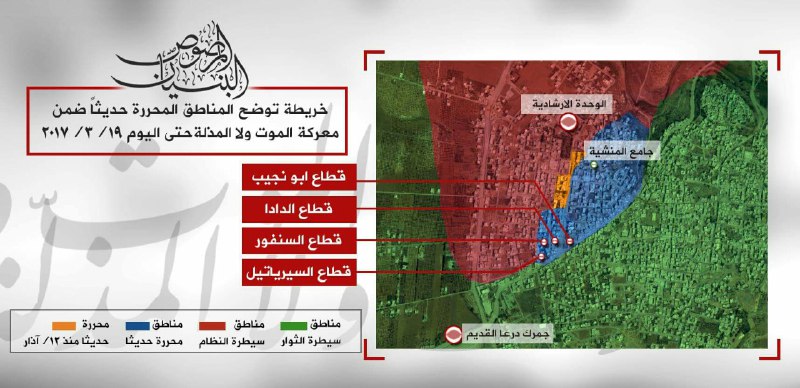
Figure 41: Yellow = “Liberated since 12 March” Blue = “Recently liberated” Red = “Regime Controlled” Green = “Revolutionary Controlled”
March 21 and 22, 2017
BM releases two sets of additional pictures showing skirmishes throughout the neighborhood. On March 21, BM published two photos (Figures 42 and 43) claiming to show a TOW strike on four pro-government fighters manning what appears to be a mortar. On March 22, BM publishes two photos (Figures 44 and 45) claiming to show the destruction of an ATGM position in Manshiyah.
Figure 42
Figure 43
Figure 44
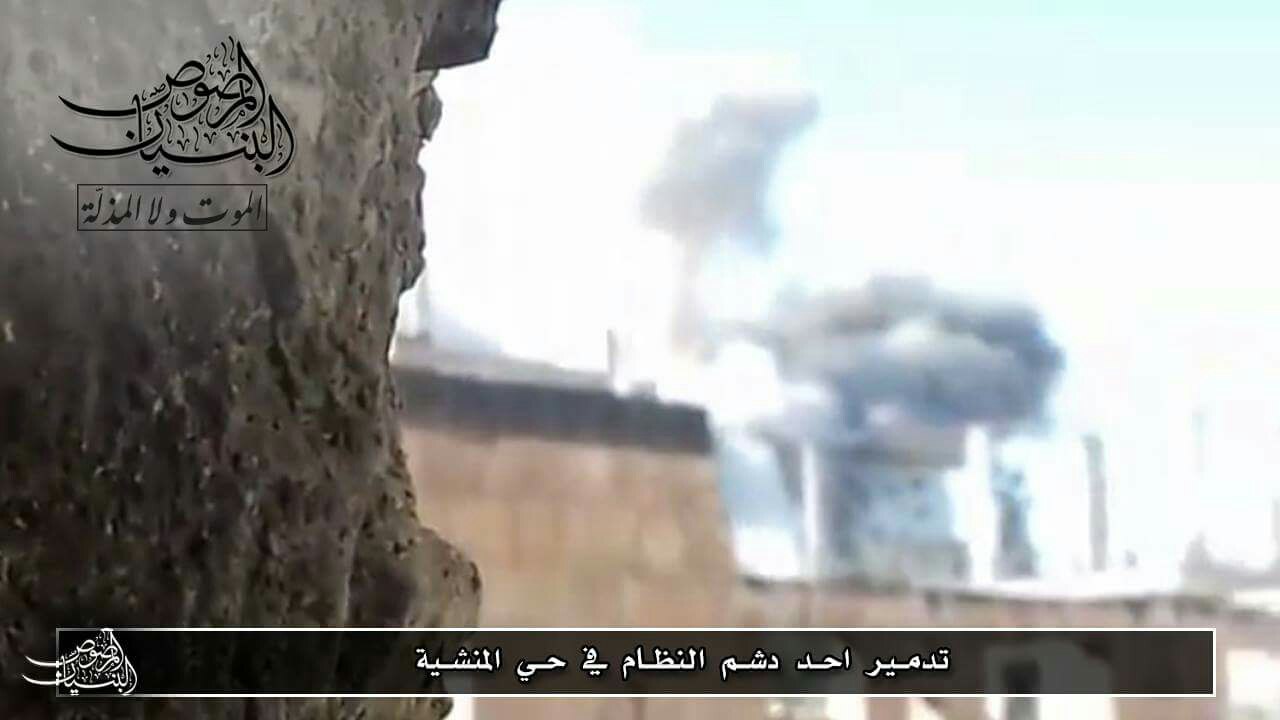
Figure 45
Counter-Attack
March 25, 2017
Both BM and pro-regime media report on a regime counter-attack, with Pro-regime media reporting minor gains during the attack and BM reporting no change in territory. BM shells regime positions in retaliation. The following day, BM media releases an infographic of regime KIA (Figure 46), including a general from the 15th Suweida Paratroopers, a Colonel, and a Lieutenant.

Figure 46
Attack
March 27, 2017
BM goes on the offensive again, attempting “to take control of [Manshiyah] and the adjacent neighborhood of Sajnah” where regime counter-attacks are launched from. They claim to damage a tank and destroy an ammo depot as well as an Elephant Rocket launch site in the Sajnah District. BM also releases photos (Figures 47-49) of a rocket and artillery strike on what appears to be the Mauwiya Checkpoint (Figure 50) and possibly the Abu Raha Checkpoint which was previously captured on March 12.
Figure 47
Figure 48
Figure 49
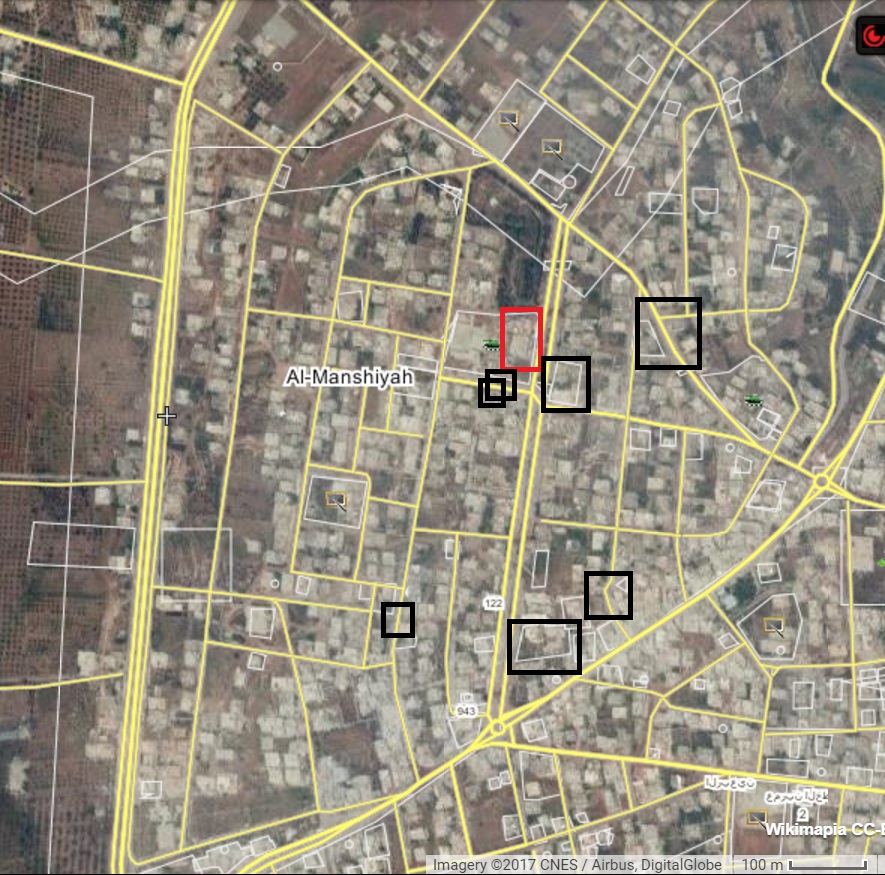
Figure 50
Pause
March 30, 2017
BM releases photos of an explosive hose attack (Figures 51 and 52) in southwestern Manshiyah on the Binayat Checkpoint (Figure 53).
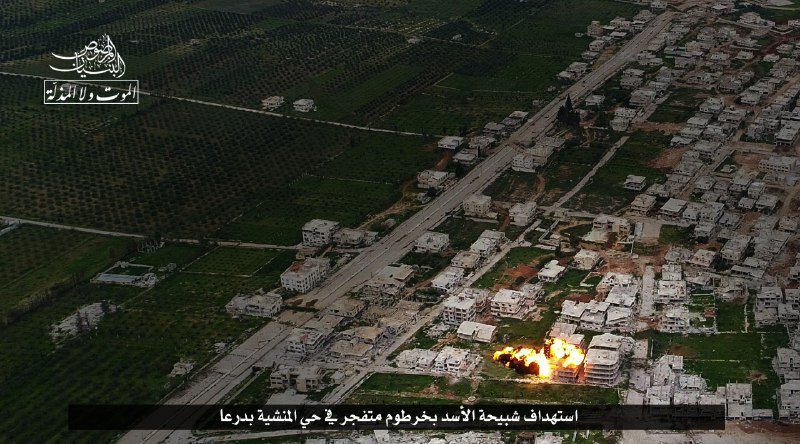
Figure 51
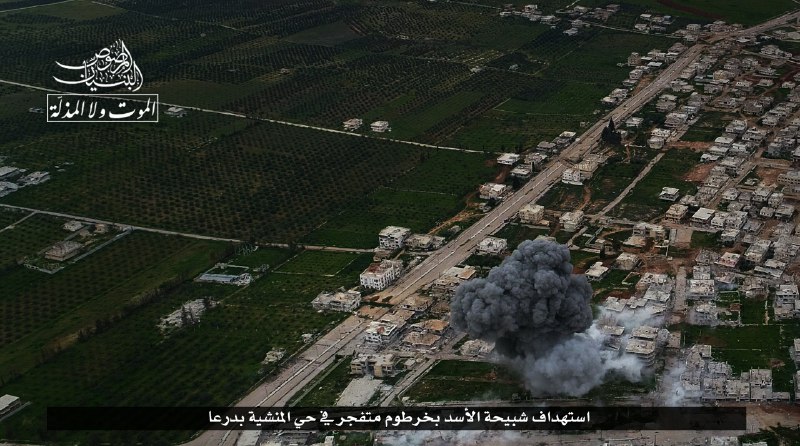
Figure 52
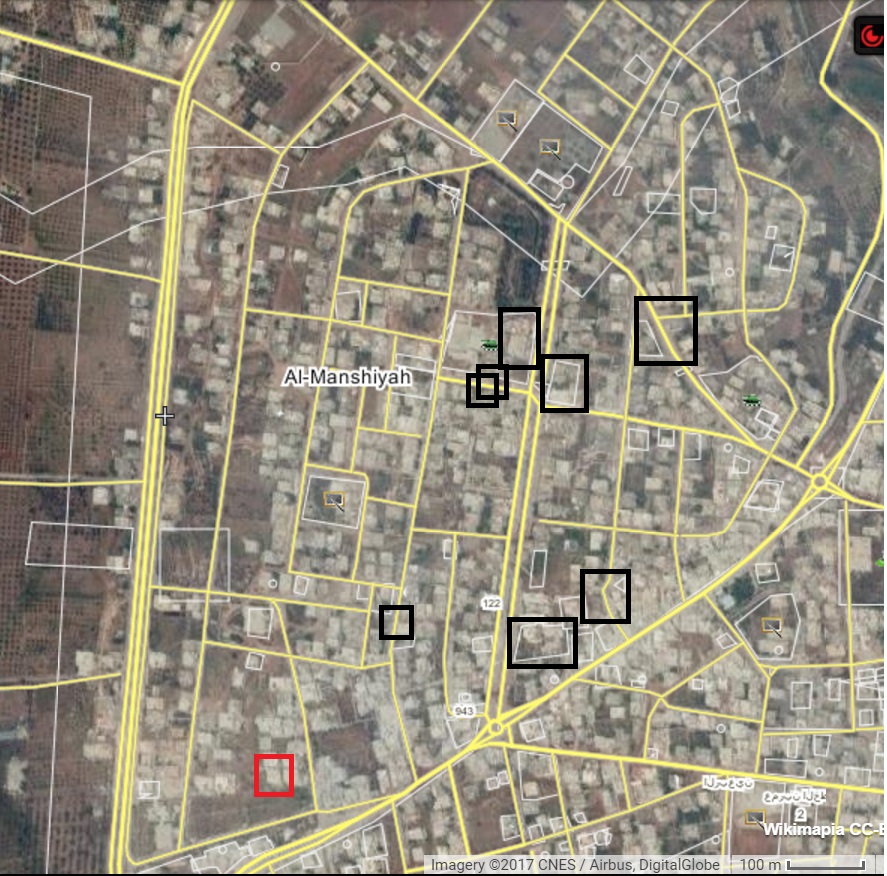
Figure 53
Attack
April 4, 2017
BM launches a new eight-day assault on the southern and western sections of Manshiyah under which regime defenses appear to rapidly fall. BM claims that a prisoner taken on April 5 confirms the death of eight Hezbollah fighters in another explosive hose attack (Figure 54) in southern Manshiyah in the area around Syriatel and the Sanfour Checkpoint (Figure 57).
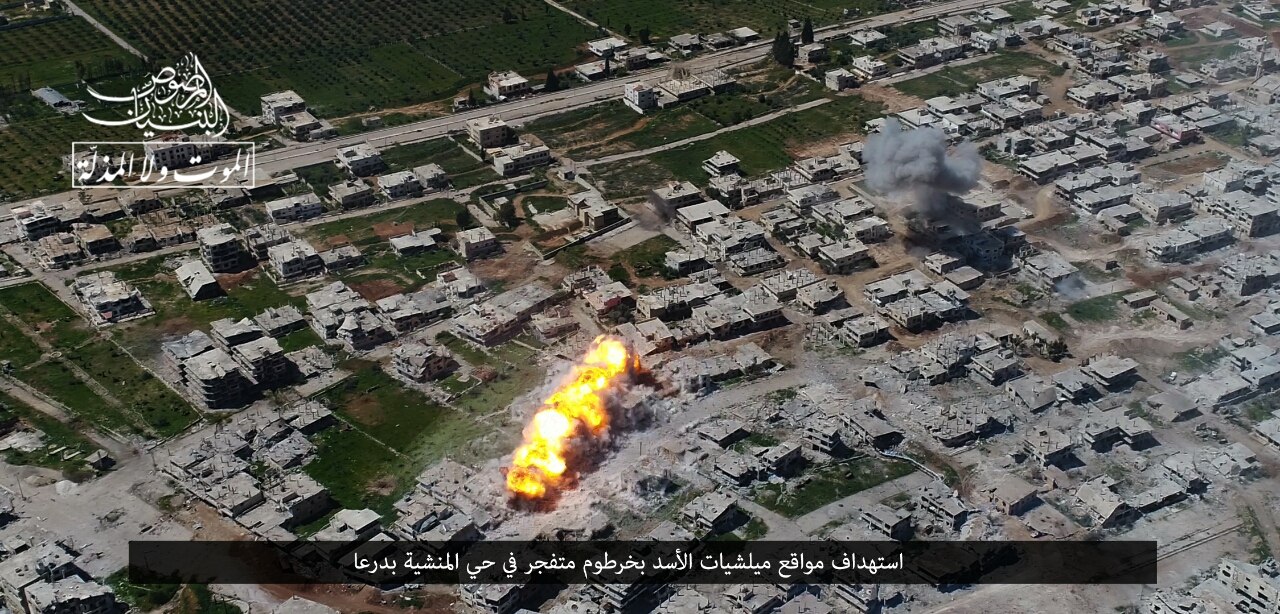
Figure 54
April 5, 2017
BM announces the capture of 45 residential blocks in south-western Manshiyah, including the Dada and Sanfour Checkpoints, as well as the death of three regime fighters and the capture of a fourth. Photos are released showing a hell cannon launch (Figure 55) and the destruction of a tank (Figure 56) in north-western Manshiyah (Figure 57).
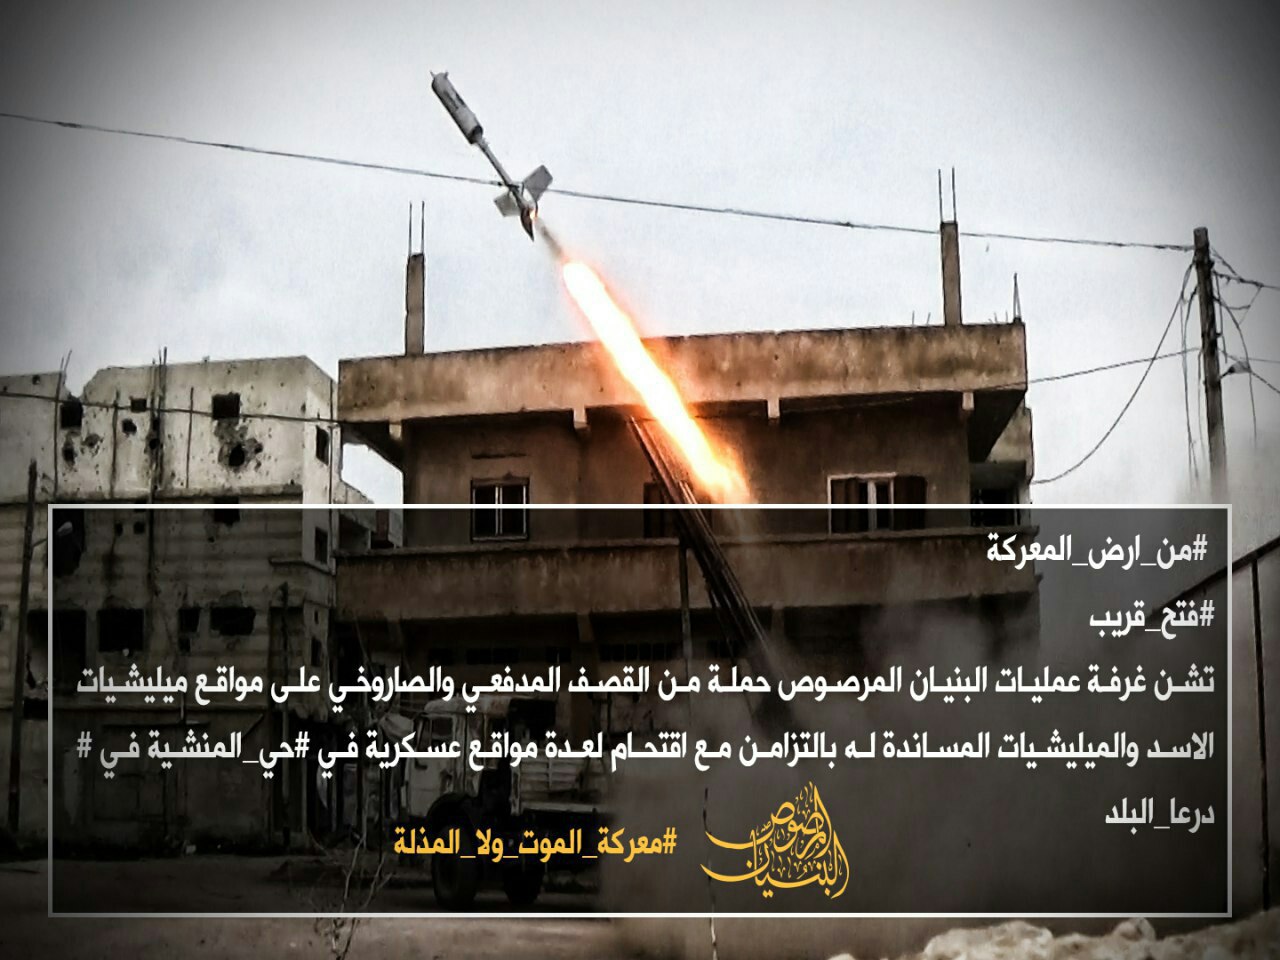
Figure 55
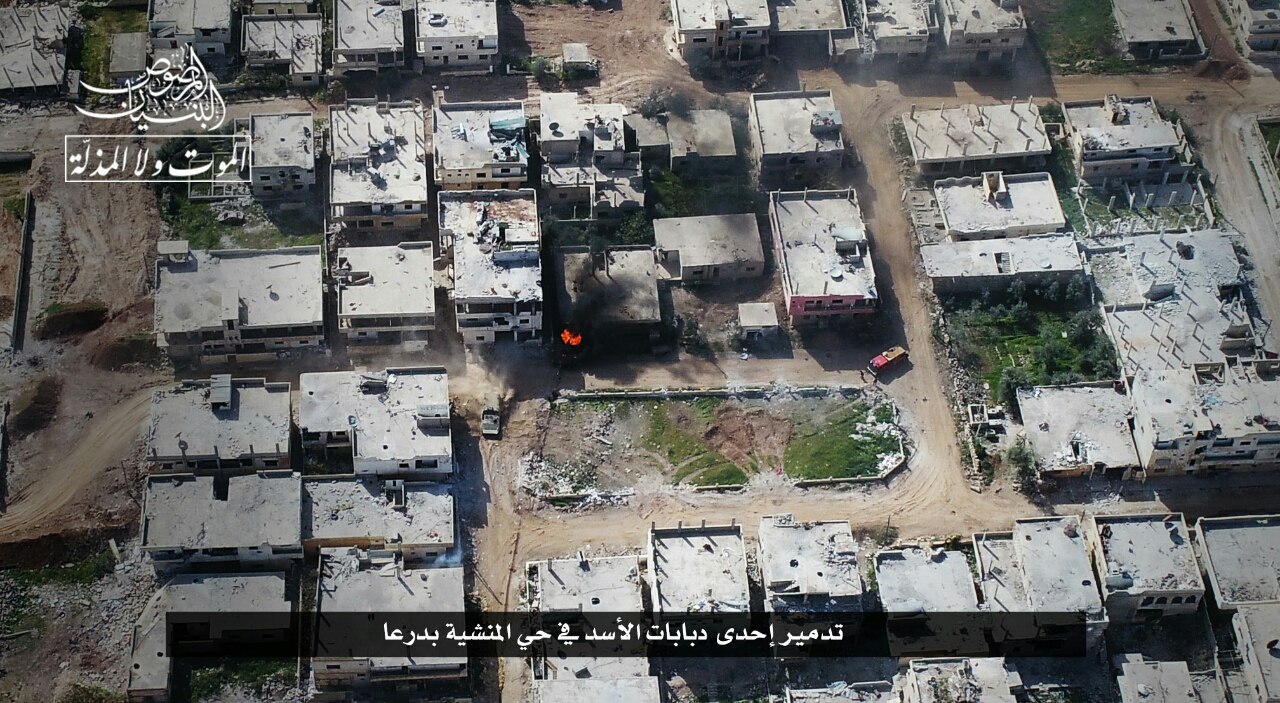
Figure 56
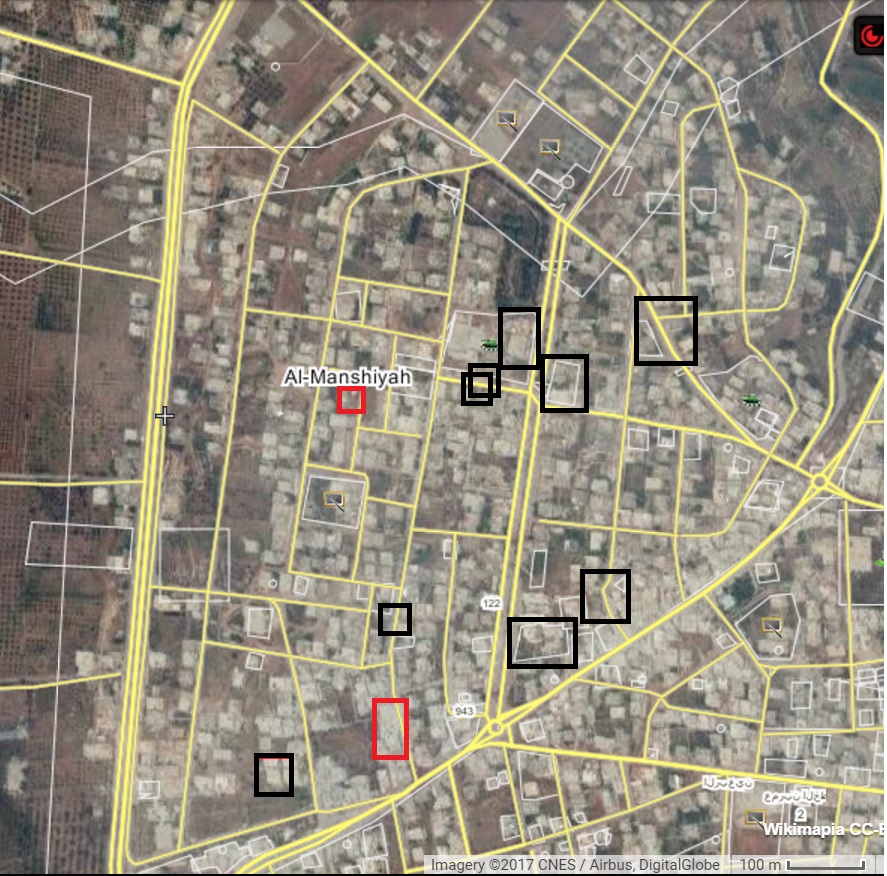
Figure 57
April 6, 2017
BM publishes photos (Figures 58 and 59) of a booby-trapped vehicle hitting the Fayez al-Adeeb block in northern Manshiyah (Figure 60) and claim to have used an explosive hose, although no pictures are provided. Rebels also claim to have expanded control westward of the Sanfour and Dada Checkpoints towards the two positions targeted on March 30 and April 4 and advanced towards the Fayez al-Adeeb block, killing a Lieutenant Colonel and detonating a weapons depot in the process.
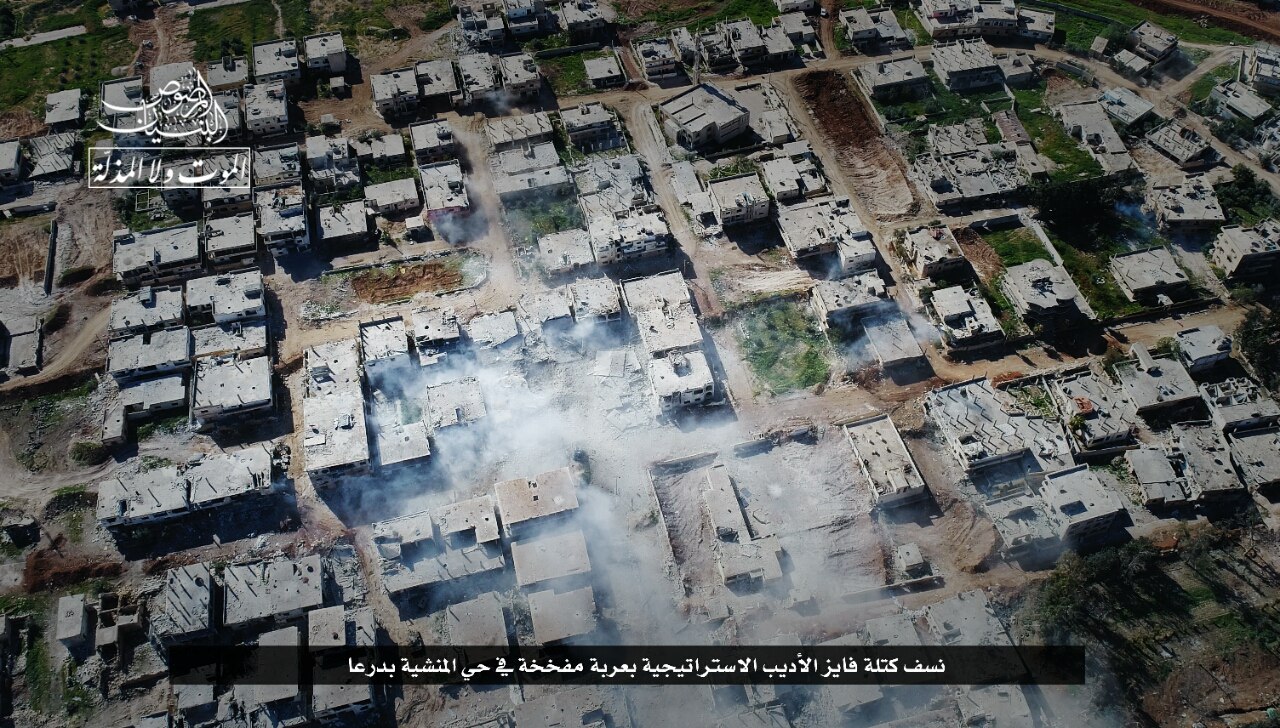
Figure 58

Figure 59
Figure 60
April 7, 2017
BM releases photos of a destroyed machine gun trench (Figures 61 and 62) and infographic of eight regime KIA (Figure 63) from the recent clashes. The killed fighters hailed from Suweida, Damascus, Homs, Tartous, and Hezbollah.
Figure 61
Figure 62
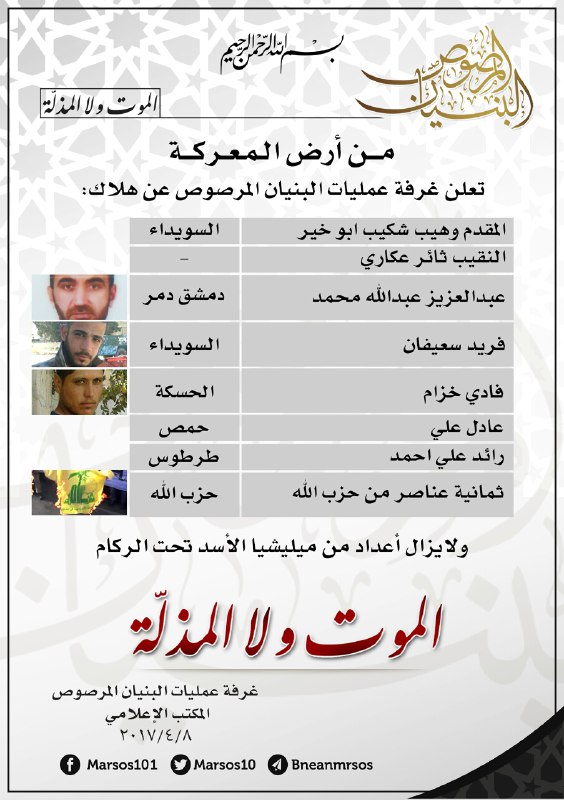
Figure 63
April 8, 2017
Rebels advance further westward, appearing to kill a number of pro-regime fighters in a trench (Figure 64) along the western-most edge of Manshiyah (Figure 65) as well as claiming to take four prisoners and destroy a tank with a TOW missile. BM also releases photos of an Omar missile strike (Figure 66) on a building in northern Manshiyah (Figure 67) and a new map depicting extensive gains throughout all of southern Manshiyah (Figure 68, bombing locations overlaid on top). BM claims to have killed three commanding officers, two officers, and five soldiers in the recent clashes.
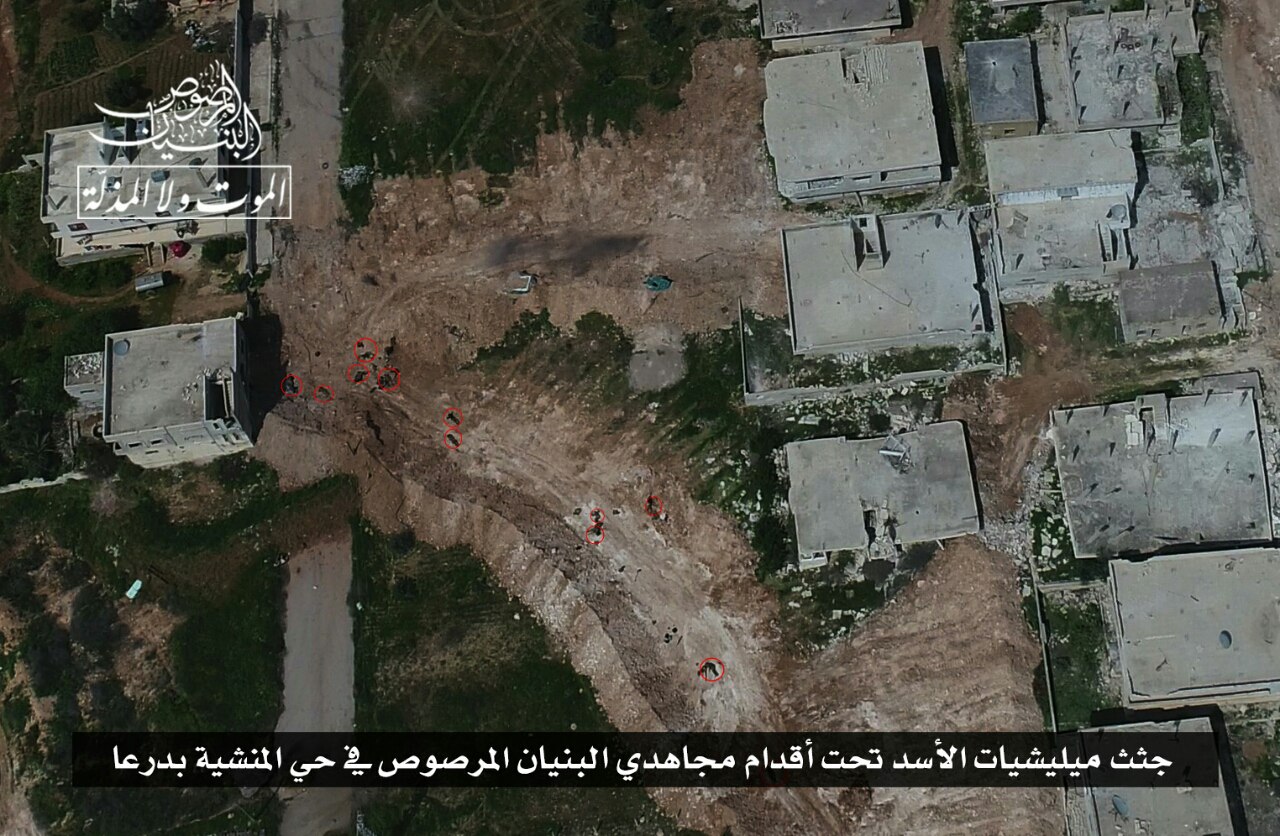
Figure 64
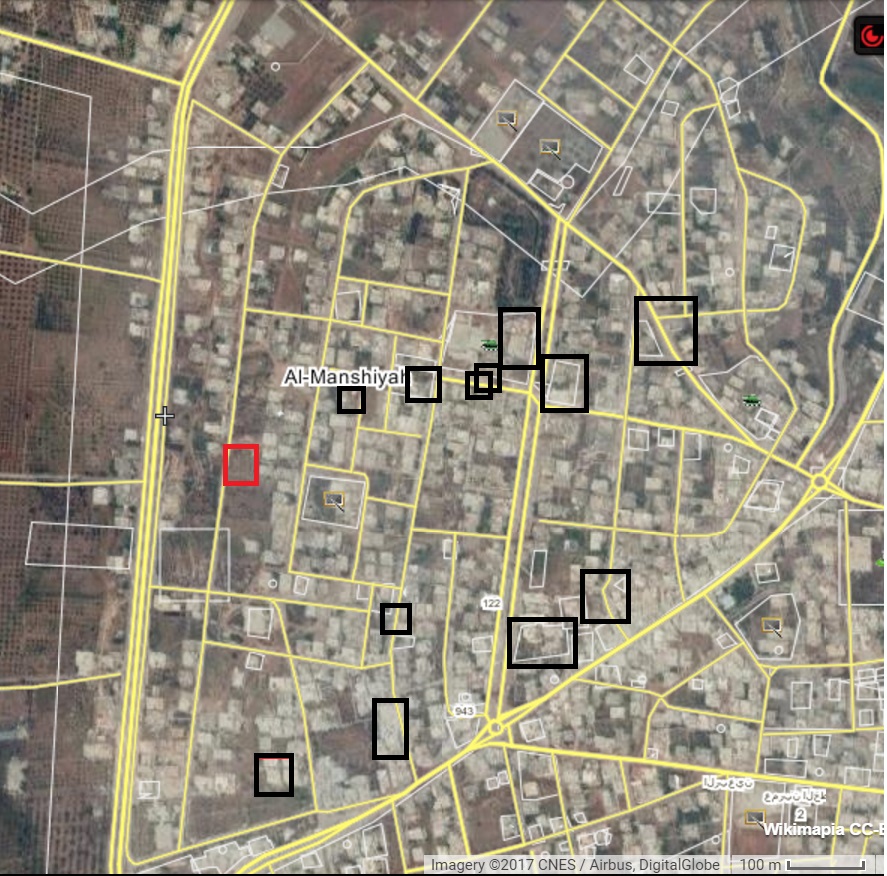
Figure 65
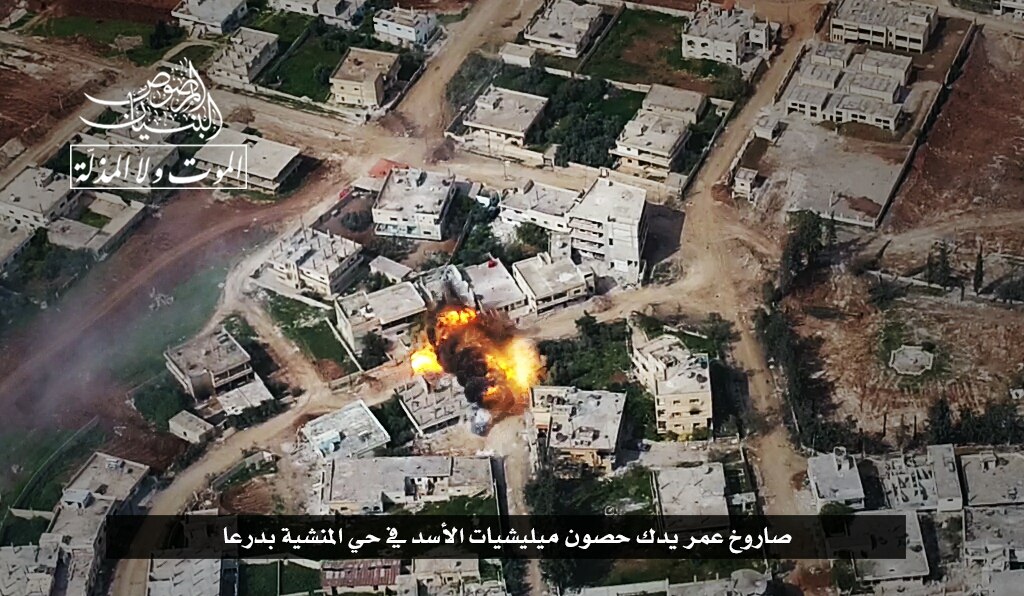
Figure 66
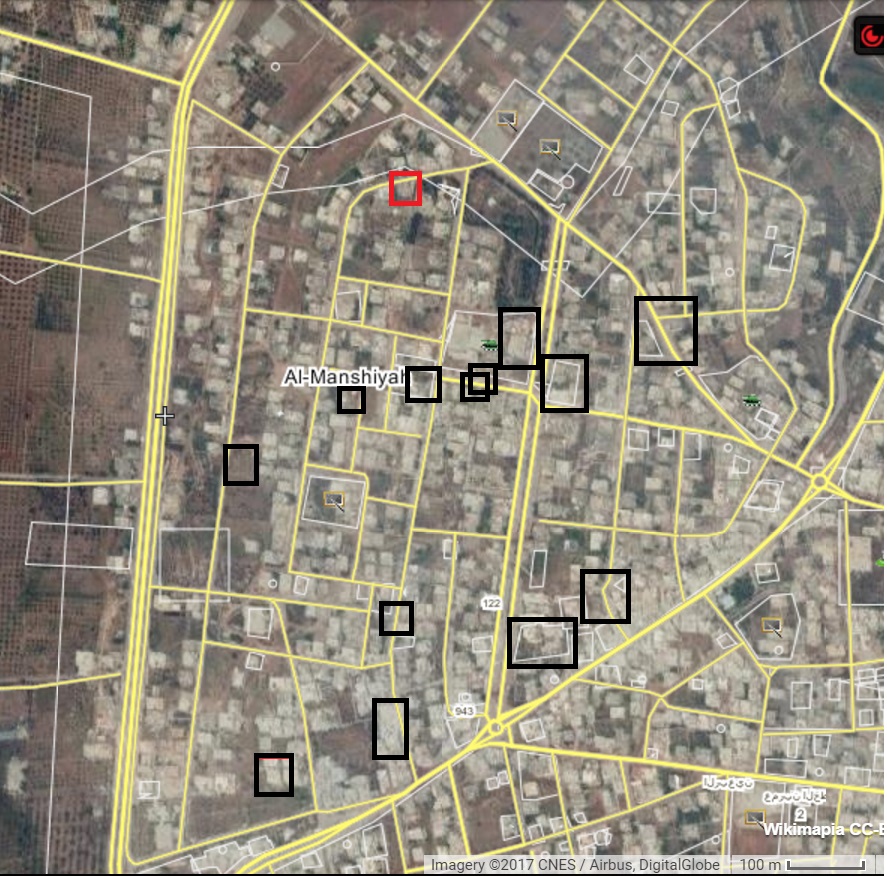
Figure 67
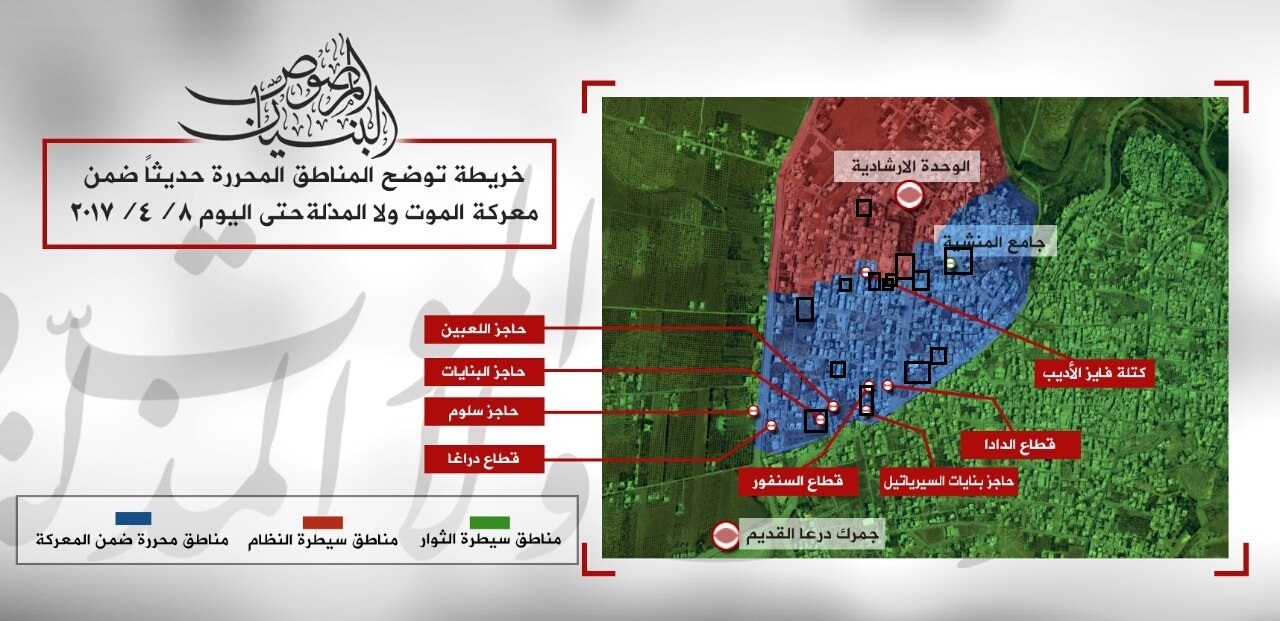
Figure 68: Blue = “Area liberated during the battle” Red = “Regime controlled area” Green = “Revolutionary controlled area”; Red Labels Counter-Clockwise: La’abeen Checkpoint, Binayat Checkpoint, Saloum Checkpoint, Daragha Checkpoint, Sanfour Sector, Syriatel Checkpoint, Dada Sector, Fayez al-Adeeb Block
April 9, 2017
BM publishes photos of recently captured checkpoints: Saloum (Figure 69), Daragha (Figure 70), La’abeen (Figure 71), Syriatel (Figure 72, destroyed by explosive hose), and Binayat (Figure 73, damaged by explosive hose). BM also releases an infographic (Figure 74) showing 15 Syrian pro-regime deaths since April 4 and an updated infographic (Figure 75) on all regime losses since February 12. Rebels claim to have killed 103 Syrian regime fighters, nine Hezbollah fighters, and one Iranian as well as destroyed six tanks and six Shilkas.
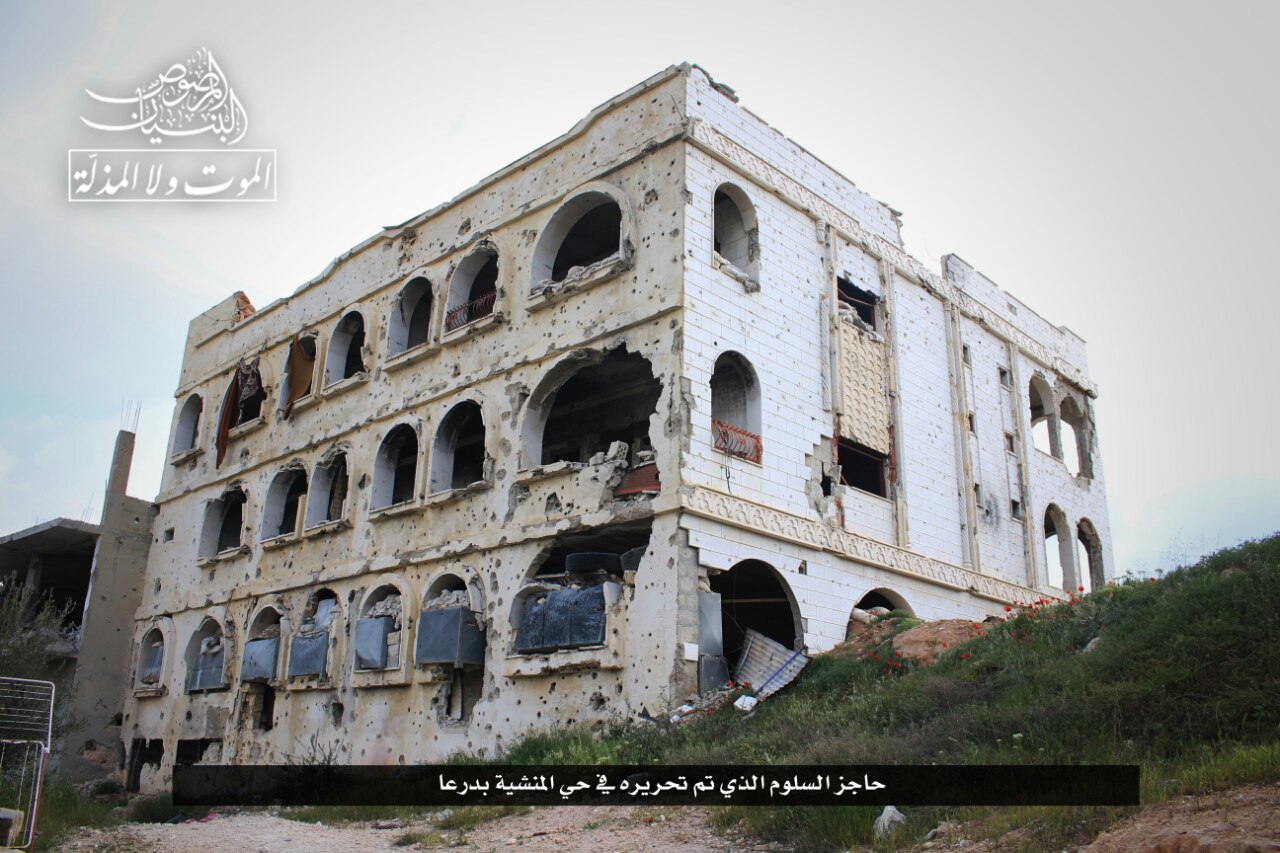
Figure 69
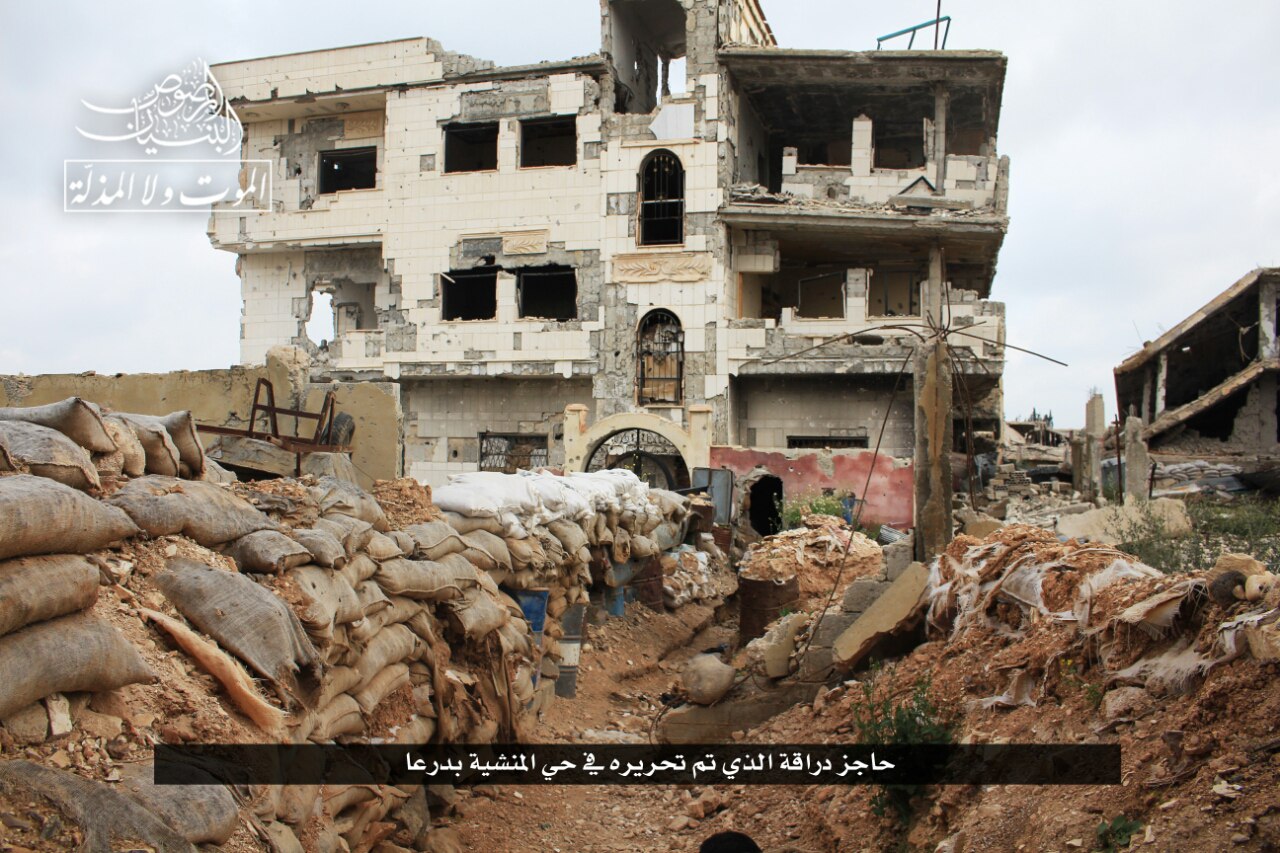
Figure 70
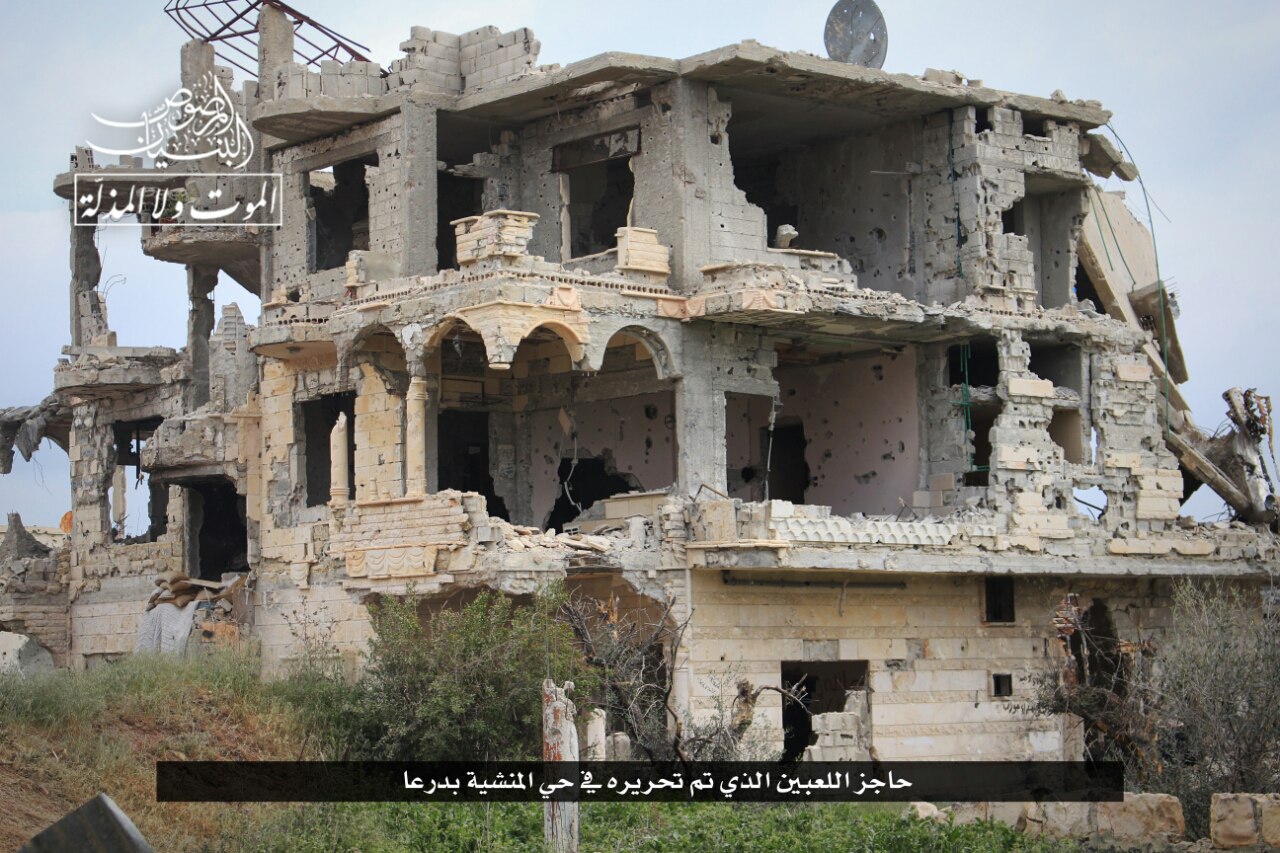
Figure 71
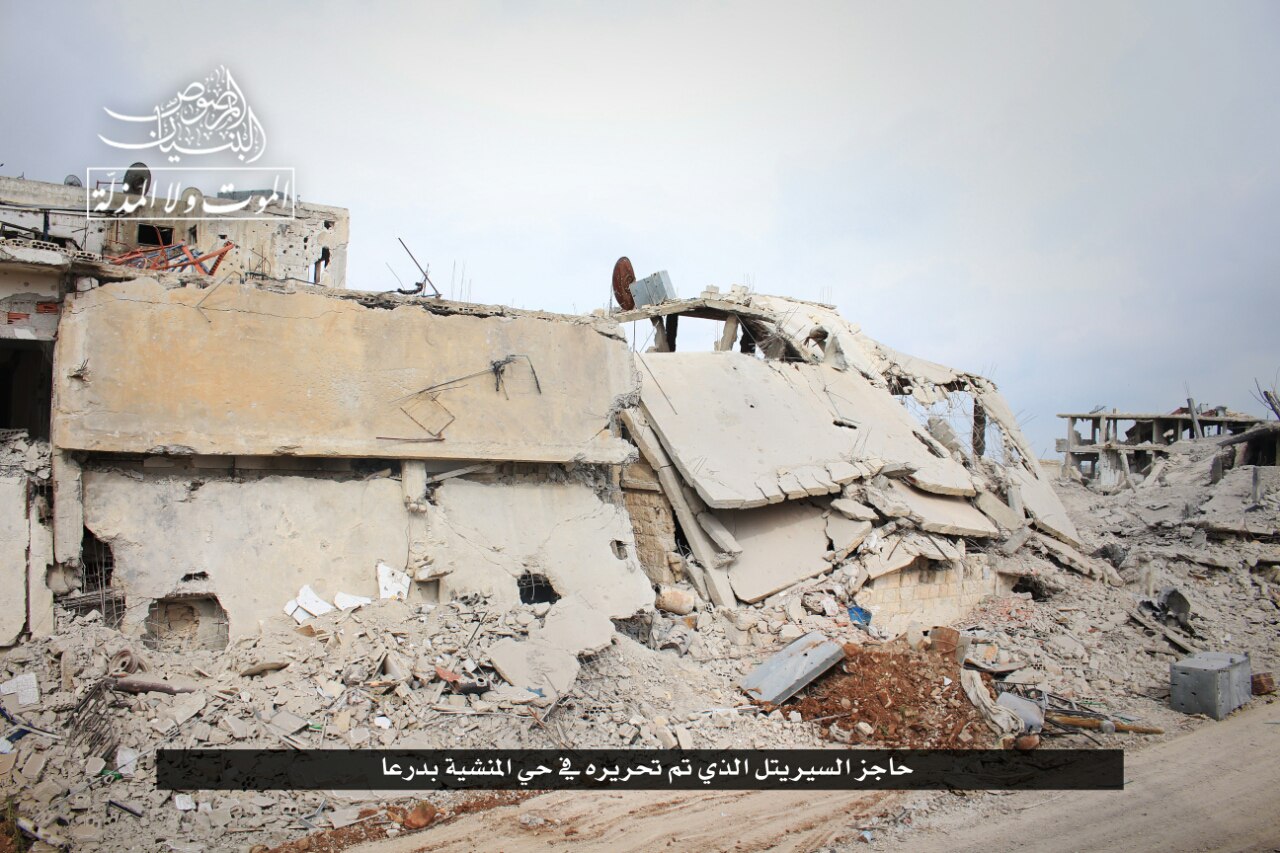
Figure 72
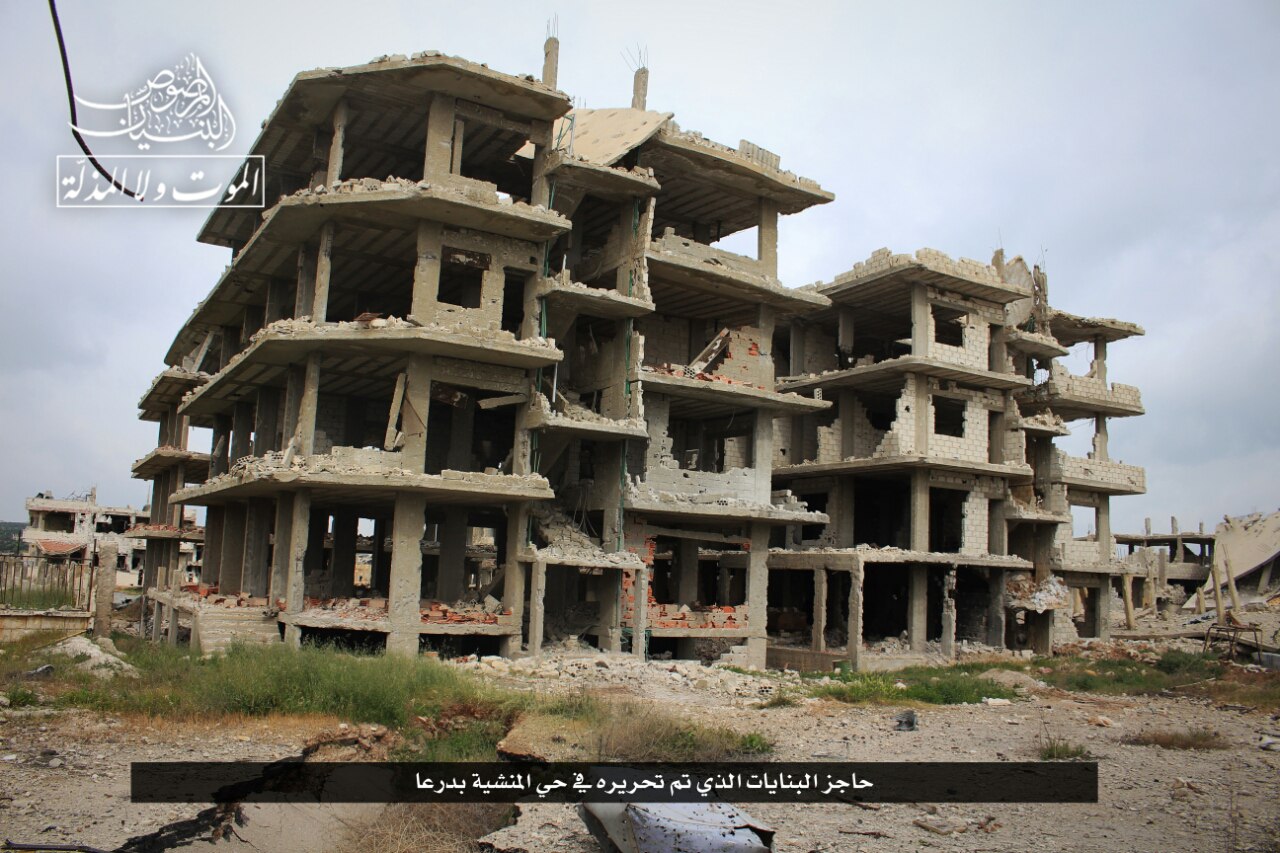
Figure 73
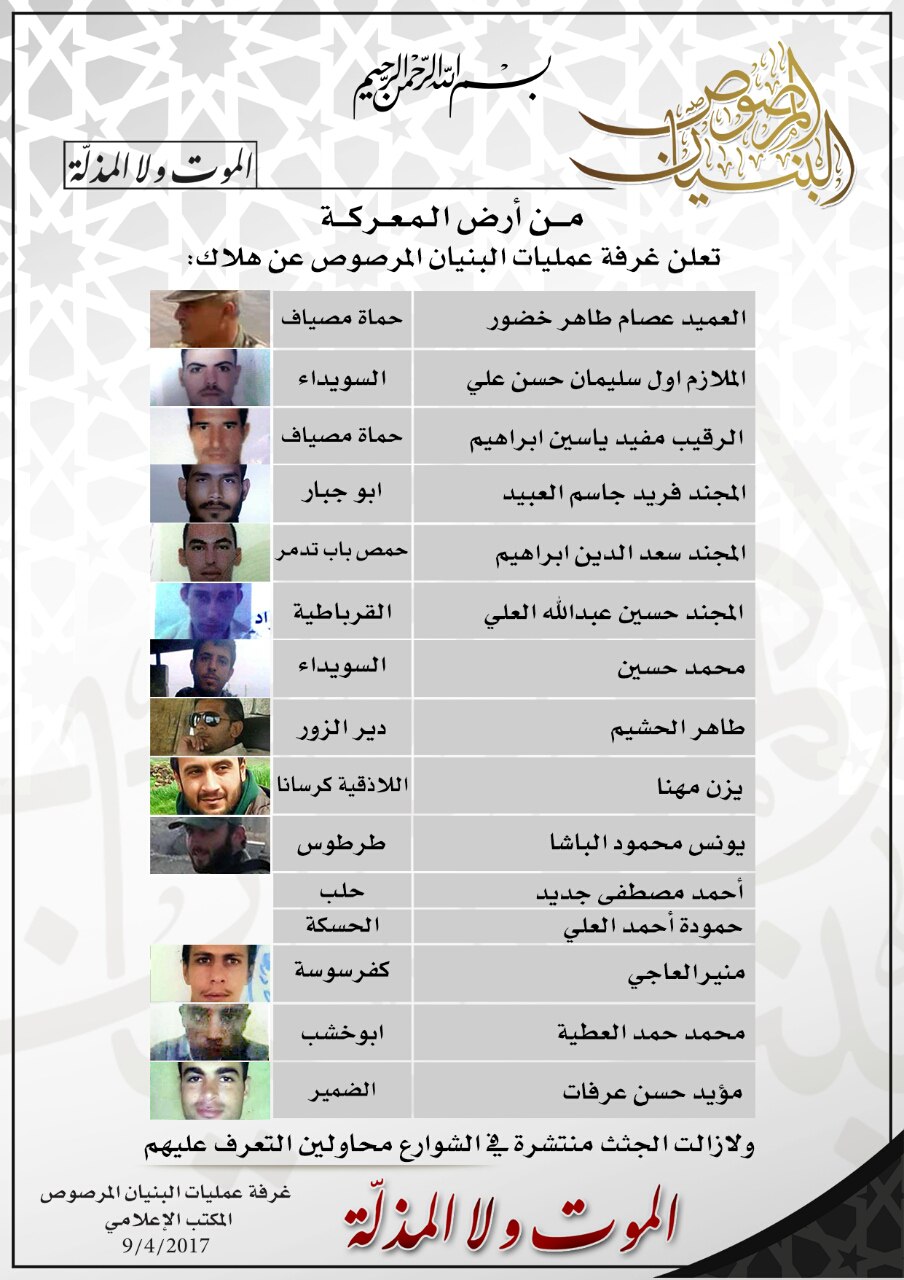
Figure 74
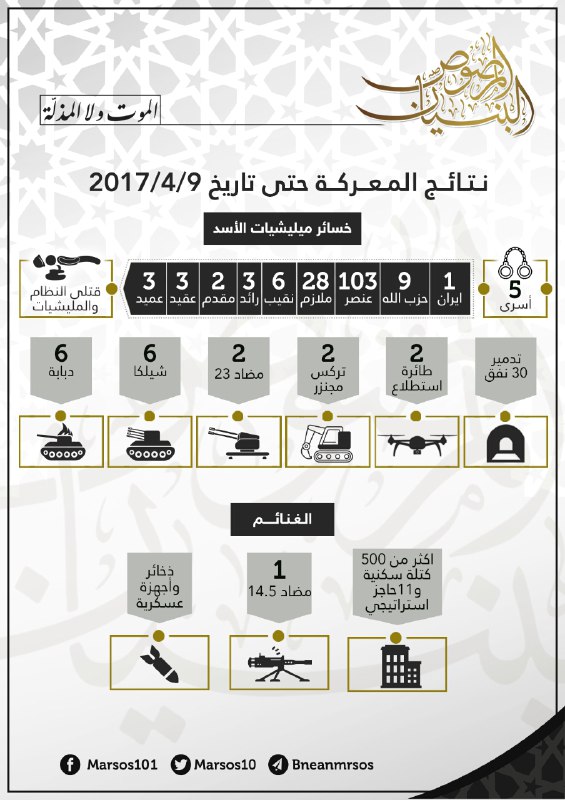
Figure 75
April 10, 2017
BM publishes photos of captured regime tunnels (Figures 76 and 77) and more regime losses (Figure 78).
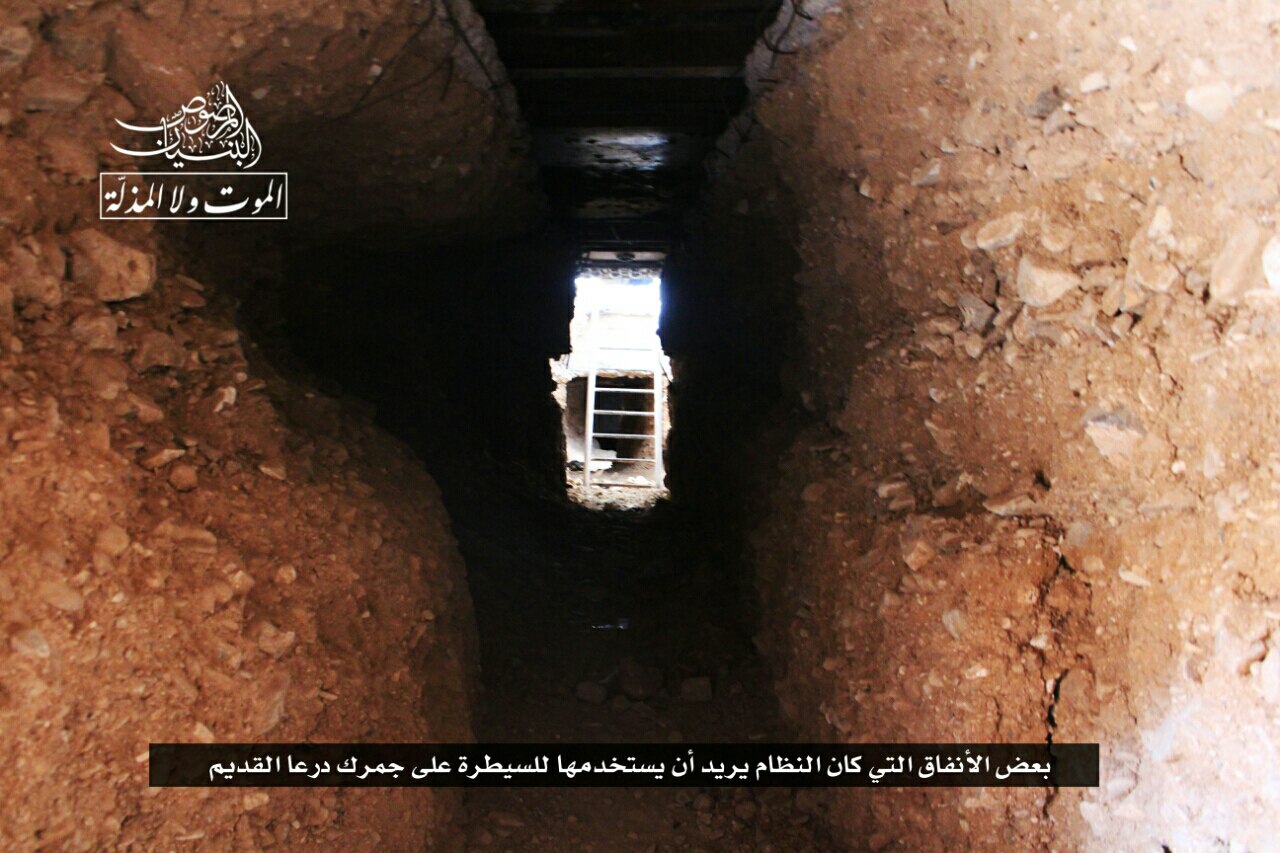
Figure 76
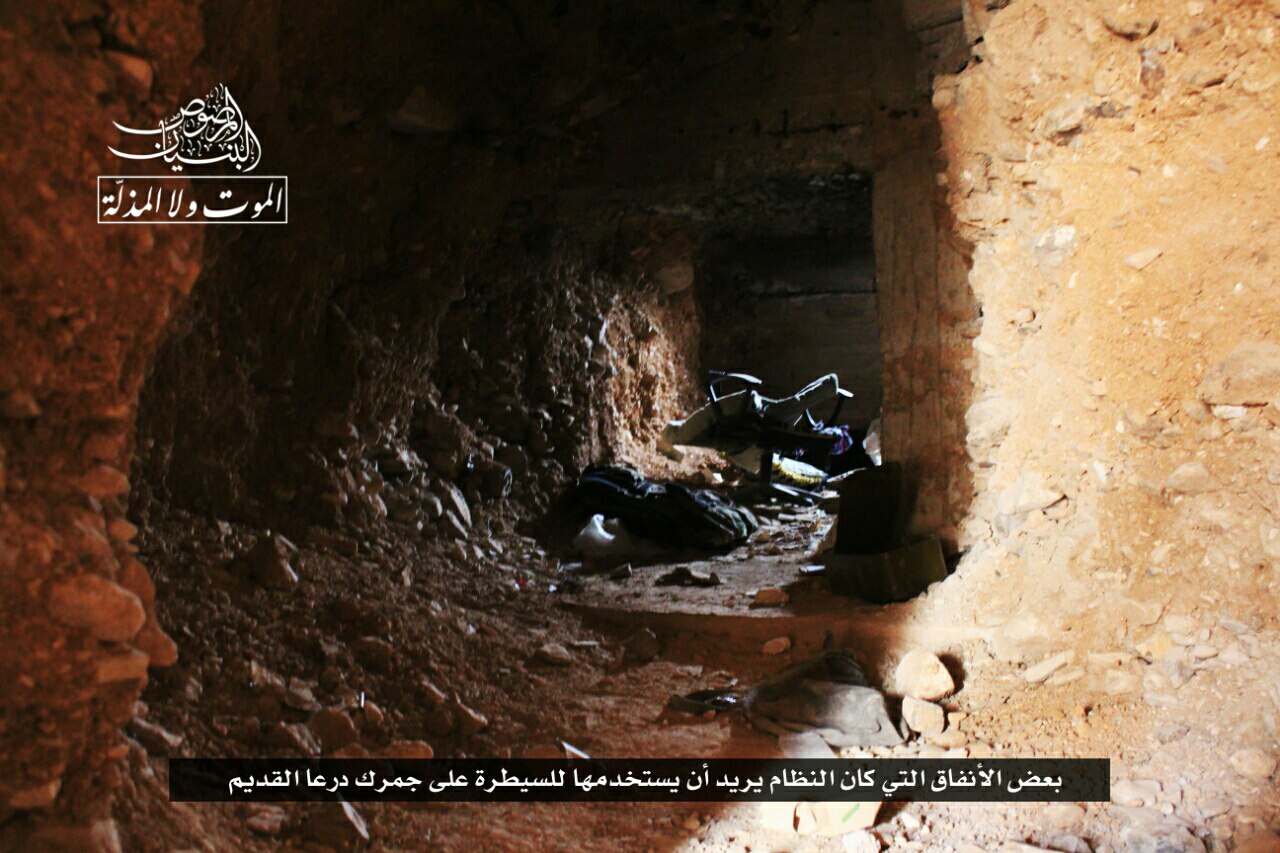
Figure 77
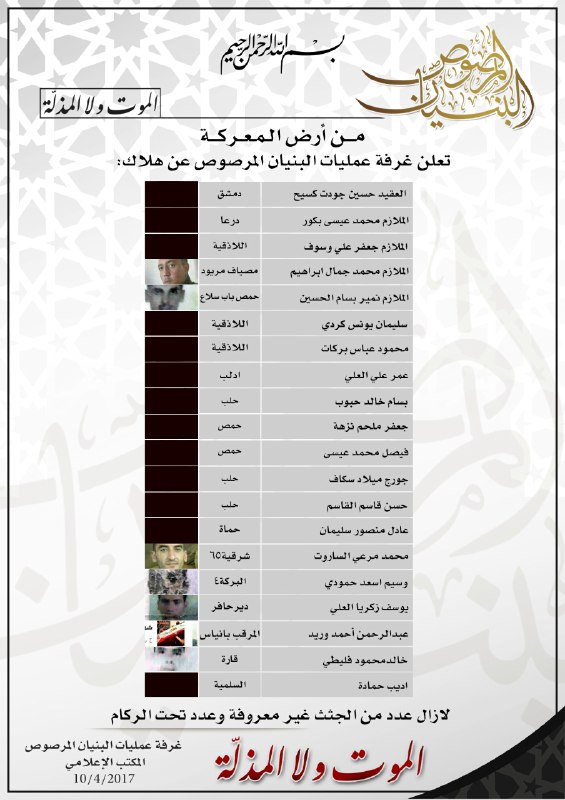
Figure 78
April 11, 2017
BM claims to capture the “15 Block” residential block and destroy a tank and kill three, including two Lieutenants (Figure 79).
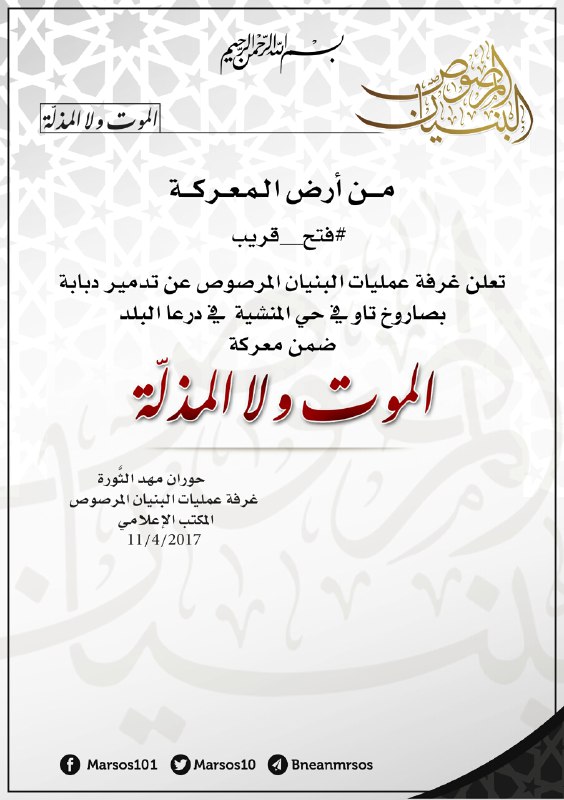
Figure 79
Pause
Attack
April 14, 2017
After a brief pause in fighting, BM launches an 11-day offensive and reports eight pro-regime deaths (Figure 80), including the three men killed on April 11 and the destruction of a 23mm cannon. After a fourth explosive attack – this time with an explosive hose (Figures 81 and 82) – the rebels finally capture the Mauwiya School Checkpoint (Figure 83). The last major regime defenses in Manshiyah collapse under this final assault, as rebels capture the ‘Aqba Bin Nafa’ Mosque (Figure 84) in northwestern Manshiyah (Figure 85) as well as two headquarters belonging to Colonel Firas and Colonel Talal.
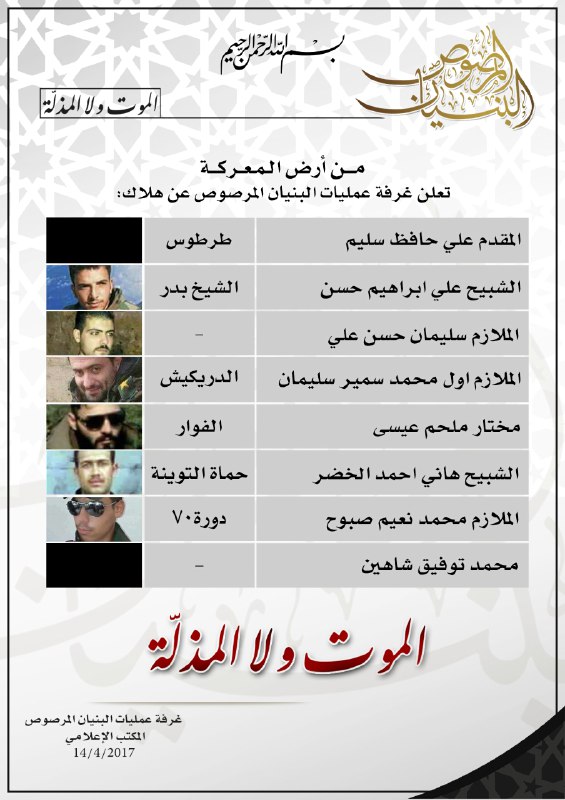
Figure 80
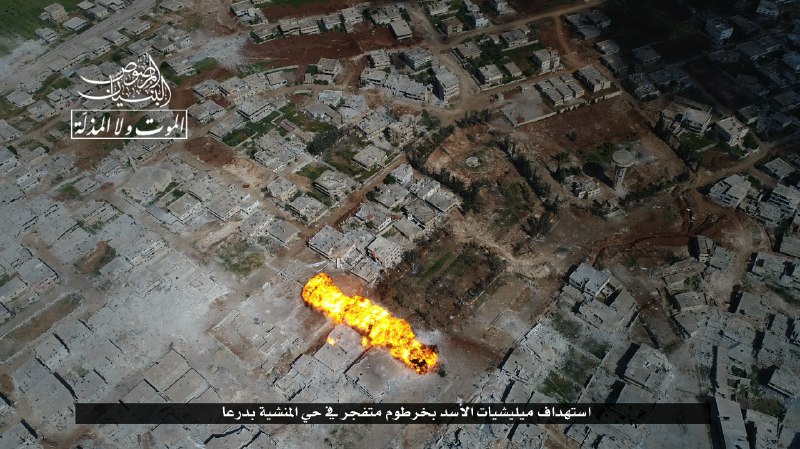
Figure 81
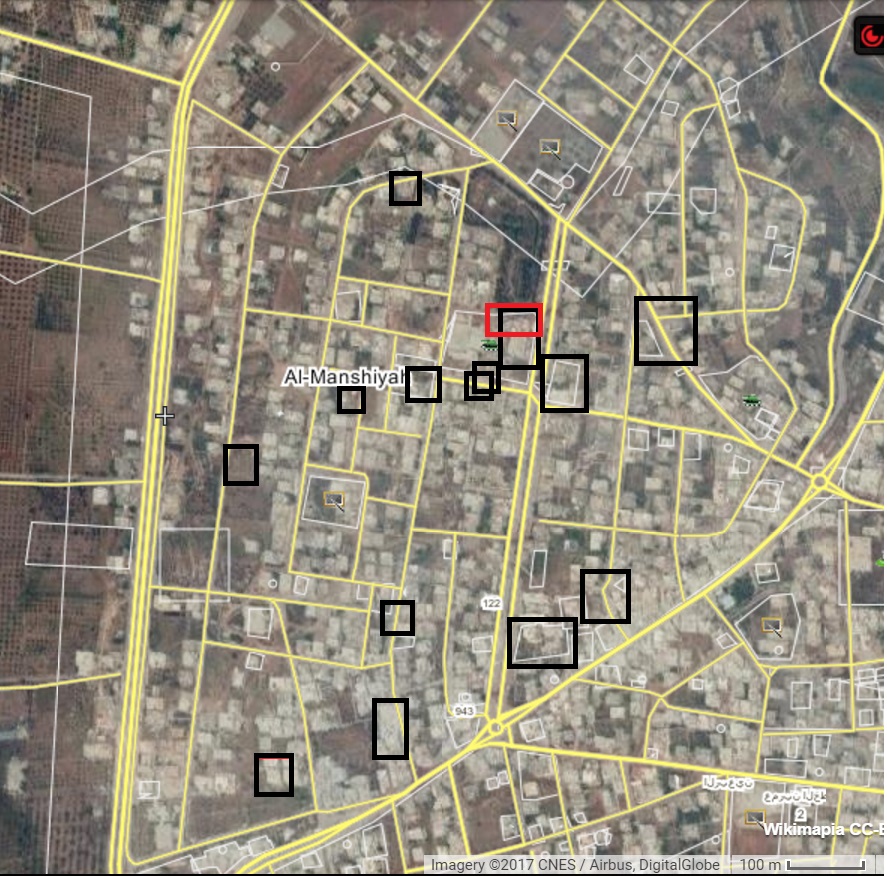
Figure 82
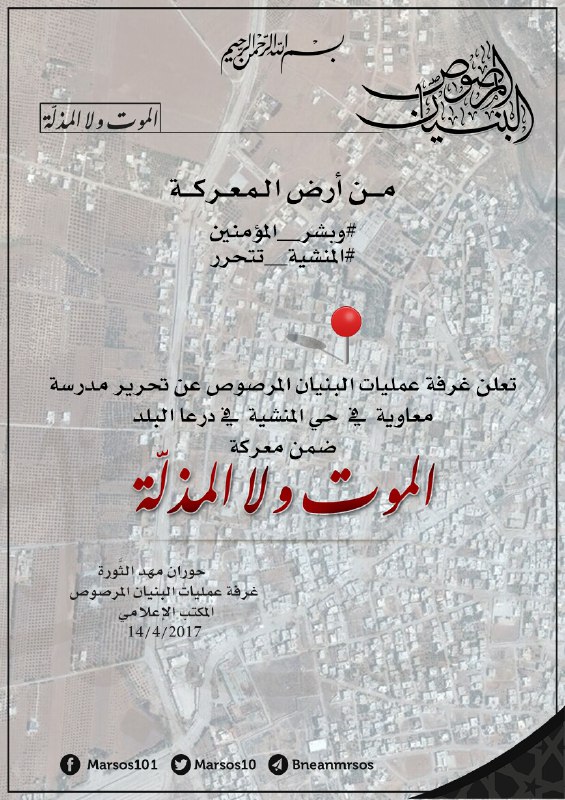
Figure 83
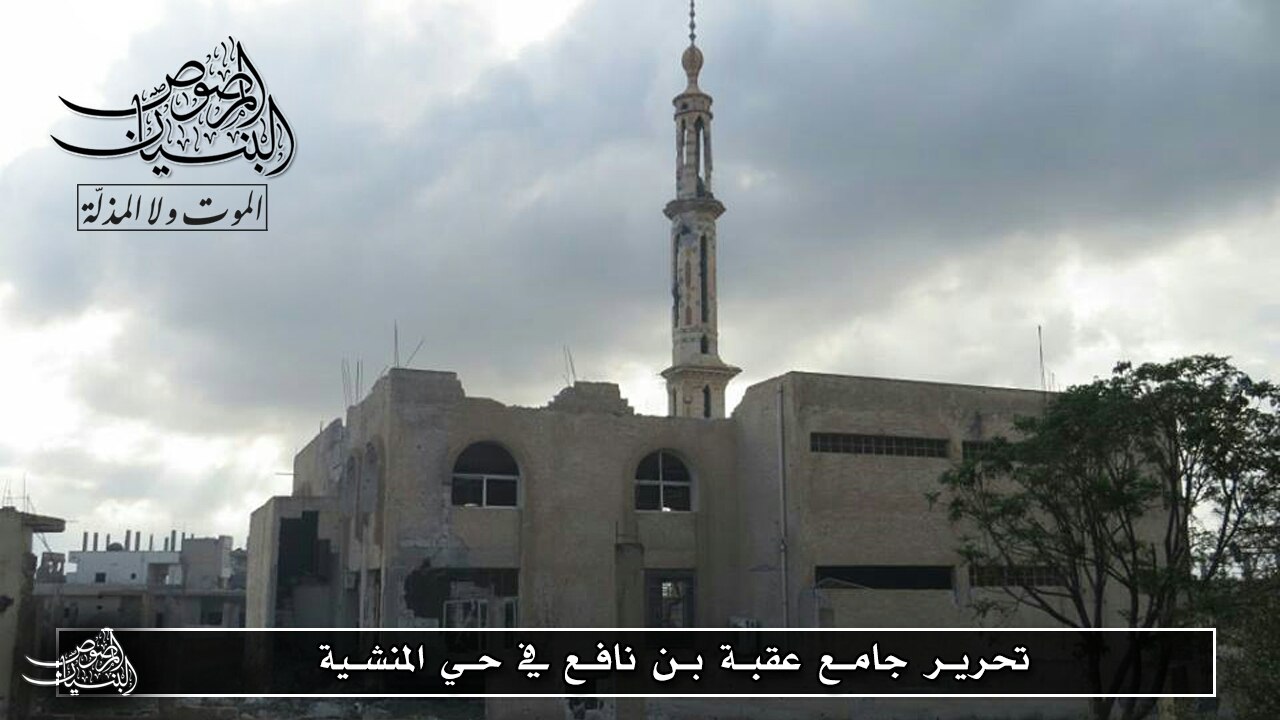
Figure 84
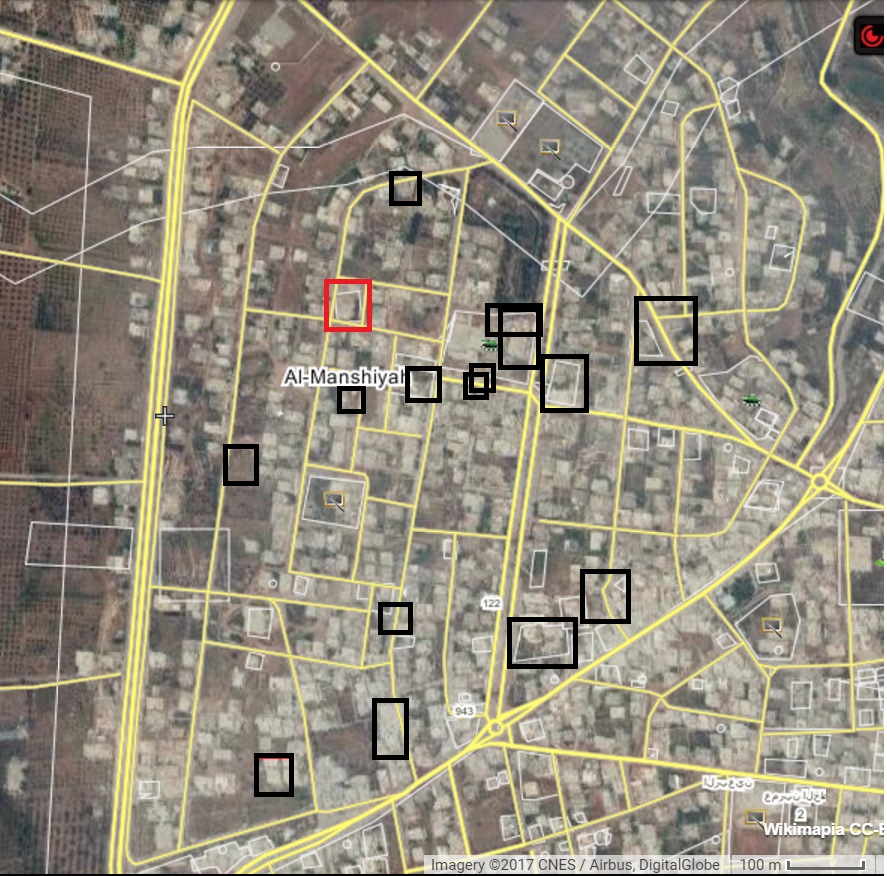
Figure 85
April 15, 2017
BM publishes a new map (Figure 86) showing near complete control over Manshiyah and reports nine more regime deaths on April 15 (Figure 87) and nine deaths on April 16 (Figure 88). Reported regime losses during the latest wave of attacks have increasingly come from coastal fighters, indicating the demographic shift that the regime garrison in the city has undergone since the start of the rebel offensive.
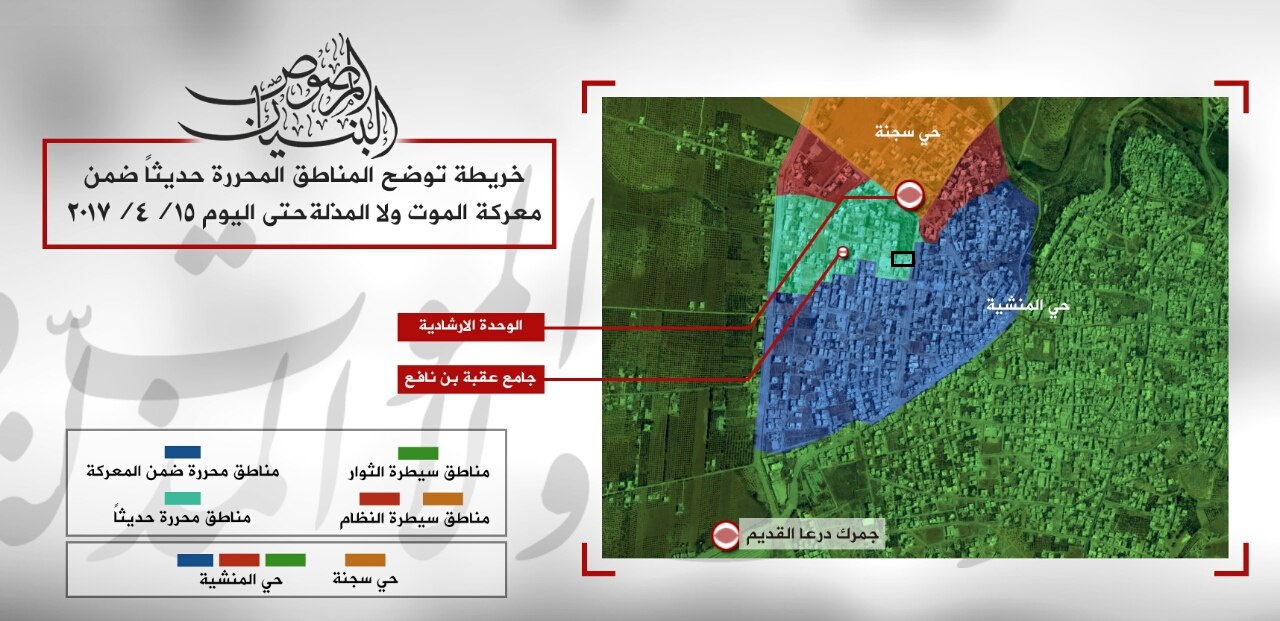
Figure 86: Blue = “Liberated during the battle” Green = “Revolutionary controlled” Light Blue = “Recently liberated” Red = “Regime controlled” Black Rectangle = Mauwiya Checkpoint
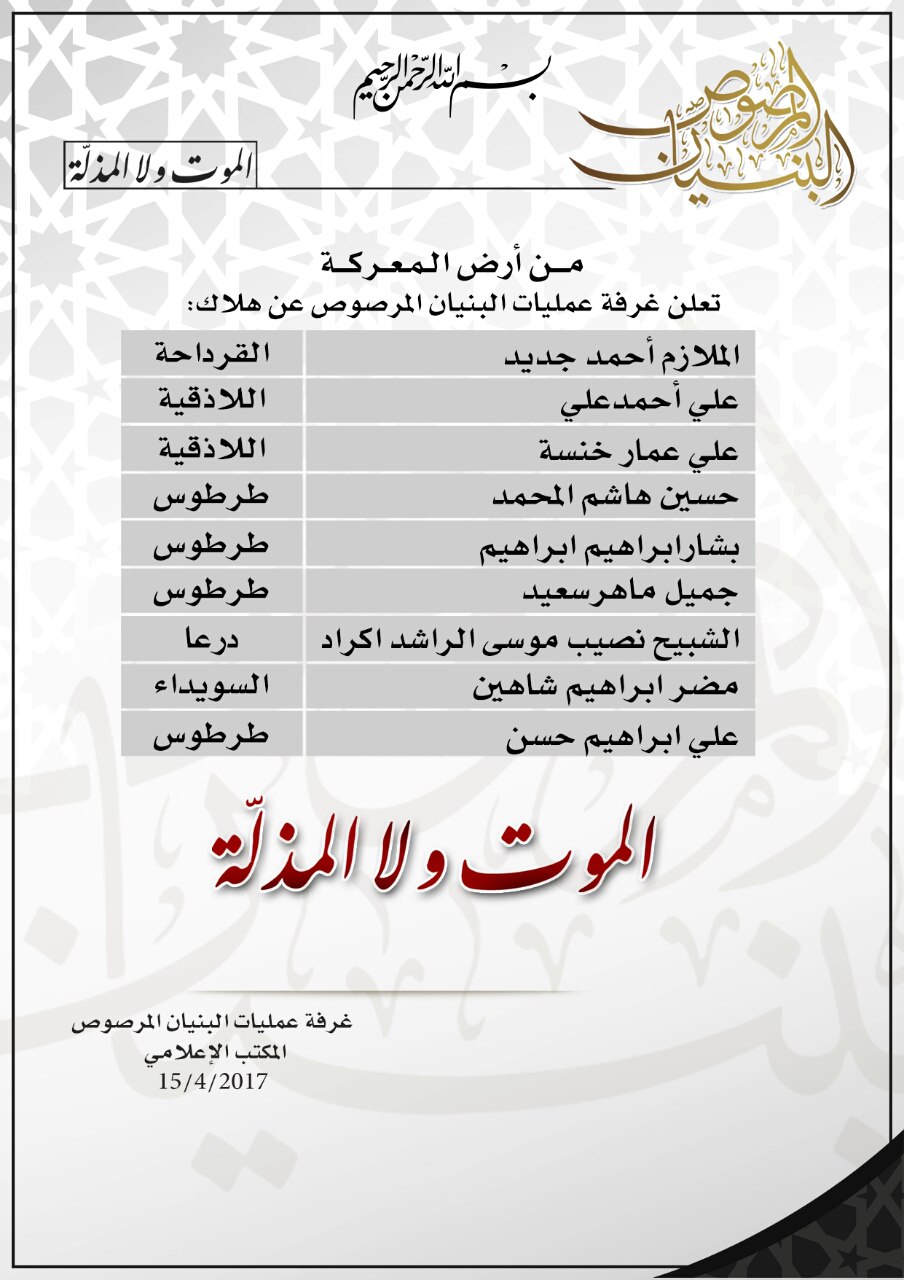
Figure 87
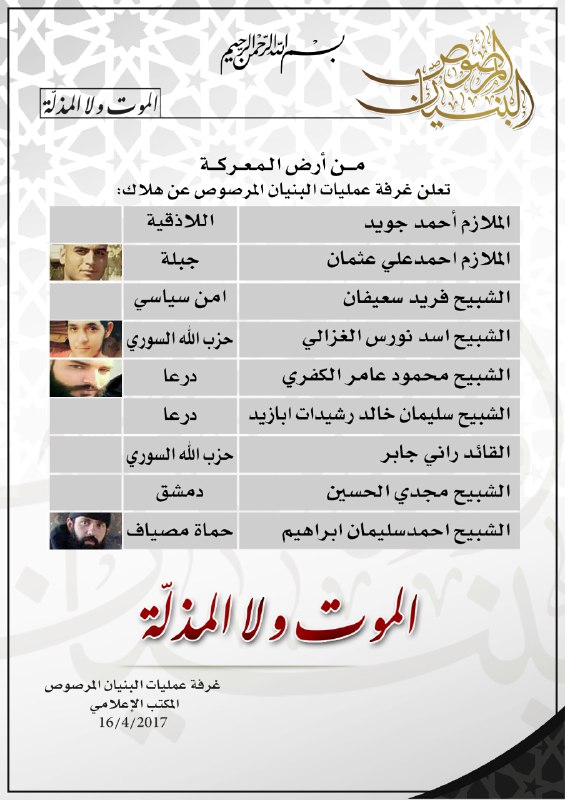
Figure 88
April 17, 2017
Rebels launch an Omar missile on a regime staging ground in the Sajnah District of Daraa (Figure 89). A picture of the aftermath appears to show several damaged vehicles (Figure 90).
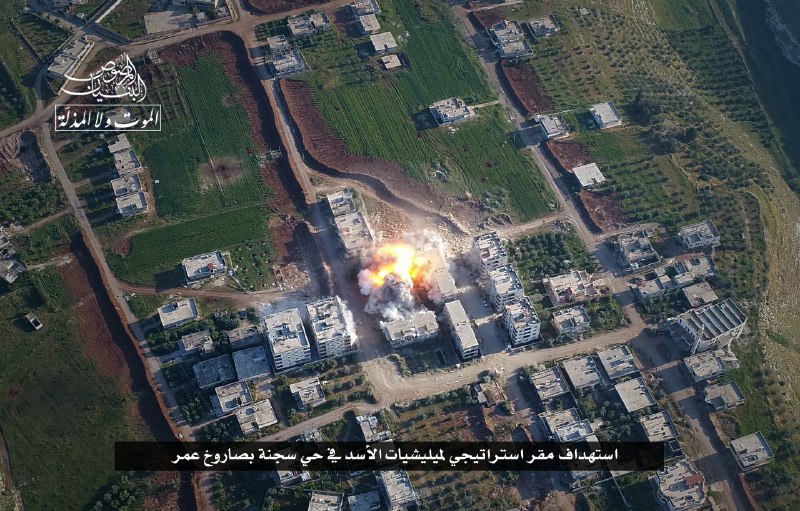
Figure 89
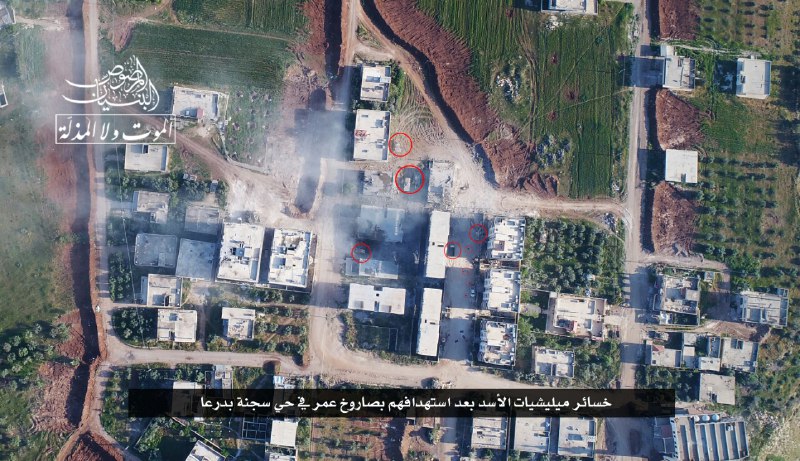
Figure 90
April 19, 2017
BM publishes a picture of an explosive hose attack on the Salkhadi Block (Figure 91), just east of the Engineering School along the border of Manshiyah and Sajnah (Figure 92), and claims to destroy a tank. The following day, rebels release pictures of the destroyed checkpoint (Figure 93) and a list of 11 killed regime fighters (Figure 94).
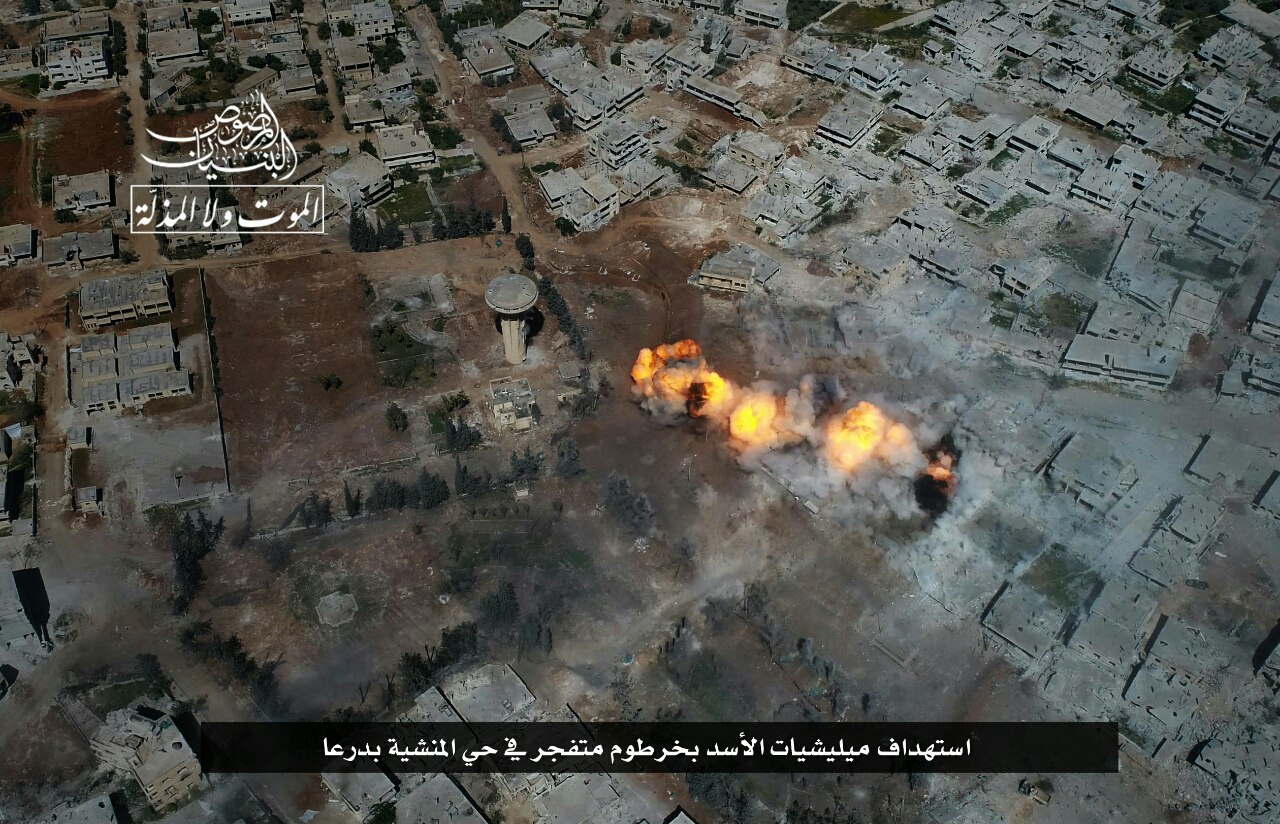
Figure 91
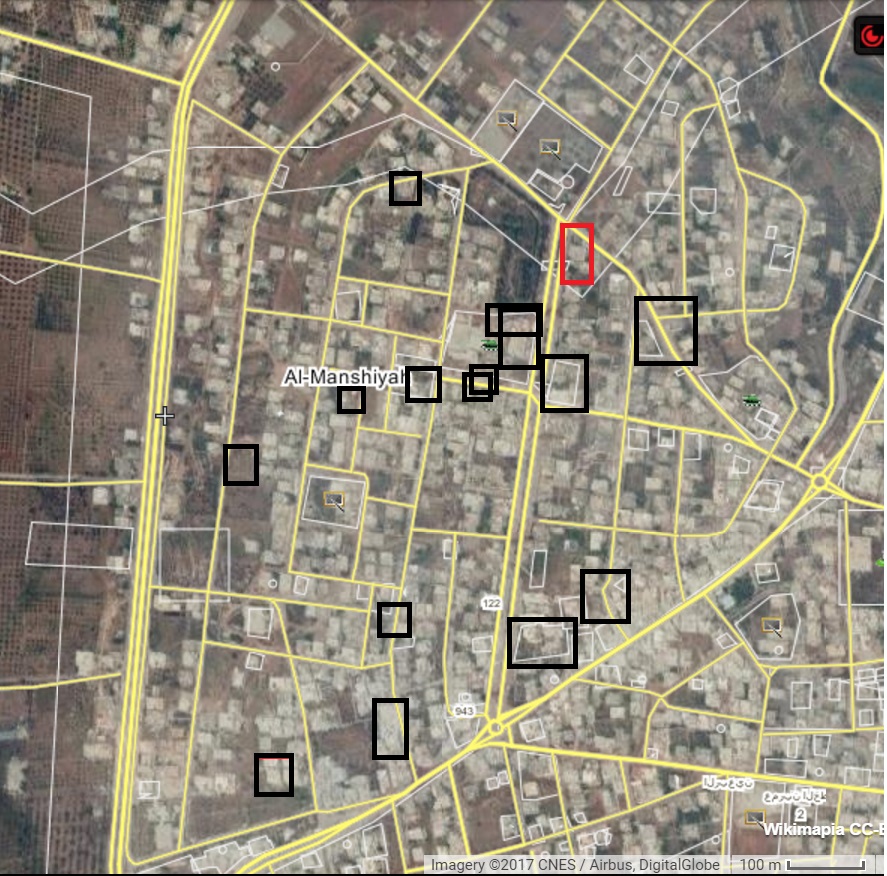
Figure 92
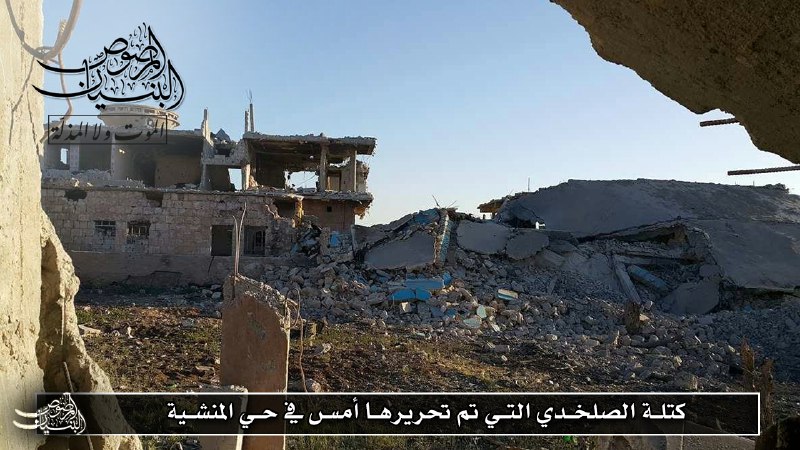
Figure 93

Figure 94
April 22, 2017
BM releases a new infographic detailing all regime losses since February 12 (Figure 95), claiming to have destroyed eight tanks, seven Shilkas, and killing 155 Syrian fighters.
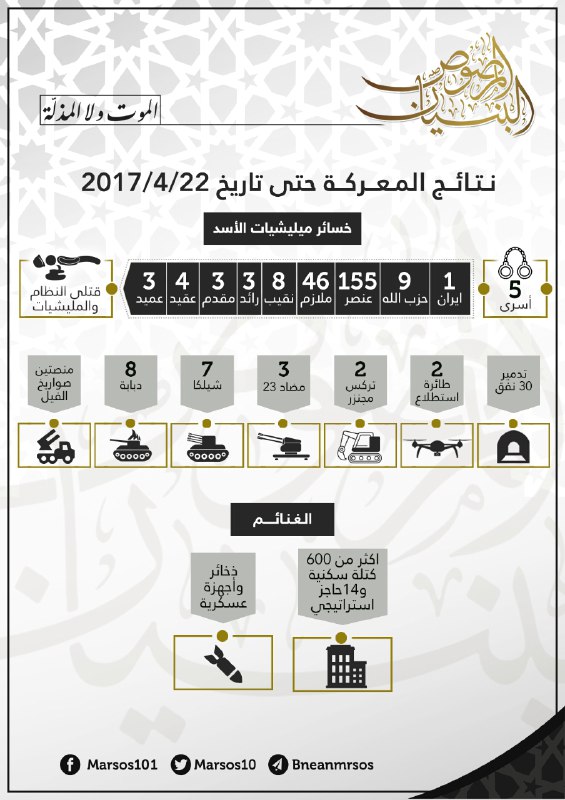
Figure 95
April 23, 2017
After advancing to the Salkhadi Block, rebel forces spend the ensuing days targeting regime positions in the north-east corner of the neighborhood with SPG-9s, at least one TOW, and another explosive hose. On April 23, BM publishes photos of a destroyed regime ATGM position (Figures 96 and 97).
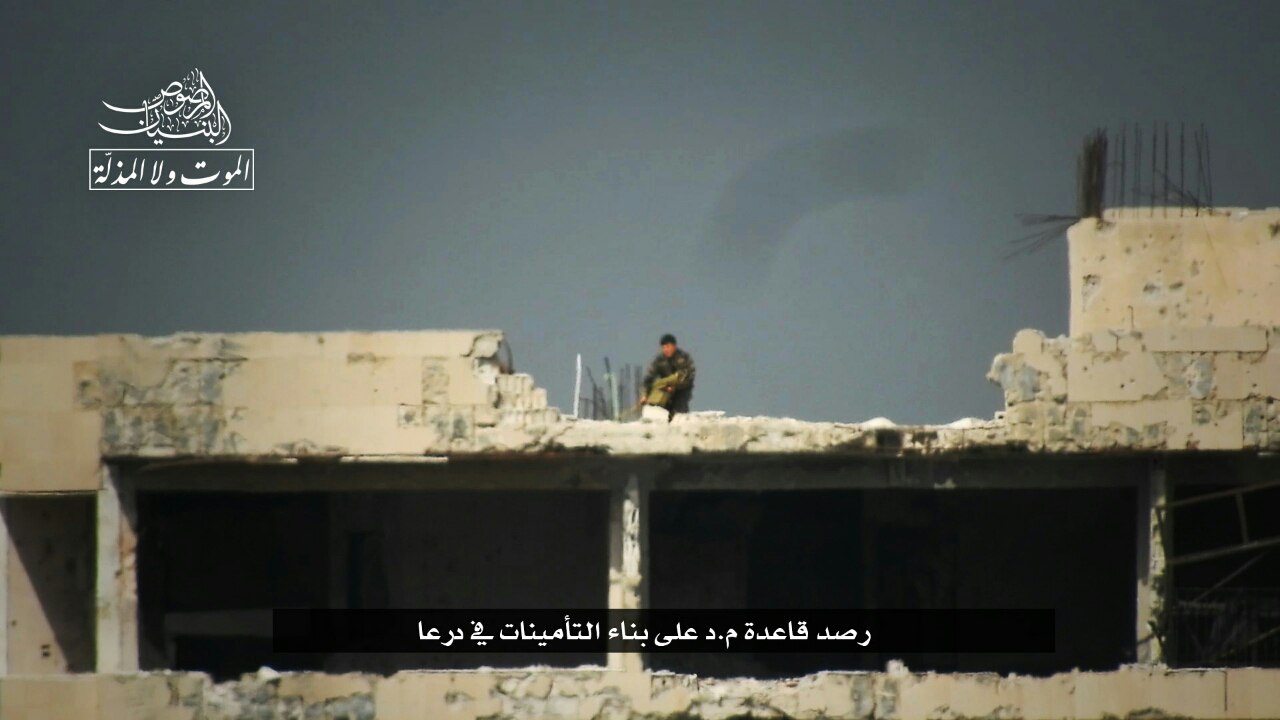
Figure 96
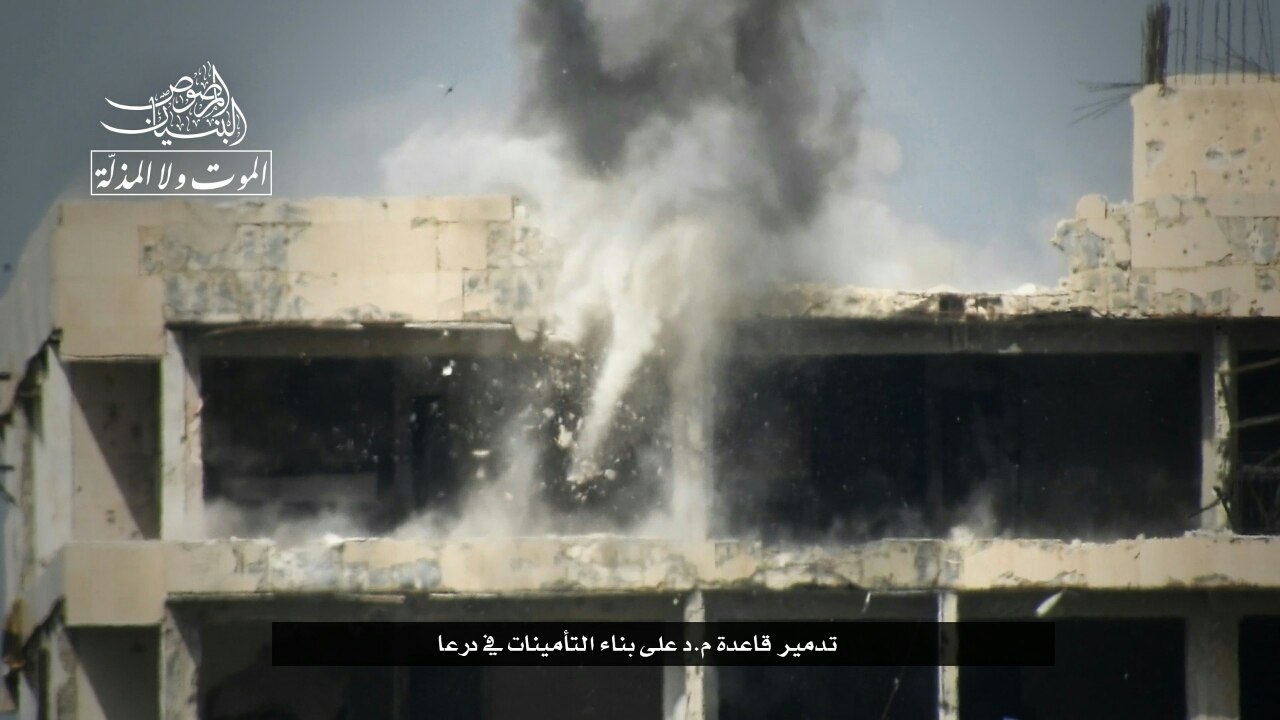
Figure 97
April 25, 2017
BM releases a statement and photo report on their activities since April 23, claiming to have detonated another explosive hose just north of the Salkhadi Block (Figures 98 and 99), destroyed a 23mm cannon with an SPG-9 (Figures 100 and 101), and destroyed a Shilka with a TOW (no pictures provided). The following day, BM releases the names of 28 killed regime fighters (Figures 102 and 103).
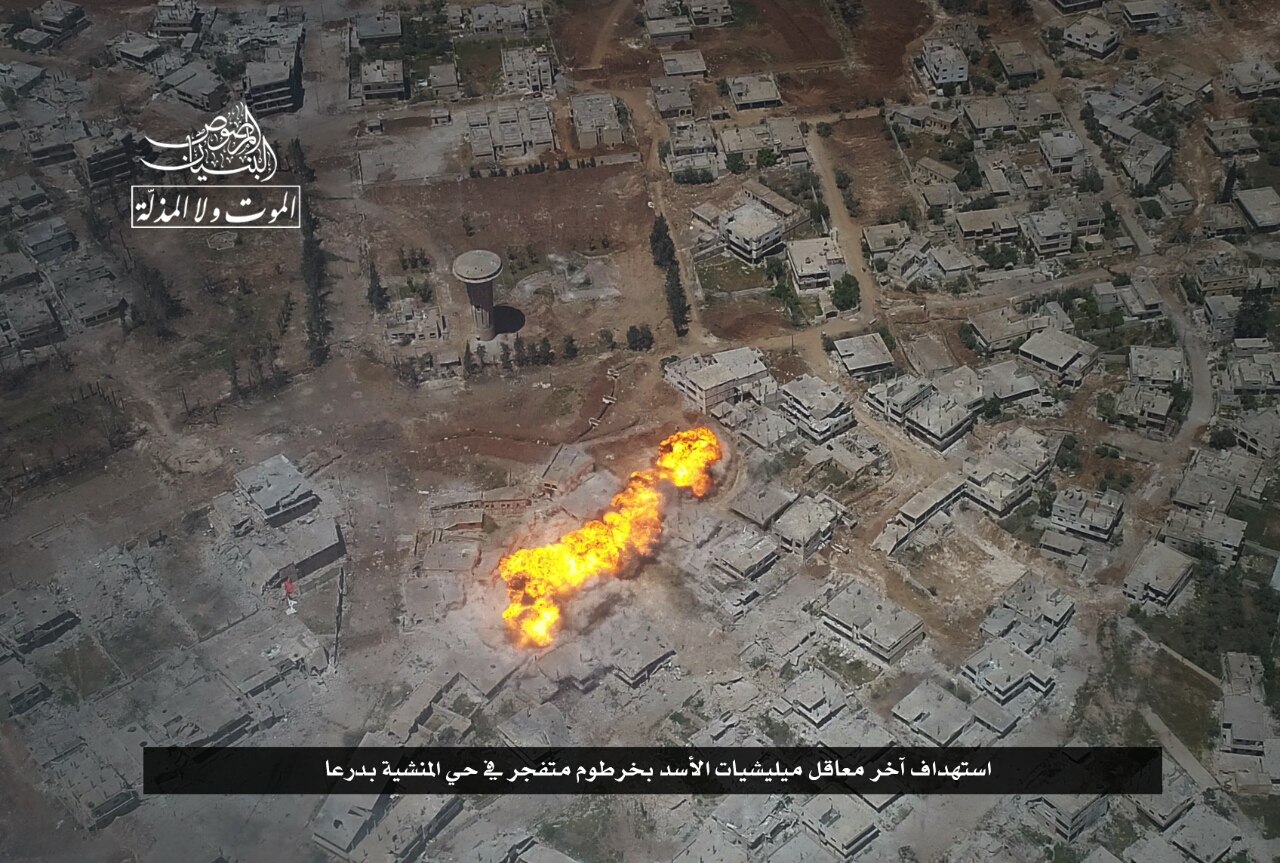
Figure 98

Figure 99
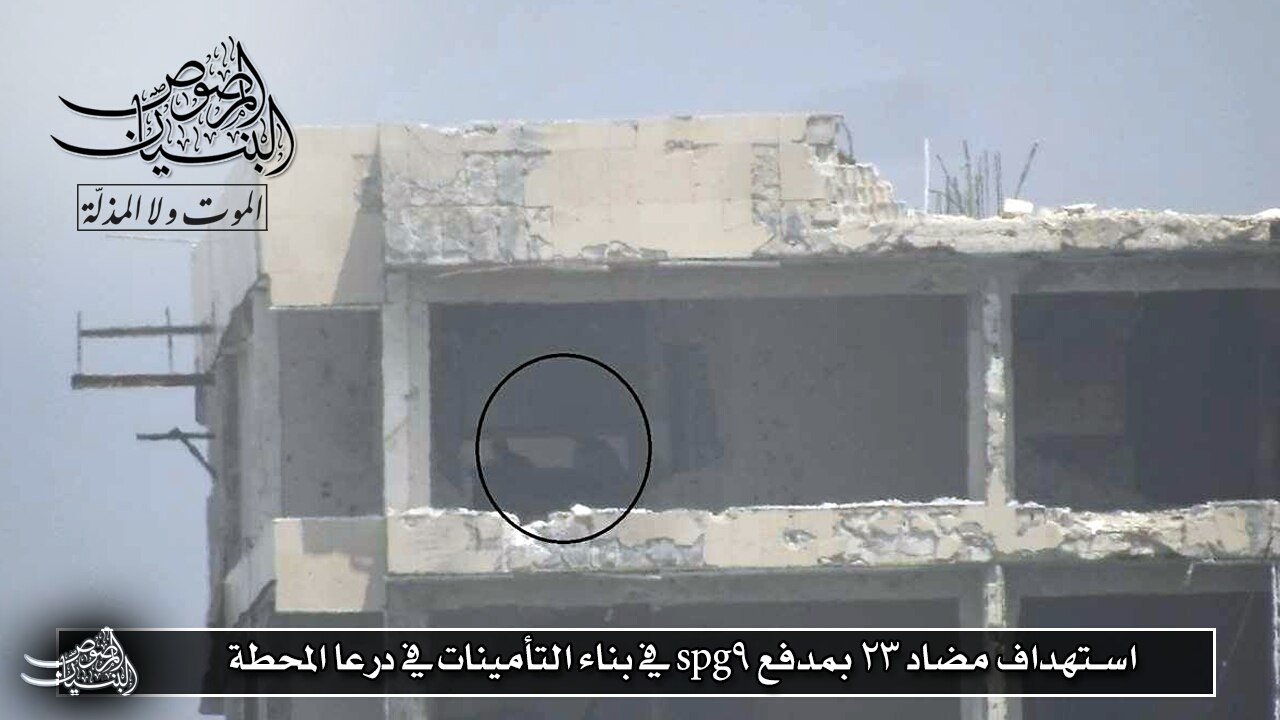
Figure 100
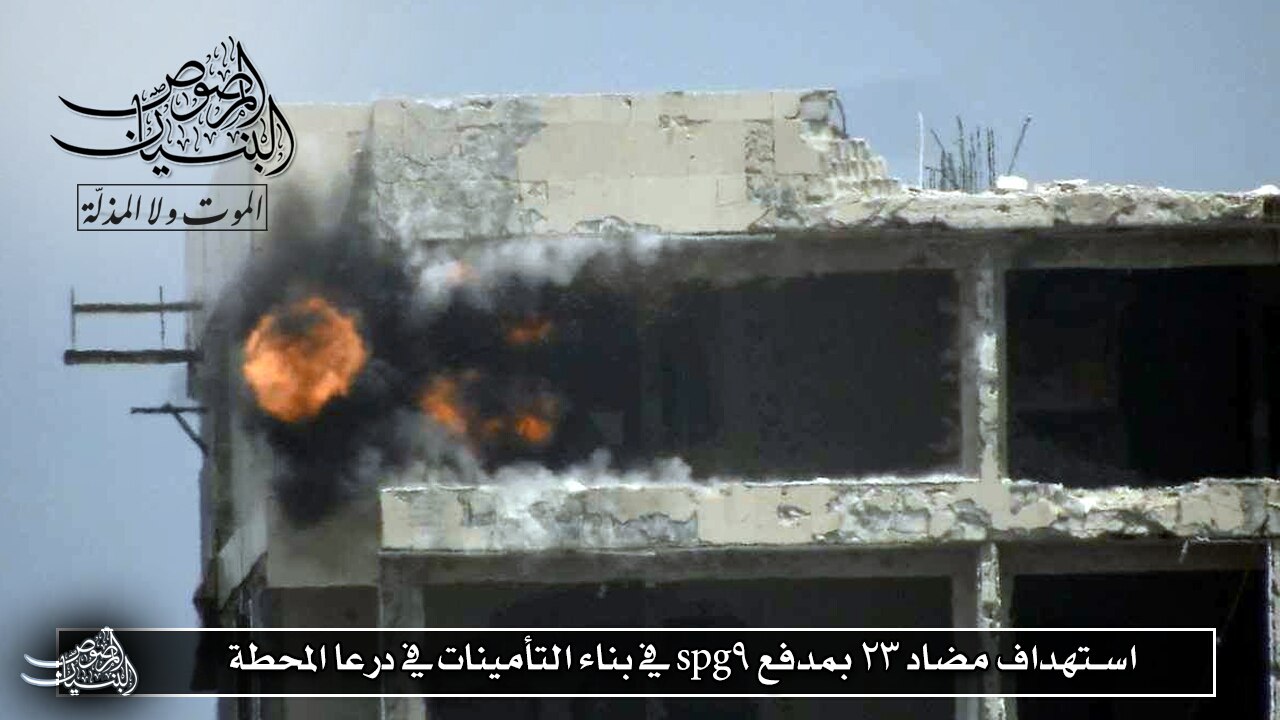
Figure 101

Figure 102
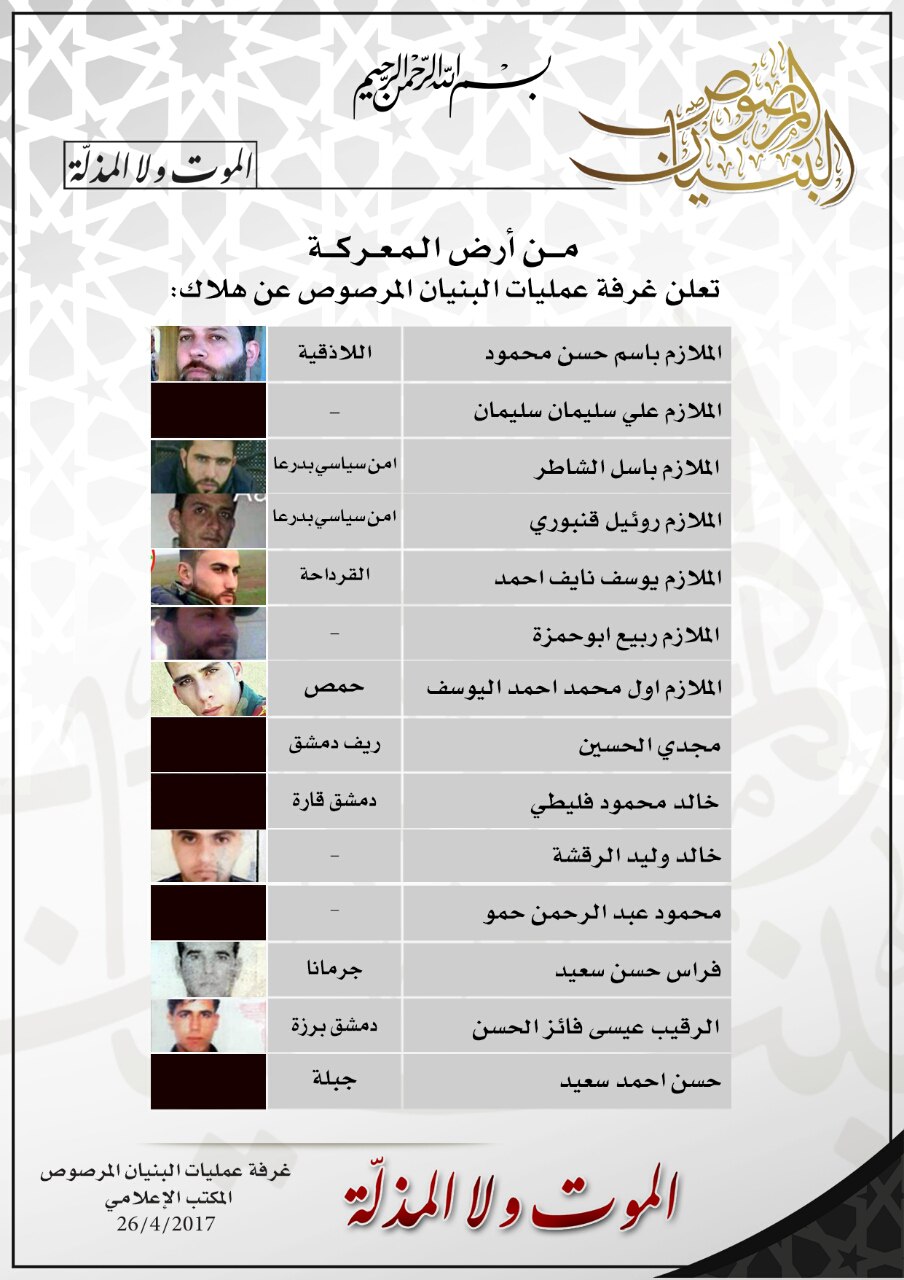
Figure 103
Pause
May 5, 2017
On May 5 a ceasefire, brokered by Russia, comes into effect in four regions of Syria, including Dara’a.
Counter-Attack
May 17, 2017
Twelve days after the southern de-escalation zone is established, fighting breaks out in Manshiyah. Pro-regime media reports a failed rebel offensive in which two HTS and one FSA Saif al Haq commanders are killed, “Bilal Abu Zaid and Abu Hashem al-Tabuki (a Saudi national) of HTS, as well as Moetaz al-Nabwani.” BM claims that the regime attempted to regain lost positions under the cover of heavy shelling, calling the attack “a major breach of the agreement to ease the escalation” in the city. The Carter Center claims that regime forces failed to advance in the district.
May 22, 2017
After five days of clashes, BM releases another statement and photo report claiming to have repelled an intense regime attack in north-east Manshiyah. BM publishes photos of a destroyed BVP-1 AMB-S (Figures 104 and 105), the destruction of a regime ammo depot (Figure 106), and a damaged tank (Figure 108 and 109), along with the names of 11 killed regime fighters (Figure 107). The vehicles and ammo depot were all destroyed in the Sajnah District, which by now has become the regime’s only staging area for attacks on Manshiyah. However, the main staging point in Sajnah is separated from Manshiyah by more than 500 meters of open roads, with a clear line of sight to rebel positions in the north-west corner of Dara’a al-Balad.
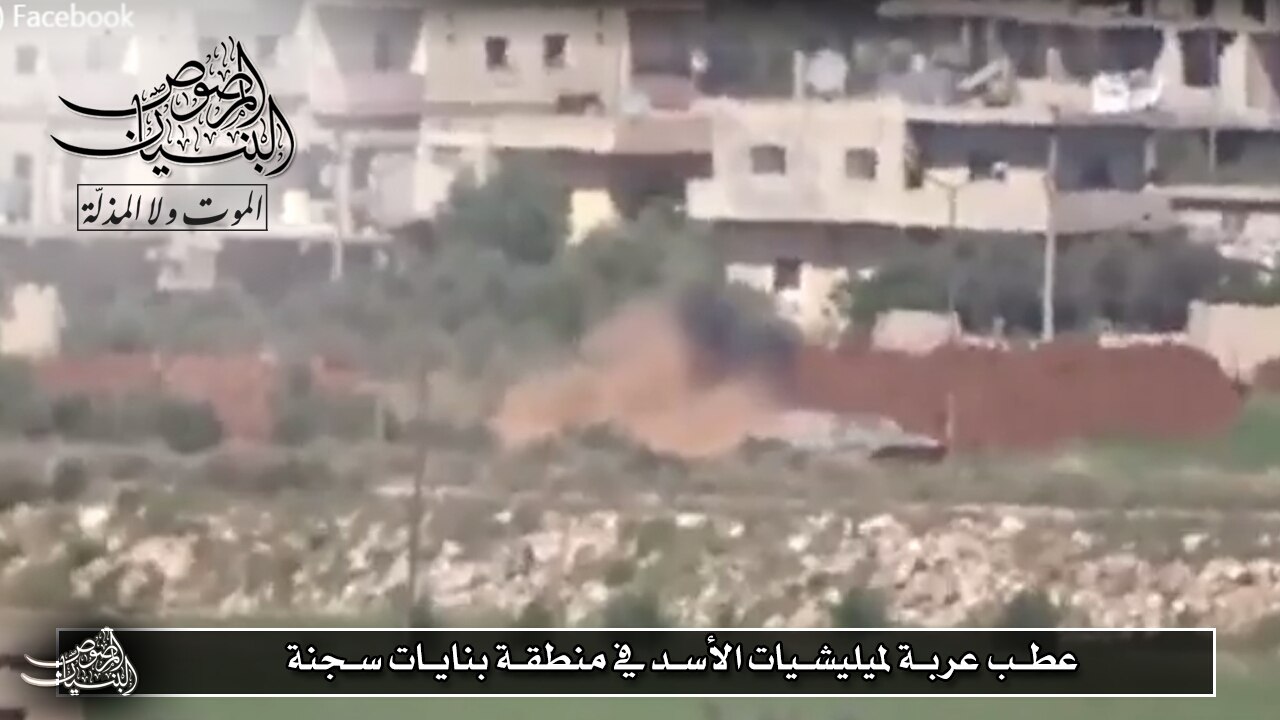
Figure 104
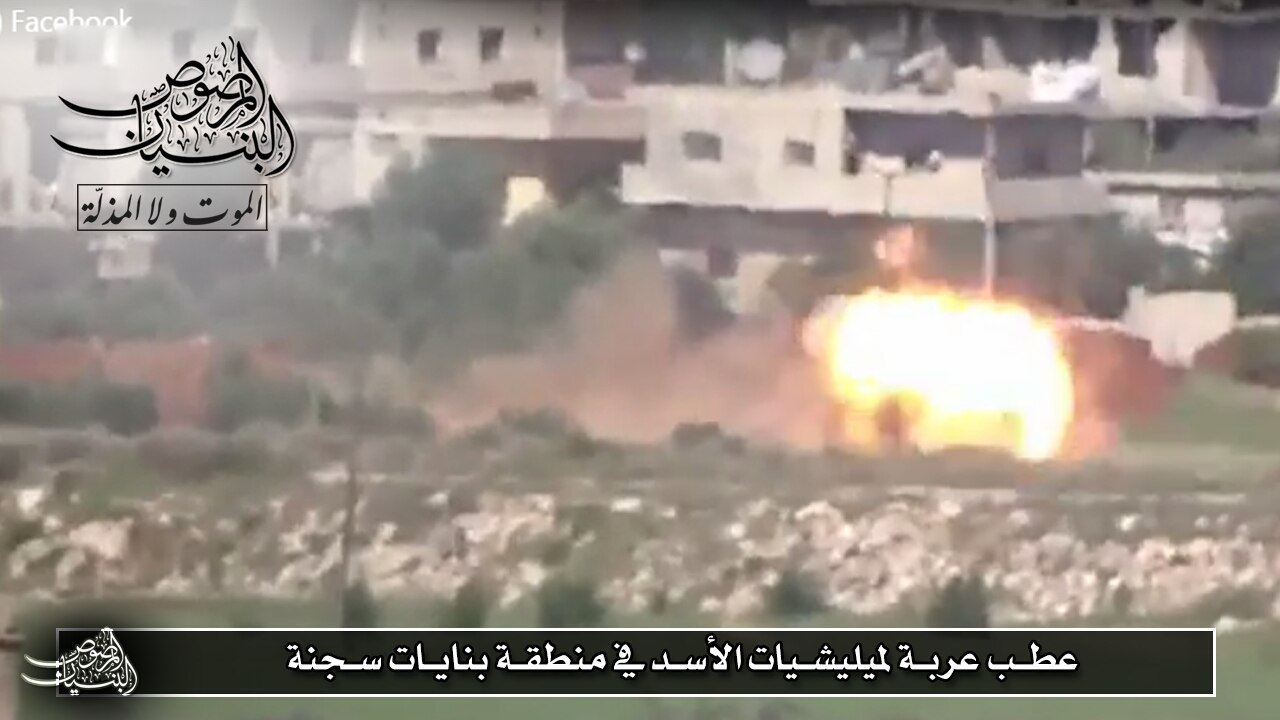
Figure 105
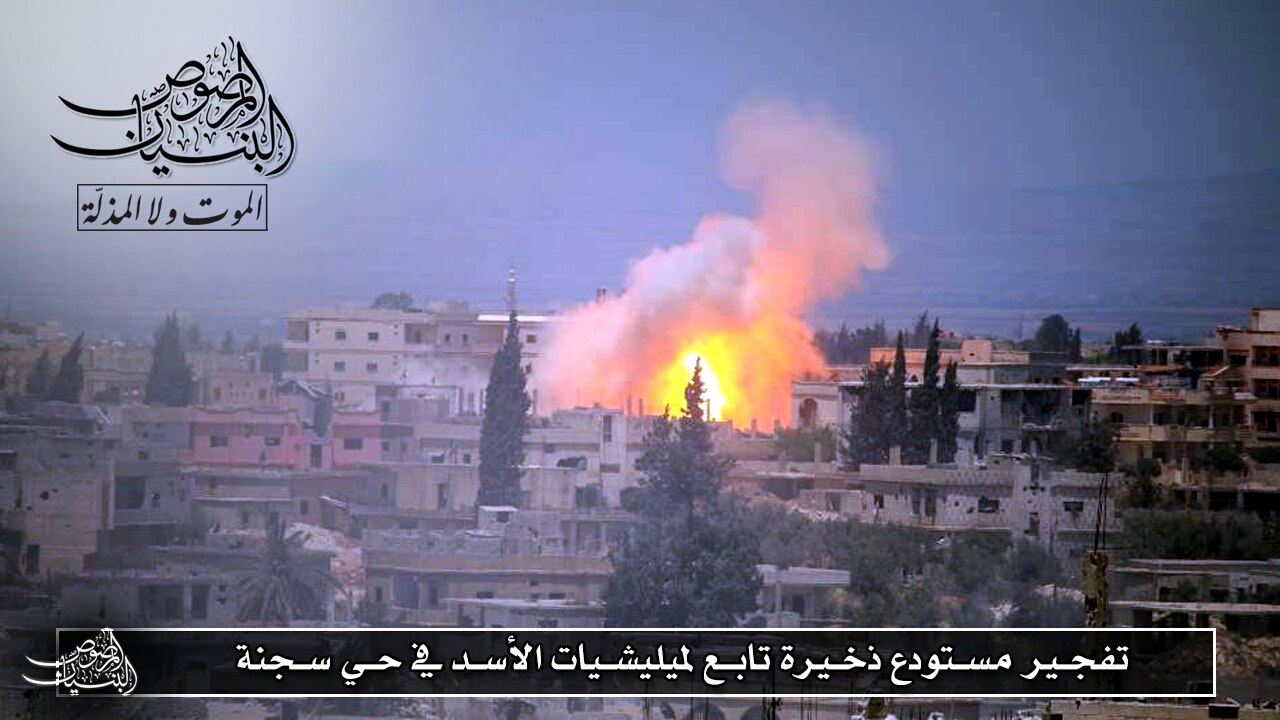
Figure 106
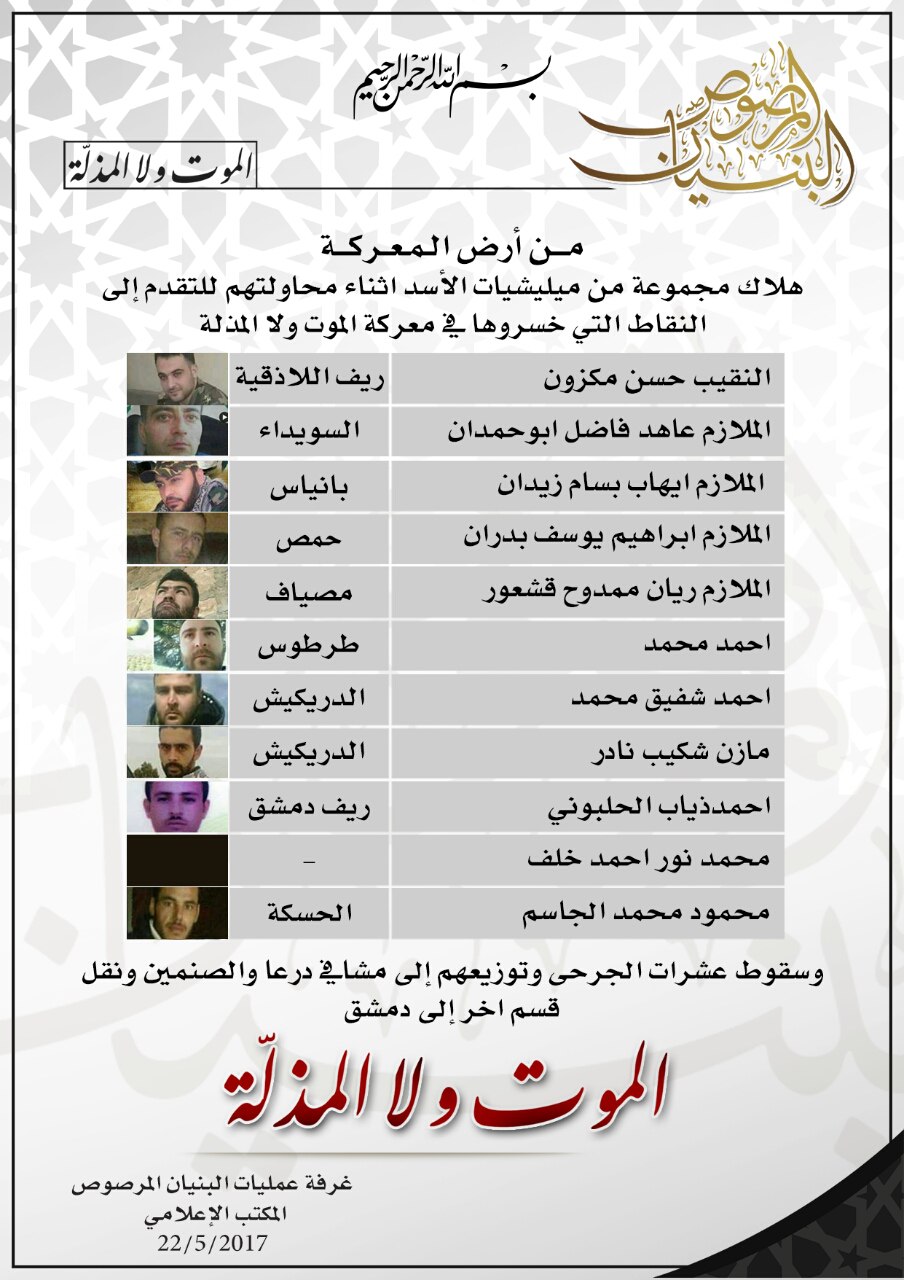
Figure 107
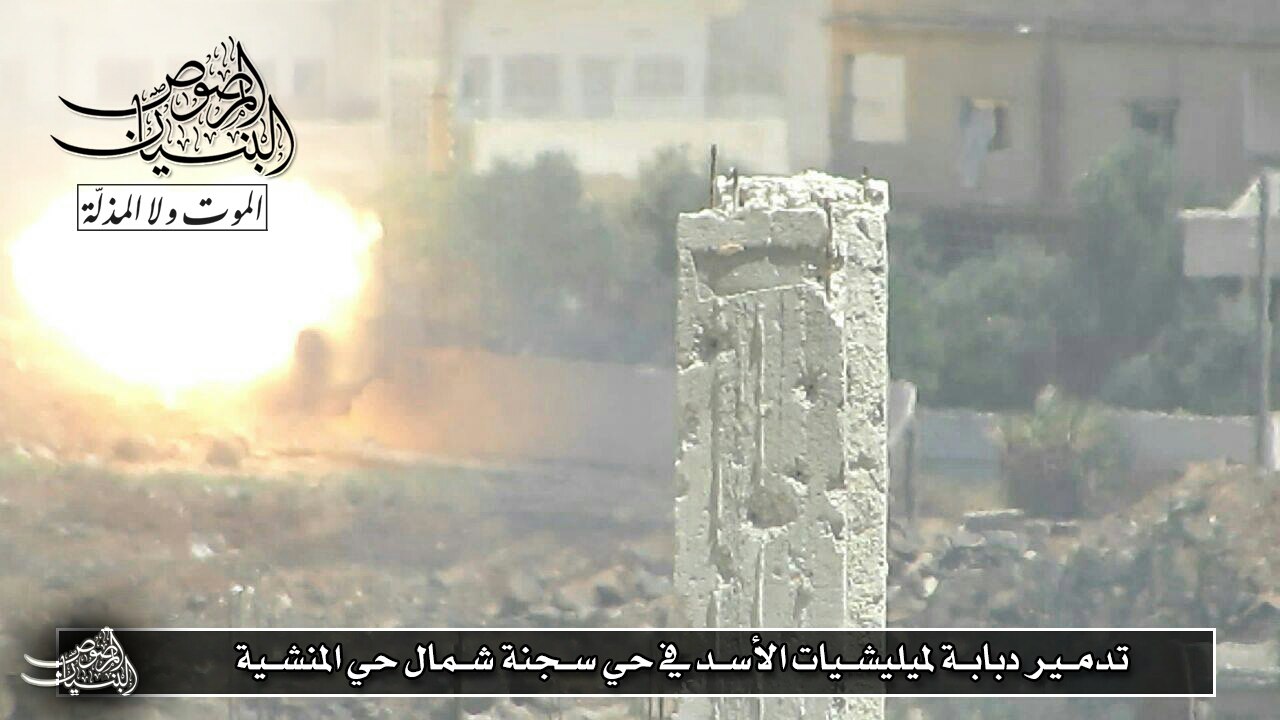
Figure 108
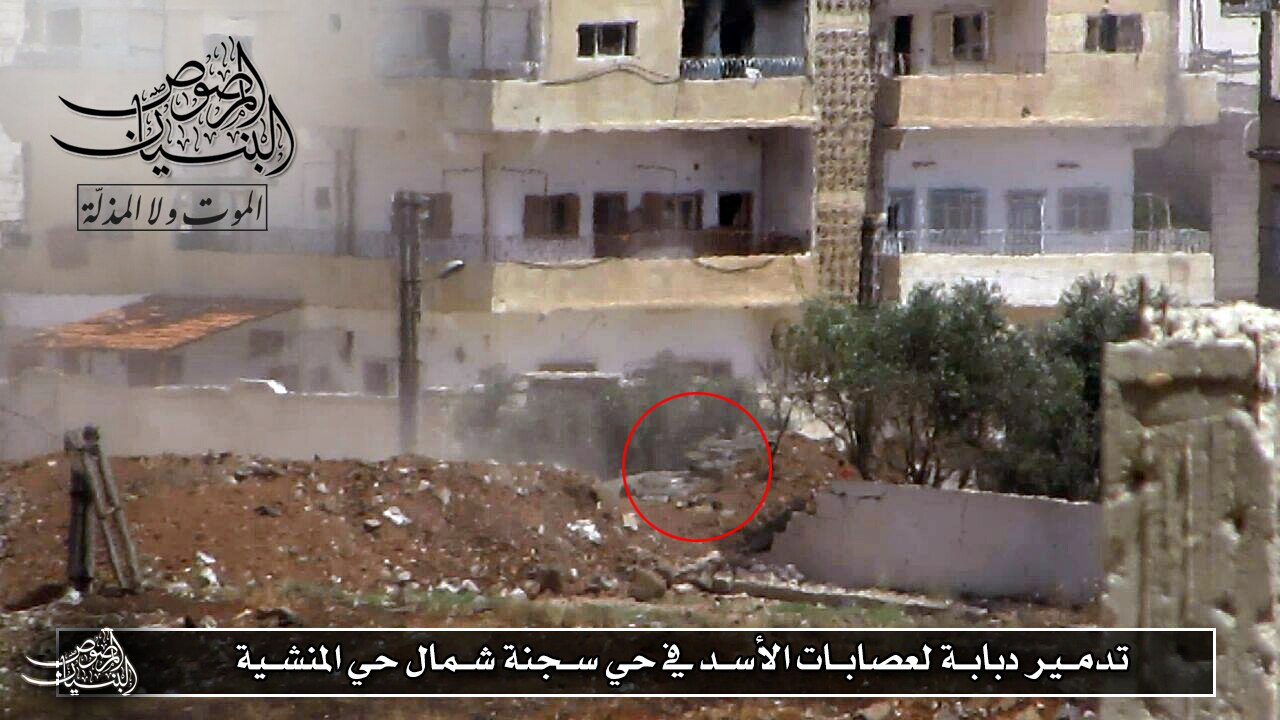
Figure 109
May 24, 2017
BM releases its final map (Figure 110) showing the newly captured north-east corner of Manshiyah and only a small regime pocket in an open area in the north-west of the neighborhood.
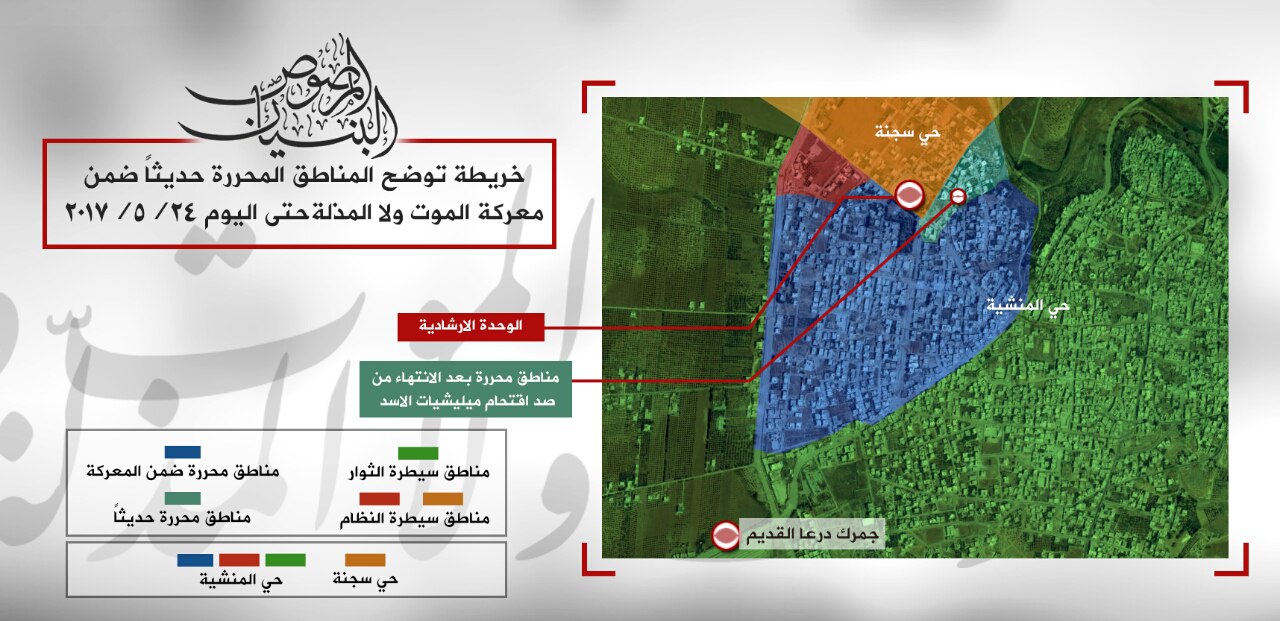
Figure 110: Blue = “Area liberated during the battle” Green = “Opposition controlled area” Light Blue = “Recently liberated area” Red and Orange = “Regime controlled areas”
Pause
Counter-Attack
June 2, 2017
The regime launches a new offensive on multiple axes. Fierce clashes occur along the Manshiyah-Sajnah border and throughout the Palestinian Camp north of Dara’a al-Balad. Frontlines remain unmoved by the end of June and a ceasefire settles over the city.
Conclusion
The rebel victory in Manshiyah and subsequent government counter offensive proved a decisive blow against the government in the south. Overstretched and preoccupied with higher priority fronts, Damascus cannot afford to devote the necessary resources to succeed on this front. It’s defense against the rebel offensive increasingly relied on foreign fighters, while its failed June offensive not only required the relocation of Damascus-based armored units but a further commitment from Hezbollah, which itself endured heavy losses.
The formation of al Bunyan al Marsous was the result of a fractured Southern Front following the coalition’s failures in 2016. However, BM’s success both in unity and on the battlefield appears to have inspired greater unity across Dara’a and Quneitra. As the government counter offensive began in June, several mergers and coalitions formed across the Dara’a countryside as the milieu of FSA groups came together to successfully defend their positions. In July, the Jaish Muhammad operations room formed in Quneitra. Although dominated by Jabhat al-Nusra, JM mirrored BM’s style and practices: media updates on the battle’s progress were tightly controlled, and the few infographics that were released loosely resembled those of BM.
Since calm has returned to Dara’a, more mergers have taken place. By July 30, as many as 57 factions had joined the newly formed National Front for the Liberation of Syria. It is entirely likely that BM’s successes have reignited the southern forces’ morale and helped ease tensions between independent groups and those who were previously closely aligned to the US-led Military Operations Center. This unity has enabled the southern forces to sideline HTS’s ambitions and will prove a renewed challenge for Damascus. Of more immediate importance, however, are the implications of the poor performance pro-government forces displayed in urban combat both here and in Ayn Terma, Damascus. Although Damascus has finally broken the Islamic State’s siege of Deir Ez Zor, the urban fight to liberate the city itself will surely prove tougher than either previously mentioned front. If the costs of liberating Mosul and Raqqa – and the failures in Dara’a and Ayn Terma – are any indication, Damascus risks unsustainable losses in its fight for the city.