
Bellingcat’s Invitation Is Waiting For Your Response: An Investigative Guide To LinkedIn
Whether you’re investigating a company purporting to have damning information on Robert Mueller or conducting research on anti-Islamic State foreign fighters in Iraq and Syria, LinkedIn can serve as a useful resource for online researchers across a wide variety of subjects.
This guide aims to provide helpful tools and techniques for identifying LinkedIn profiles and for extracting information that will then allow you to pivot to other social media profiles belonging to the target.
Some of the useful information you might glean from the social network for professionals include:
- Biographical details, including employment history, education and other affiliations
- Personal and work contact information
- Approximate location
- Profile photo
- Username
- Personal website
- Employer’s website
- Members of an individual’s social network
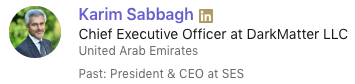
It’s important to keep in mind that all of the information listed on a profile is self-reported and can be completely made up (for example, no, David Jewberg is not the name of a senior Pentagon Russia analyst).
Lock Your Profile Down
Before beginning an investigation, there are a few steps you should take so that you can access as much content as possible and ensure your anonymity.
First, create a profile. If you don’t, you won’t be able to view profiles whose public visibility setting is turned off. It’s against LinkedIn’s terms of service to create a fake profile or more than one profile for yourself, but doing so allows you to obscure your true identity from the subjects of your research.
Second, make sure your profile’s privacy settings are as strict as possible so that you don’t reveal your identity (this is obviously more important if you are conducting research under your real LinkedIn account). Click on the “Me” icon in the top-right corner of the page, and go to “Settings & Privacy” under “ACCOUNT.” There are dozens of settings to lock down, so I won’t go through all of them, but probably the most important setting to change is under “profile viewing options.”
Here, you can change what LinkedIn users see about you when you view their profile. Instead of your real name and headline (or that of your alias profile), you can choose to be in private mode so that you appear as an “Anonymous LinkedIn Member.”
LinkedIn Premium users can see who has viewed their profiles going back 90 days, but they cannot see users who are in private mode. You will know someone has a Premium account when you see this gold LinkedIn logo:
Non-Premium LinkedIn users who are not in private mode can also see a few details about some of the most recent individuals who have viewed their profile:

So, if your company affiliation will alert your target to the fact that they’re being investigated, you can either use a fake profile or change your current employer to one other than your own.
Please also note that non-premium users who are in private mode cannot see any users who have viewed their profile.
Find Those Profiles
The easiest way to find a LinkedIn profile for someone with an uncommon name is to Google their name with the word “LinkedIn” in quotes. If that doesn’t work, also include something you know about them, such as their location or current employer. More often than not, Google’s search algorithms will surface the relevant profile. There are also people search sites like Pipl and Spokeo that return LinkedIn profiles if you can identify the relevant individual.
In cases where the subject has a common name or you are otherwise having a difficult time locating their profile, here are some techniques to try.
Email Trick
By default, LinkedIn allows “everyone” to look up your profile via email. You can change the setting to “2nd-degree connections” and “nobody.”
If you have an email address for your target, enter it into this URL in place of example@example.com (you have to be logged in to LinkedIn):
https://www.linkedin.com/sales/gmail/profile/viewByEmail/example@example.com
If the subject used that email address for their profile and their privacy settings are set to “everyone,” you will see something like this:
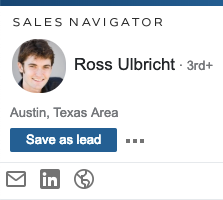
To go to the subject’s LinkedIn profile, click either their name or the LinkedIn logo.
In the above example, I used the Gmail address of Silk Road creator Ross Ulbricht:
https://www.linkedin.com/sales/gmail/profile/viewByEmail/rossulbricht@gmail.com.
Clicking Ulbricht’s name or the LinkedIn logo directs to his profile at https://www.linkedin.com/in/rossulbricht.
To take another example, using the URL string to search for an email address used by indicted Russian hacker Yevgeniy Aleksandrovich Nikulin, chinabig01@gmail.com, returns a LinkedIn profile for an unreported alias for Nikulkin: “Jammiro Quatro.” While the Quatro profile may not appear to be useful on the surface (it’s blank, aside from the location being listed as “Russian Federation”), researchers and investigators could search for this alias elsewhere, and law enforcement could seek to obtain a court order or subpoena requiring LinkedIn to turn over additional information about the account and its owner.
Within LinkedIn
You can search within LinkedIn itself via the search bar at the top of the page. You can click “all filters” to drill down by location, company, and other criteria. Even more criteria are available via these hidden search operators, including “headline:” (search keywords within headlines), “yoe:” (search for years of experience) and “geo:” (search by Geoname).
If you are using a fake profile, most of the results of your searches will likely not show the user’s name and will look something like this:
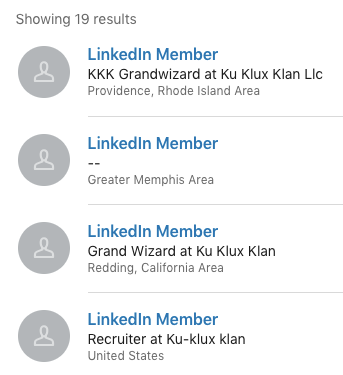
LinkedIn won’t let you view these profiles — when you click on “LinkedIn Member” to view the profile, LinkedIn will tell you that “profiles out of your network have limited visibility.” Your next step should be to search for the profile outside of LinkedIn using search operators.
Google Dorks
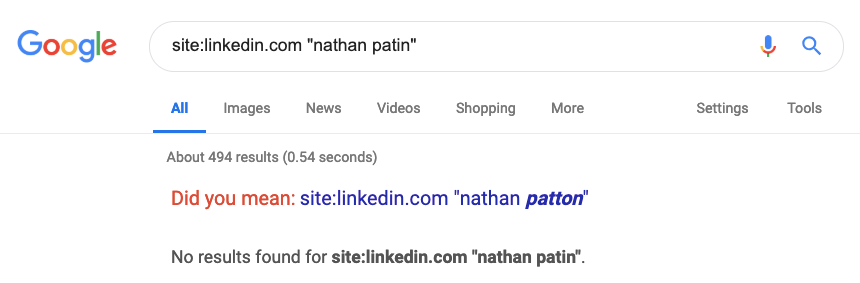
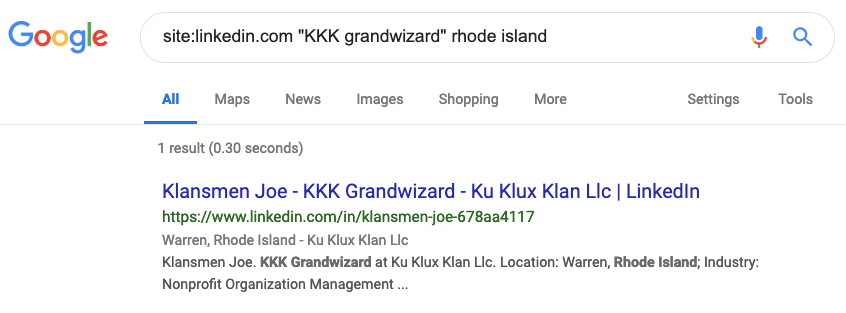
Google dorks are Google search queries using search operators that will make your search results more precise. For example, the site:[example.com] operator will return search results indexed by Google only for that particular website. Using the KKK Grandwizard above as an example, search for site:linkedin.com “KKK grandwizard” rhode island. Note, a null result doesn’t necessarily mean your subject doesn’t have an account, it’s possible to change your account’s privacy settings so that it is not indexed by Google:
Using this technique, we can see that the self-described KKK Grandwizard in Providence, Rhode Island Area goes by Klansmen Joe:
Review And Pivot
Using LinkedIn Tools
One of the first things I do after I identify a relevant profile is use RocketReach or a similar tool like ContactOut that can take a LinkedIn profile and return social media profiles, email addresses, and phone numbers, which in turn can be used for additional searches (Please note that in order to use the free trial for RocketReach, you’ll have to create an account with a business email or through a Gmail or Facebook account. You may also have to verify your account with a phone number).
RocketReach returned no results for Klansmen Joe or Nikulin’s sockpuppet. This is what it looks like when you have more luck:

Clicking the Google+ and Facebook icons lead to Ulbricht’s accounts on those platforms.
Note Username And Contact Info
It’s important to make note of whether there is a username in the URL of a LinkedIn profile. The default URL provided by LinkedIn is typically separated by dashes and has seemingly random letters and numbers at the end (e.g., https://www.linkedin.com/in/jammiro-quatro-1a410656). LinkedIn lets users customize their URL into a unique username (e.g., https://www.linkedin.com/in/rossulbricht), which can then be Googled or run through a service like KnowEm, which will search for the username on hundreds of websites.
Also be sure to click on “See contact info,” which can contain email addresses, personal websites and social media profiles.
Reverse Search Profile Photo
If your subject has included a profile photo, run it through reverse image search services, including TinEye and Yandex. As shown again and again, Yandex is far superior to Google when it comes to reverse image searches and facial recognition, even when filters are used.
Find Endorsers With Uncommon Names
If you’re still unable to identify useful information to pivot on, take a look at the subject’s endorsers. Find a few endorsers with uncommon names and try quickly searching for their Facebook profiles, for instance, to see if any of them have public friends lists. If you find an endorser with a public Facebook friends list, search for your subject there (try just their first name or just their last name, as it’s not uncommon for Facebook users to use a middle name or some other slight name variation instead of their full name).
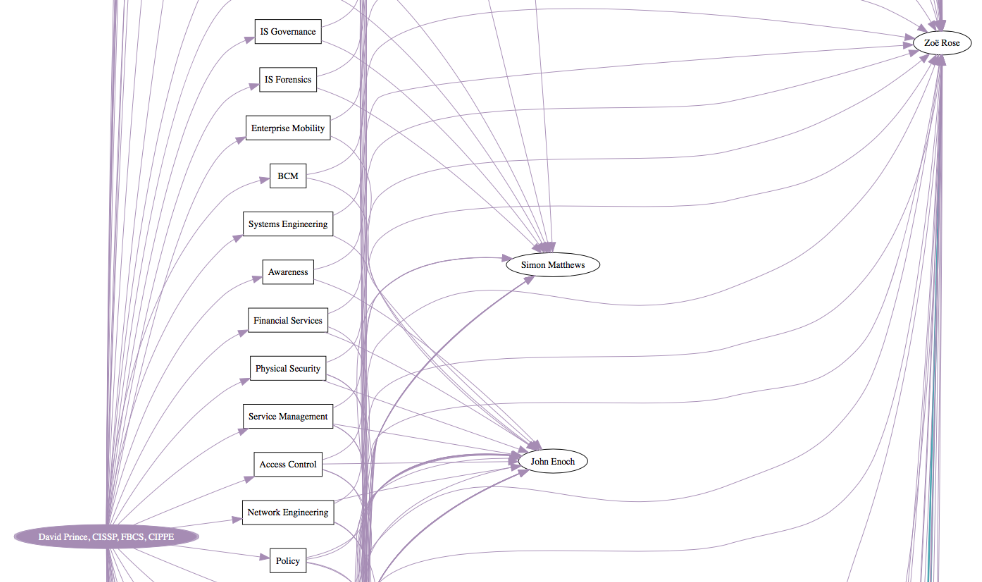
Draw Out Connections Between Profiles
If you’ve identified multiple LinkedIn profiles of interest, and you’re interested in determining connections between or among them, there’s a useful command line script called The Endorser that will visualize common endorsers of two or more LinkedIn profiles. The output is a PDF that like this:
Find Zip Code In Source Code
In some cases, you may want to know with a little more specificity where a LinkedIn user indicates that they live, especially for users who list their location as “[Large City] Area.” For example, say your subject lists their location as the Washington, D.C. Metro Area, which encompasses parts of Maryland and Virginia as well as all of D.C., but you want to drill down on their location.
You can find a user’s self-reported postal code in the source code of a LinkedIn profile. Right-click on the page, and choose “View Page Source.” Then, Control/Command+F for “postal.” You will see code that looks like this: postalCode":"[postal code here].
For example, a Nikolay Tyaglo describes himself as Second Secretary of the Russian Embassy in D.C. and lists his location as the Washington, D.C. Metro Area on his LinkedIn profile (https://www.linkedin.com/in/nikolay-tyaglo-019a8a25/). Tyaglo listed his postal code as 20007, the same postal code as the Russian Embassy in D.C.:
With just a few more searches using only his name, it’s possible to find Tyaglo’s Twitter profile (https://twitter.com/NTyaglo) and Facebook profile (https://www.facebook.com/nikolay.tyaglo.3).
Both profiles show that he is connected with other Russian civil servants, but more importantly, they both include this mesmerizing, publicly available photo of half-naked men (colleagues, perhaps?) eating crawfish in a sauna:

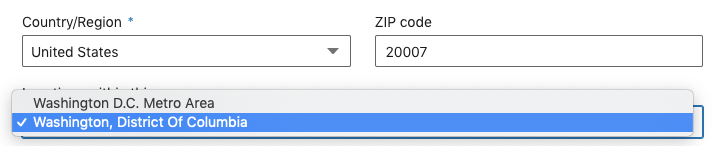
Note, LinkedIn will not let you enter a postal code for one area of the country and display a location for another area. For example, you cannot enter 20007 as your postal code and list your location as Seattle, Washington. Instead, LinkedIn will present you with a finite number of locations you can choose based on the postal code you provide:
LinkedIn will let you enter no postal code or, in some instances, a non-existent or obsolete postal code. For instance, the postal code for Nikulin’s “Jammiro Quatro” profile is 346146, which appears to be obsolete. A second LinkedIn profile for Tyaglo (https://www.linkedin.com/in/nikolay-tyaglo-5368653b) lists his location as “United States” — there is no postal code in the profile’s source code.
Summary
LinkedIn can be a crucial resource for online investigations. Whether you’re trying to pin down someone’s location or identify email addresses and phone numbers that belong to your subject, LinkedIn profiles can provide a wealth of useful information that can greatly further the scope of your research. All LinkedIn users can see some details about the profiles that have viewed their page, and some LinkedIn users (LinkedIn Premium subscribers) can see exactly which profiles viewed their page, except for users browsing in private mode. This being the case, it’s important to create a profile with very strict privacy settings, or, perhaps, a sockpuppet account not tied to your true identity.
Once you’ve created and secured an account, there are several ways to identify LinkedIn profiles:
- Within LinkedIn, via the search bar. Choose “all filters” to better focus your search or use these hidden search operators.
- Via email, using this URL: https://www.linkedin.com/sales/gmail/profile/viewByEmail/[emailgoeshere@example.com]
- Google dorks. If the name is uncommon enough, Google will more often than not surface the subject’s profile when searching for their name with one or two other identifiers. Use the site: operator for targeted searches of LinkedIn headlines and other content.
If you have identified a profile of interest, you can use the following tools and techniques to review the profile:
- RocketReach and ContactOut are just a couple of tools that return social media profiles and contact information connected to a LinkedIn profile.
- Look at the profile’s URL to see if the owner has changed it to a username, which can be searched on other platforms. Don’t forget to click on “See contact info,” which can contain email addresses, personal websites and social media profiles.
- If you’re not having any luck finding information that could lead you to another profile belonging to your subject, try searching for social media profiles of a few of your subject’s endorsers who have uncommon names. Search for your subject in the profiles you identify with public friends or followers lists.
- Use The Endorser script to visualize common endorsers of two or more LinkedIn profiles.
- Use TinEye and Yandex to reverse search profile photos.
- Drill down on your subject’s location by identifying the postal code entered by the user in the source code of the profile. It will appear in a string that looks like this: postalCode":"[postal code here].
Is there a way to identify an account with a phone number? Are there other tools that let you visualize endorsers? Please comment below with any tips, tools, or techniques for investigations involving LinkedIn.